Archive for May, 2011

Optimizing Error Pages: Creating Opportunities Out Of Mistakes

Advertisement in Optimizing Error Pages: Creating Opportunities Out Of Mistakes
 in Optimizing Error Pages: Creating Opportunities Out Of Mistakes  in Optimizing Error Pages: Creating Opportunities Out Of Mistakes  in Optimizing Error Pages: Creating Opportunities Out Of Mistakes

In this article, we’ll review a few techniques that will help Web designers and UI professionals improve their error pages in order to engage visitors and improve the experience. As C.S. Lewis said, “Failures are finger posts on the road to achievement.� Website designers should take this to heart.

We’ll focus on error and maintenance pages, from both a tracking and usability perspective. You’ll find examples on how to use analytics and defensive design in order to optimize the user experience on those pages.

First, let’s go over error pages and how to optimize them. We’ll try to answer the following questions:

  • Does your 404 page succeed in engaging visitors, who are already frustrated from not finding what they came for?
  • How do you decrease the number of people who arrive on your 404 page?
  • How do you monitor 404 page traffic efficiently?

After, we’ll discuss techniques for improving conversion rates, even when the website is under maintenance. Here are some of the questions we’ll consider:

  • How to time maintenance periods wisely?
  • How to increase visitor engagement using a maintenance page?

Optimizing 404 Pages

The topic of improving error messages was thoroughly covered in Defensive Design for the Web, a book written by the 37signals team. They go over 40 guidelines to “prevent errors and rescue customers if a breakdown does occur.� In guideline 16 (page 93), they advise us to customize our “Page not found� error pages, and they offer interesting insight into how to create error pages:

Instead of merely saying a page is not found, your site needs to explain why a page can’t be located and offer suggestions for getting to the right screen. Your site should lend a hand, not kick people when they are down.

Smart things to include on your 404 page:

  1. Your company’s name and logo;
  2. An explanation of why the visitor is seeing this page;
  3. A list of common mistakes that may explain the problem;
  4. Links back to the home page and/or other pages that might be relevant;
  5. A search engine that customers can use to find the right information;
  6. An email link so that visitors can report problems, missing pages and so on.

A while ago, I came across the great examples shared on Smashing Magazine (part 1 and part 2) and was inspired to create my own 404 page. But because understanding and analyzing online behavior is so important, I asked myself, Is what I’ve come up really good? How can I make it better? Below we’ll go over a few techniques to both monitor and optimize 404 pages.

If you do not have a customized 404 page, please refer to this simple explanation of how to set one up.

Monitoring 404 Page Traffic

How often do you check the traffic to your 404 page? Most of the companies I have worked with never did, even once. Yet it is hard to overemphasize the importance of consistently monitoring it. For example, if a prominent blog links to your website but the link is broken, this will make for a very poor experience for users (who will not find what they expect) and for search engines (which will not crawl the right content). Below are a few tips on tracking those pages seamlessly using Google Analytics. (The screenshots were taken from the new Google Analytics version, which is still in beta, so your mileage may vary.)

Create an alert on Google Analytics.
As seen in the screenshot below, you can set Google Analytics to alert you each time 404 traffic reaches a certain number of visits a day. This way, you have to do the work only once, but you’ll be alerted every time there is a problem.

Google-Analytics-Alerts in Optimizing Error Pages: Creating Opportunities Out Of Mistakes
This is where you create a custom alert to track 404 page views.

Track your 404 page as a goal.
Setting the 404 page as a goal on Google Analytics will yield important (and otherwise unattainable) information. For example, you’ll be able to see the three steps that visitors took to get to this page. In addition, setting this goal makes it easier to find traffic sources with broken links.

Google-Analytics-Goal in Optimizing Error Pages: Creating Opportunities Out Of Mistakes
Create a goal to track 404 page views in your reports.

Add the 404 content report to your dashboard.
Every report in Google Analytics can be added to the dashboard. By adding the 404 page, you will be able to constantly monitor visitor trends on the page.

Google-Analytics-Dashboard in Optimizing Error Pages: Creating Opportunities Out Of Mistakes
Add a 404 goal to your dashboard.

Check your navigation summary report.
This will help you understand what visitors do upon leaving this page, which is important for knowing how to optimize it.

Google-Analytics-Navigation in Optimizing Error Pages: Creating Opportunities Out Of Mistakes
The navigation summary for a 404 page on Google Analytics.

Track internal searches from this page.
If your 404 page does not have a search box, seriously consider adding one. From searches performed on this page, you will be able to understand what people were expecting to find, and you will get an idea of what links to add to the page. Below are the metrics you will be able to track with this feature:

  1. Total unique searches
    The number of times people started a search from the 404 page. Duplicate searches from a single visit are excluded.
  2. Search result page views after searches
    The average number of times visitors viewed a search results page after performing a search.
  3. % search exits
    The percentage of searches that resulted in an immediate exit from your website.
  4. % search refinements
    The percentage of searches that resulted in a new search using a different term.
  5. Time after search
    The average amount of time visitors spend on your website after performing a search.
  6. Search depth
    The average number of pages that visitors viewed after performing a search.

Decrease Your Errors (Fixing Broken Links)

Monitoring 404 pages is important, but that alone won’t do you any good unless you act on it. Taking action means doing all you can do to decrease the number of people who reach the 404 page and improving the experience of users who do reach it (see the next section). Below are a few tips on finding and fixing both internal and external broken links.

Check the navigation summary report.
This will show you the route that visitors took on your website to get to the 404 page (and thus tell you which pages contain broken internal links). You will see the percentage of visitors who arrived on this page from internal sources as well as from external sources; and the internal sources will be listed in this report (see the navigation summary screenshot above).

Check the sources of traffic that lead to the 404 page.
This will clearly show which websites have broken links to your website. With the list, you should either contact the sources or create 301 redirects to the correct pages.

Google-Analytics-Landing-Page in Optimizing Error Pages: Creating Opportunities Out Of Mistakes
Traffic sources that lead visitors to a 404 page.

Usability Tips to Improve 404 Engagement

Basically, usability practices for error pages are not much different from general usability practices. Below are a few tips to help you increase the conversion rate of your 404 page. For our purpose, conversion is essentially the click-through rate (CTR), because our main objective is for visitors to find what they’re looking for.

  1. Be simple and focused.
    Appealing images and an original design are important, but a clear focus is critical. Users are already disoriented from landing somewhere they were not expecting, so make their lives easier by presenting a clear action to take.
  2. Know your visitors.
    Many 404 pages use humor, including geek humor. Keep in mind that you are not your visitor, and jokes can be misunderstood, so use humor wisely.
  3. Let the visitor decide.
    As I said in “Web Analytics Process�: “Customers should tell us what to do, not consultants, friends or feelings; data and online surveys are the place to look for customers’ needs.� The best way to understand what works for visitors is to present a few page versions and let the best one win. (See the review of advanced A/B testing techniques by Paras Chopra.)

Optimizing Maintenance Pages

Not long ago, I worked on a website that had weekly downtime for maintenance, about one to two hours a week. The owners chose the day with the least traffic for maintenance, but I believe they did not completely understand how this affected the website and, more importantly, how they could have optimized the user experience and taken advantage of the downtime. In a post on Smashing Magazine, Cameron Chapman provides a good checklist for designing effective maintenance pages:

  1. Keep the maintenance page simple and useful.
  2. Realize it’s an inconvenience to visitors.
  3. Don’t be afraid to use humor.
  4. Give the page the same look and feel as the rest of your website.
  5. Let visitors know when the website will be back up.
  6. Recommend content.
  7. Invite visitors to return when the website is online again.
  8. Inform visitors about the progress of the maintenance.

Two other rules are especially important to satisfy and engage visitors…

Time Maintenance Periods Wisely

Common practice for timing maintenance is to choose the time of day or day of week that has the lowest traffic. But this overlooks an important point: websites should be optimized for performance, not for traffic. By choosing the maintenance time based on visitor count, you could be optimizing for traffic and not for dollars. A better way to decide would be to run an hourly report and check what time of day or day of week has the lowest conversions.

Increase Visitor Engagement Using Maintenance Pages

Increase visitor engagement while the website is in maintenance mode? Yes, you read that right. While in maintenance, you have a great opportunity to promote your other marketing channels: offline stores, Facebook fan pages, YouTube channels and Twitter accounts.

Maintenance-page-example1 in Optimizing Error Pages: Creating Opportunities Out Of Mistakes
The maintenance page for Online Behavior.

Parting Thoughts

Errors happen, and we must be prepared for them. We must lend a hand when visitors are most frustrated and make them feel comfortable again. People’s patience and understanding are decreasing, and users have a world of choices just a click away, so website owners cannot let one small error get in their way.

What are your thoughts on this subject? Feel free to share them with us in the comment section below!

(al)


© Daniel Waisberg for Smashing Magazine, 2011. | Permalink | Post a comment | Smashing Shop | Smashing Network | About Us
Post tags: , , , ,


Graphical Design with OSS

Advertisement in Graphical Design with OSS
 in Graphical Design with OSS  in Graphical Design with OSS  in Graphical Design with OSS

Many designers don’t use graphical Open Source Software. This is not a coincidence: usually they don’t understand it, don’t like or even despise it. Since using the free software requires more time and technical knowledge — it seems easier to pay for a working package from a well-known vendor.

This approach is common, but it could be useful to take a peek at another one. Today’s OSS provides so many possibilities, that it becomes relatively easy to create almost anything that’s possible to make with the proprietary software, especially in the web design areas. In my opinion, it happens to be so good, that it may be worth taking a leap of faith.

The WHY

Usually, when it comes to graphical design, few people agree that open source software is capable of producing the same level of quality work that the proprietary software does. My intention in this article is to question this stereotype and to present a strong case for using OSS for graphical web design, without going into a discussion over which one is better to use. The bottom line should sound like this: it’s possible, and isn’t necessarily more difficult to create any type of web graphic or design using only OSS.

Ubuntu Penguin1 in Graphical Design with OSS
Ubuntu Tux Floats to work by Daniel J. Porter

In spite of all the mentioned appeal, most graphical designers prefer to keep using the proprietary software, and for a good reason — it provides in many cases easier, more stable and more intuitive interfaces that save professional designers’ time. In the professional web design environments where a client waits for the results, this is very critical. Also, it takes time to learn something new, so many question why spend it… But for the majority of website creators, and for those who just starting to take their first steps in the web industry and aren’t sure whether they really need to spend money on graphical software, open source software can offer all the necessary tools, educational opportunities needed to enrich and shape your creative thinking and technical skills.

A quick warning: using and learning gOSS usually requires more time than learning proprietary software. How much more? It depends. But if you have some spare time, and are ready to have fun with exploring another mysterious world of software, then you will only benefit from it. However, trying to go for broke right off the bat, expecting to be exactly at the same level you are in other more familiar software and setting somewhat unreasonable or out of reach goals, might not be the best attitude to start with. After all, most things in life become more rewarding after we have taken the time to learn more about them, and our grip on them improves. Same with OSS.

Where gOSS is extremely useful? — In web design agencies it’s common that the web designs and layouts are composed by a graphics expert. Then these designs are passed to the developers, which can decide what and how to slice in order to optimize the graphics better for the general consistency of the web site. For simple operations like these a natural choice would be using an OSS program such as GIMP and not wasting the money on proprietary software.

If you’re new to web design, you’ll quickly learn that the proprietary graphical software is very expensive. So if you’re unsure which one to choose, my advice to you is to first try the open source software. One big plus of using OSS, is that you can get it all for no cost. Another advantage becomes clearer with some of the more popular gOSS programs: they are developed quickly and newer updates include more and more interesting features. The beauty of this quick development is that anyone from anywhere in the world can extend or improve any program. So if someone wants a new feature in their program, every other user can have it as well.

To inspire you, and to let you taste what is possible to create with these free software tools — please have a look at this Sintel open movie, which was entirely created using graphical OSS. I worked in a relatively large animation studio, which couldn’t produce during one year a fraction of what this tiny and talented group produced with gOSS in less than a year. This important lesson in life taught me the following: it’s not the type of software which is important, but the kind of professionalism, passion and will that are keys to succeeding.

To start, let’s separate four common graphical types. Under each type, you’ll see a name of the program that handles it, and it’s brief features list.

Inkscape Scr8 in Graphical Design with OSS

Inkscape screenshot by Val Kotlarov

  • Vector graphics — great for creating icons, illustrations, charts, web decorations, and other usually quick and impressive vector art.
    Inkscape — Spiro curves, Converting rasters to vectors, Gradients, Basic vector shapes and Boolean operations.
  • Photos — probably the most popular graphics type. Software helps you to batch-process photos, for example, when you need to cut down the image size and in the same time to enhance the quality.
    GIMP — Layers, Brushes, Selection tools, Masks, Image and Canvas transformations, Filters etc. A lot of free plugins are available too, such as G’MIC. A lot of file types are supported, so converting to a transparent PNG or creating sprites can be real fun.
  • Rendered 3D graphics — probably the most time-consuming to create, but also very impressive when well done.
    Blender 3D — Basic shapes: cubes, cylinders etc., Lights, Textures, Shaders. Different rendering engines.
  • Drawings — for any artist, the natural way to express himself or herself.
    MyPaint — Provides the ability for a free hand drawing when used with a digital tablet. It has a very impressive set of prebuilt and customizable brushes, Layers, different color pickers and very intuitive keyboard and mouse shortcuts.

Sintel Wallpaper Ishtar in Graphical Design with OSS

© copyright Blender Foundation | www.sintel.org

Sure, there are many other gOSS programs and tools that can be used for the various types of graphics. However, the programs suggested offer a specialized and a narrower set of tools to handle the graphic type they were associated with on the list. So for example, if one wants to edit a photo, best practices suggest using GIMP instead of something else, because it’s built exactly for that. Similarly, if you want to create a vector icon, although GIMP allows doing it with paths, converting them to selection areas and filling with gradients, it’s much easier and more fun to use Inkscape, and the rasterized result will have better quality in addition to allowing easier changes to it later.

Other related programs which can be interesting are:

  • Krita — allows sketching and painting.
  • Xara Xtreme — handles vector graphics manipulation.
  • Luminance HDR — for High Dynamic Range images processing and tone mapping.
  • exiv2 — a handy utility if you want to modify images’ metadata.

The HOW

Before you start, you need to define your need then use a suitable program. Often you’ll need more than one program. For example, after creating and saving a vector graphics image, you might want to correct the colors or try to optimize it for web. GIMP always comes in handy here.

Generally speaking, using gOSS might initially be a bit confusing. Usually, these programs are initiated by creative developers, for whom the programming languages feel just like a mother tongue. Since they develop it usually for themselves, there might be some lack of good documentation with some programs. Though a quick trip to Google usually satisfies the any beginner’s need: be it the need for good tutorials or documentation, there is plenty online from those who came before you and were willing to contribute.

Exploring the program’s interface also produces greater understanding of available functionality. Many plugins can be found online, if some functionality is missing. For example, GIMP plugin registry has a lot of great plugins. Save for web for example, helps to optimize and preview the image before saving. Liquid rescale is another interesting example – it allows resizing an image without shrinking/stretching of the objects.

Several tips for using gOSS.

  • Like with any graphic work you are doing no matter the software, get in the habit saving your work more often. Unfortunately, some gOSS is not always that stable.
  • You may want to check frequently for the new software updates, and download them. Security updates are of course of the main concern, and they should be updated. Ubuntu linux and other distributions, automatically check for these updates, and suggest you install them.
  • Keep the stable release for your work. You can additionally download and install the development release, with newer features and bug fixes, but they will tend to lack the stability. So they should be used for your main work only if some added feature is indeed indispensable.
  • Participate in online forums to get extra help, or help others. Explaining to someone how to make something can often result in discovering new features or techniques, and lead to a better understanding of the work. Writing a tutorial has a similar effect.
  • The real power of gOSS is, of course, in the open source code. If you feel like coding, you can take the program, and change it the way you like. You can make it really shine, to look and behave exactly as you wish.

What to use, how and when?

GIMP is comparable to Photoshop. You can achieve virtually the same results with it. Usually any tutorial for Photoshop from the web can be done with the GIMP. The missing functionality can be substituted with a few simple steps. For example, in Photoshop, you can apply a shadow effect to a layer. In GIMP, you will need to apply a shadow filter, which will create a separate layer with the shadow below the desired one.

Here is a very handy batch processing plugin for GIMP, David’s Batch Processor. It allows selecting a bunch of images, resizing them, enhancing, changing their format and more with a few clicks.

GIMP can be easily transformed to Gimp Paint Studio (GPS) — additional features that bring in rich sets of brushes and makes GIMP easier to use.

Use Inkscape when you want to create logos, web icons, cartoon-like illustrations which are so commonly used in the web design. It’s possible to create those beautiful, colorful and shiny posters, this blog has many tutorials for Inkscape. Inkscape has the Spiro curves — simpler and more intuitive curves than Bezier. It has plenty of filters, modifiers, layers, paths and so much more. Sketch easily practically any shape. Save vector files as PNGs, in varying dimensions. The interface is very easy, and for the beginner as always it’s advised to explore the menu, as well as going through the documentation.

Since Blender belongs to other graphical programs category, the UI is less intuitive and requires more time to learn. This program is great if you want to bring some realism to your website. Things like adding a realistic shadow to a photo can be done quickly. It’s a really good choice if your drawing skills aren’t good enough and you want to draw realistic objects in space. Another advantage is that you can crate and render an amazing red car from any angle, change the environment, lights etc. Of course drawing these from scratch would require more time and skills. So what’s possible to create with Blender? You can find fine examples here, or here, or here.

The WOW


SharkRide 2 0s in Graphical Design with OSS

Shark Ride by Kjartan Tysdal

Finally, I decided to interview some great artists who use OSS. I found their email addresses, contacted them, and they kindly agreed to answer a few questions about using OSS.


Andrew Price Daisy in Graphical Design with OSS

A work in progress from Andrew Price

David Revoy

David is better known as an art director from the Sintel open movie. He uses programs like MyPaint, GIMP/GPS, Inkscape and many others. More info can be found on his website.


David Revoy Electron Donor in Graphical Design with OSS

Electron Donor by David Revoy

You have many beautiful and interesting works on your website. Which one is your favorite?

Thanks a lot. It’s hard for me to define a ‘favorite’. That’s probably because I still see something to fix in each illustration I did. When I update my portfolio, I always let my wife decide which artwork she would choose for inclusion. My real favorite illustration — is certainly the idea I have in mind just before trying to lay it down with my tools. I still try to get closer and closer to this original idea.

Can you describe some difficulty that you encountered while using Open Source software?

It was a real challenge, and only 2 years ago for me. The first set of difficulties was purely technical : installing and choosing a distribution, makes almost all the hardware working, configure the tablet ; all of this is difficult and I had to spend time and patience to understand how it worked. The second set of difficulties is more related to my artworks. . No other users at this moment did professionals digital painting with graphical OSS. I had almost to invent a way to do it , test many softwares and try to find a professional workflow. I had to find alternative to a lot of things, and change totally my way to think an artwork. Thanks to Mypaint, Alchemy and the fork Gimp-painter , I discovered great tools.

2 years after, I can see things grew so fast that 95% of the difficulties I encountered totally disappeared : Distribution, tablet and most of the OSS I use are really easy to install, and documentation and tutorials now exist.

How do you contribute to the Open Source community?

I contribute as a user can do : I report bugs, I communicate with developers to give them feedback on new features, I use them and I maintain a blog to share my resources/tips/tutorials. I’m mostly around Mypaint, Krita, Ubuntu/Mint and Blender.

As an active user in the community, can you share some of your thoughts about the future of the graphical OSS?

Graphical OSS will grow ‘slowly by surely’ and become stronger tools, this is sure. I already see many studio adopting FLOSS, or schools learning to student with them and I guess it will grow too in the future. So, I’m confident about a very bright future for graphical OSS.

Andrew Price

For many, Andrew is better known as Blender Guru. He has created/creates many great works, you can find more info about him, and a lot of smashing Blender tutorials on his Blender 3D tutorials website.


Andrew Price Dream House in Graphical Design with OSS

Dream House by Andrew Price

Why did you choose Blender? Was it a hard decision to go the ‘Open Source’ way?

Nope! I started way back when I was 15, and had the choice between $3000+ commercial software or the open source Blender. It was a no brainer for me :)

How would you compare Blender to a proprietary 3D software in terms of ability to create great 3D scenes?

One of the great things about blender is that it’s a complete 3d suite. It allows you to create an entire animation or artwork from start to finish without ever leaving blender. Once you’ve used the built-in compositor you won’t ever want to leave ;)

However, Blender is not without it’s shortfalls. The internal render engine is severely lacking when compared with commercial render engines. In my opinion it’s the one thing that is stopping Blender from being production ready, so I hope it’s improved shortly.

Do you think it would be difficult for someone who’s not familiar with Blender to learn to use it?

Of course! But that comes with the territory. All 3d software has a very steep learning curve, it’s up to the artist to persevere through the roadblocks until they become good at it. The hardest part for most beginners is getting used to working in three dimensions. Once you’ve got that down pat, everything else usually falls into place.

Leaving the financial side, would you recommend Blender, or would you suggest buying a 3D editing program? Why?

In all honesty, if you want to get employed in the 3d industry then you need to be using 3ds Max. It’s just a simple fact. It’s the industry standard application and most employers will expect you to know how to use it. However having said that, Blender is the perfect application for beginners to get their feet wet. They can learn the fundamentals in a supportive community, do almost everything with it that commercial applications can and with no costs. It’s a seriously powerful program, but it may take a while before the industry realizes that.

Sebastian Zakrzewski

I found Sebastian’s portfolio on DeviantArt. He uses GIMP / GPS among the other tools. Take a look at his amazing works.

Voxmortem Edgewalk in Graphical Design with OSS

Edgewalk by Sebastian Zakrzewski

Why do you prefer using the open source programs? Which benefits do they give you?

Open source is free and legit. It’s also solid alternative to commercial programs — it offers same basic functionality and performance.
It’s also about flexibility — commercial projects usually stick to one design and approach to work,
while community behind open source doesn’t hesitate to experiment and often comes up with great ideas on how things can be done in different way.

Do you encounter situations when you would prefer using similar proprietary software for your art works instead?

Yes and no: I miss few handy tools like freeform transformation from Photoshop but I can live without them. On the other hand there’s no good alternative in open source for ArtRage or Google Sketchup I sometimes use, but they’re addition to software I’m using on regular basis. If need arises and I won’t be able to find anything suitable in open source, I won’t hesitate using proprietary software.

Would you recommend others use open source software?

Yes, it’s definitely worth trying — it may suit your needs and thanks to popularity it’s constantly gaining I think more and more solid programs will show up.

Useful links

Here’s a bunch of download links for free graphical software to try out. The first four programs were described in this article, and can be downloaded straight away, others can be easily added on Linux machines.

(rb)


An Introduction To CSS3 Keyframe Animations

Advertisement in An Introduction To CSS3 Keyframe Animations
 in An Introduction To CSS3 Keyframe Animations  in An Introduction To CSS3 Keyframe Animations  in An Introduction To CSS3 Keyframe Animations

By now you’ve probably heard at least something about animation in CSS3 using keyframe-based syntax. The CSS3 animations module in the specification has been around for a couple of years now, and it has the potential to become a big part of Web design.

Using CSS3 keyframe animations, developers can create smooth, maintainable animations that perform relatively well and that don’t require reams of scripting. It’s just another way that CSS3 is helping to solve a real-world problem in an elegant manner. If you haven’t yet started learning the syntax for CSS3 animations, here’s your chance to prepare for when this part of the CSS3 spec moves past the working draft stage.

In this article, we’ll cover all the important parts of the syntax, and we’ll fill you in on browser support so that you’ll know when to start using it.

Animated-scene in An Introduction To CSS3 Keyframe Animations

A Simple Animated Landscape Scene

For the purpose of this article, I’ve created a simple animated landscape scene to introduce the various aspects of the syntax. You can view the demo page to get an idea of what I’ll be describing. The page includes a sidebar that displays the CSS code used for the various elements (sun, moon, sky, ground and cloud). Have a quick look, and then follow along as I describe the different parts of the CSS3 animations module.

(NOTE: Safari has a bug that prevents the animation from finishing correctly. This bug seems to be fixed in Safari using a WebKit nightly build, so future versions of Safari should look the same as Chrome. See more under the heading “The Animation’s Fill Mode”)

I’ll describe the CSS related to only one of the elements: the animated sun. That should suffice to give you a good understanding of keyframe-based animations. For the other elements in the demo, you can examine the code on the demo page using the tabs.

The Keyframe @ Rule

The first unusual thing you’ll notice about any CSS3 animation code is the keyframes @ rule. According to the spec, this specialized CSS @ rule is followed by an identifier (chosen by the developer) that is referred to in another part of the CSS.

The @ rule and its identifier are then followed by a number of rule sets (i.e. style rules with declaration blocks, as in normal CSS code). This chunk of rule sets is delimited by curly braces, which nest the rule sets inside the @ rule, much as you would find with other @ rules.

Here’s the @ rule we’ll be using:

@-webkit-keyframes sunrise {
	/* rule sets go here … */
}

The word sunrise is an identifier of our choosing that we’ll use to refer to this animation.

Notice that I’m using the -webkit- prefix for all of the code examples here and in the demo. I’ll discuss browser support at the end of this article, but for now it’s enough to know that the only stable browsers that support these types of animations are WebKit-based ones.

The Keyframe Selectors

Let’s add some rule sets inside the @ rule:

@-webkit-keyframes sunrise {
   0% {
      bottom: 0;
      left: 340px;
      background: #f00;
   }

   33% {
      bottom: 340px;
      left: 340px;
      background: #ffd630;
   }

   66% {
      bottom: 340px;
      left: 40px;
      background: #ffd630;
   }

   100% {
      bottom: 0;
      left: 40px;
      background: #f00;
   }
}

With the addition of those new rule sets, we’ve introduced the keyframe selector. In the code example above, the keyframe selectors are 0%, 33%, 66%, and 100%. The 0% and 100% selectors could be replaced by the keywords “from� and “to,� respectively, and you would get the same results.

Each of the four rule sets in this example represents a different snapshot of the animated element, with the styles defining the element’s appearance at that point in the animation. The points that are not defined (for example, from 34% to 65%) comprise the transitional period between the defined styles.

Although the spec is still in development, some rules have been defined that user agents should follow. For example, the order of the keyframes doesn’t really matter. The keyframes will play in the order specified by the percentage values, and not necessarily the order in which they appear. Thus, if you place the “to� keyframe before the “from� keyframe, the animation would still play the same way. Also, if a “to� or “from� (or its percentage-based equivalent) is not declared, the browser will automatically construct it. So, the rule sets inside the @ rule are not governed by the cascade that you find in customary CSS rule sets.

The Keyframes That Animate the Sun

For the purpose of animating the sun in this demo, I’ve set four keyframes. As mentioned, the code above includes comments that describe the changes.

In the first keyframe, the sun is red (as if it were just rising or setting), and it is positioned below ground (i.e. not visible). Naturally, the element itself must be positioned relatively or absolutely in order for the left and bottom values to have any effect. I’ve also used z-index to stack the elements (to make sure, for example, that the ground is above the sun). Take note that the only styles shown in the keyframes are the styles that are animated. The other styles (such as z-index and position, which aren’t animated) are declared elsewhere in the style sheet and thus aren’t shown here.

0% {
	bottom: 0; /* sun at bottom */
	left: 340px; /* sun at right */
	background: #f00; /* sun is red */
}

About one third of the way into the animation (33%), the sun is on the same horizontal plane but has risen and changed to a yellow-orange (to represent full daylight):

33% {
	bottom: 340px; /* sun rises */
	left: 340px;
	background: #ffd630; /* changes color */
}

Then, at about two thirds into the animation (66%), the sun has moved to the left about 300 pixels but stays on the same vertical plane. Notice something else in the 66% keyframe: I’ve repeated the same color from the 33% keyframe, to keep the sun from changing back to red too early.

66% {
	bottom: 340px;
	left: 40px; /* sun moves left across sky */
	background: #ffd630; /* maintains its color */
}

Finally, the sun gradually animates to its final state (the full red) as it disappears below the ground.

100% {
	bottom: 0; /* sun sets */
	left: 40px;
	background: #f00; /* back to red */
}

Associating The Animation Name With An Element

Here’s the next chunk of code we’ll add in our example. It associates the animation name (in this case, the word sunrise) with a specific element in our HTML:

#sun.animate {
	-webkit-animation-name: sunrise;
}

Here we’re introducing the animation-name property. The value of this property must match an identifier in an existing @keyframes rule, otherwise no animation will occur. In some circumstances, you can use JavaScript to set its value to none (the only keyword that has been reserved for this property) to prevent an animation from occurring.

The object we’ve targeted is an element with an id of sun and a class of animate. The reason I’ve doubled up the id and class like this is so that I can use scripting to add the class name animate. In the demo, I’ve started the page statically; then, with the click of a button, all of the elements with a particular class name will have another class appended called animate. This will trigger all of the animations at the same time and will allow the animation to be controlled by the user.

Of course, that’s just one way to do it. As is the case with anything in CSS or JavaScript, there are other ways to accomplish the same thing.

The Animation’s Duration And Timing Function

Let’s add two more lines to our CSS:

#sun.animate {
	-webkit-animation-name: sunrise;
	-webkit-animation-duration: 10s;
	-webkit-animation-timing-function: ease;
}

You can specify the duration of the animation using the animation-duration property. The duration represents the time taken to complete a single iteration of the animation. You can express this value in seconds (for example, 4s), milliseconds (2000ms), and seconds in decimal notation (3.3s).

The specification doesn’t seem to specify all of the available units of time measurement. However, it seems unlikely that anyone would need anything longer than seconds; and even then, you could express duration in minutes, hours or days simply by calculating those units into seconds or milliseconds.

The animation-timing-function property, when declared for the entire animation, allows you to define how an animation progresses over a single iteration of the animation. The values for animation-timing-function are ease, linear, ease-out, step-start and many more, as outlined in the spec.

For our example, I’ve chosen ease, which is the default. So in this case, we can leave out the property and the animation will look the same.

Additionally, you can apply a specific timing function to each keyframe, like this:

@-webkit-keyframes sunrise {
   0% {
      background: #f00;
      left: 340px;
      bottom: 0;
      -webkit-animation-timing-function: ease;
   }

   33% {
      bottom: 340px;
      left: 340px;
      background: #ffd630;
      -webkit-animation-timing-function: linear;
   }

   66% {
      left: 40px;
      bottom: 340px;
      background: #ffd630;
      -webkit-animation-timing-function: steps(4);
   }

   100% {
      bottom: 0;
      left: 40px;
      background: #f00;
      -webkit-animation-timing-function: linear;
   }
}

A separate timing function defines each of the keyframes above. One of them is the steps value, which jerks the animation forward a predetermined number of steps. The final keyframe (100% or to) also has its own timing function, but because it is for the final state of a forward-playing animation, the timing function applies only if the animation is played in reverse.

In our example, we won’t define a specific timing function for each keyframe, but this should suffice to show that it is possible.

The Animation’s Iteration Count And Direction

Let’s now add two more lines to our CSS:

#sun.animate {
	-webkit-animation-name: sunrise;
	-webkit-animation-duration: 10s;
	-webkit-animation-timing-function: ease;
	-webkit-animation-iteration-count: 1;
	-webkit-animation-direction: normal;
}

This introduces two more properties: one that tells the animation how many times to play, and an indicator that tells the animation to animate back to the start position.

The animation-iteration-count property is set to 1, meaning that the animation will play only once. This property accepts an integer value or infinite.

In addition, the animation-direction property is set to normal (the default), which means that the animation will play in the same direction (from start to finish) each time it runs. In our example, the animation is set to run only once, so the property is unnecessary. The other value we could specify here is alternate, which makes the animation play in reverse on every other iteration. Naturally, for the alternate value to take effect, the iteration count needs to have a value of 2 or higher.

The Animation’s Delay And Play State

Let’s add another two lines of code:

#sun.animate {
	-webkit-animation-name: sunrise;
	-webkit-animation-duration: 10s;
	-webkit-animation-timing-function: ease;
	-webkit-animation-iteration-count: 1;
	-webkit-animation-direction: normal;
	-webkit-animation-delay: 5s;
	-webkit-animation-play-state: running;
}

First, we introduce the animation-delay property, which does exactly what you would think: it allows you to delay the animation by a set amount of time. Interestingly, this property can have a negative value, which moves the starting point partway through the animation according to negative value.

The animation-play-state property, which might be removed from the spec, accepts one of two possible values: running and paused. This value has limited practical use. The default is running, and the value paused simply makes the animation start off in a paused state, until it is manually played. You can’t specify a paused state in the CSS for an individual keyframe; the real benefit of this property becomes apparent when you use JavaScript to change it in response to user input or something else.

The Animation’s Fill Mode

We’ll add one more line to our code, the property to define the “fill mode�:

#sun.animate {
	-webkit-animation-name: sunrise;
	-webkt-animation-duration: 10s;
	-webkit-animation-timing-function: ease;
	-webkit-animation-iteration-count: 1;
	-webkit-animation-direction: normal;
	-webkit-animation-delay: 5s;
	-webkit-animation-play-state: running;
	-webkit-animation-fill-mode: forwards;
}

The animation-fill-mode property allows you to define the styles of the animated element before and/or after the animation executes. A value of backwards causes the styles in the first keyframe to be applied before the animation runs. A value of forwards causes the styles in the last keyframe to be applied after the animation runs. A value of both does both.

UPDATE: It seems that the animation-fill-mode property has been removed from the spec, or else was never there to begin with, so this property may not end up in the spec. Also, Chrome and Safari respond differently when it is used. Safari will only apply a value of “forwards” if there are exactly two keyframes defined. It always seems to use the 2nd keyframe as the “forwards” state, which is not how Chrome does it; Chrome uses the final keyframe, which seems to be correct behaviour. Additionally, I’ve confirmed that the most up to date WebKit nightly does not have this bug, so future versions of Safari will render this correctly.

Shorthand

Finally, the specification describes shorthand notation for animations, which combines six of the properties described above. This includes everything except animation-play-state and animation-fill-mode.

Some Notes On The Demo Page And Browser Support

As mentioned, the code in this article is for animating only a single element in the demo: the sun. To see the full code, visit the demo page. You can view all of the source together or use the tabs in the sidebar to view the code for individual elements in the animation.

The demo does not use any images, and the animation does not rely on JavaScript. The sun, moon and cloud are all created using CSS3’s border-radius, and the only scripting on the page is for the tabs on the right and for the button that lets users start and reset the animation.

If you view the page in anything but a WebKit browser, it won’t work. Firefox does not currently support keyframe-based animation, but support is expected for Firefox 5, and the -moz-based syntax for animations is supported in the latest Aurora build. So, to make the source code as future-proof as possible, I’ve included all of the -moz prefixes along with the standard syntax.

Here are the browsers that support CSS3 keyframe animations:

  • Chrome 2+,
  • Safari 4+,
  • Firefox 5+,
  • iOS Safari 3.2+,
  • Android 2.1+.

Although no official announcement has been made, support in Opera is expected. There’s no word yet on support in IE.

Further Reading

(al) (vf) (il)


© Louis Lazaris for Smashing Magazine, 2011. | Permalink | Post a comment | Smashing Shop | Smashing Network | About Us
Post tags: ,


Freebie: Blog-O-Folio WordPress Theme Version 1.0

Advertisement in Freebie: Blog-O-Folio WordPress Theme Version 1.0
 in Freebie: Blog-O-Folio WordPress Theme Version 1.0  in Freebie: Blog-O-Folio WordPress Theme Version 1.0  in Freebie: Blog-O-Folio WordPress Theme Version 1.0

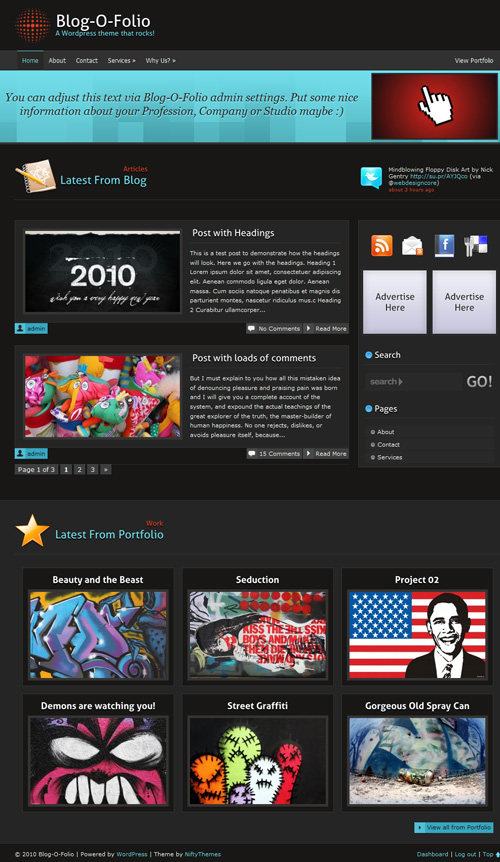
Blog-O-Folio is a free 2 column WordPress Theme suitable for any and all of your corporate, portfolio or personal blog needs. With a wide variety of tunable theme options and functionality to merge your portfolio with the blog, it is now ultra easy to maintain your blog and portfolio at the same time.

Blog-O-Folio Theme was coded and designed by MOin, supported by SloDive and featured by SmashingMagazine.

Download the Theme for Free!

The theme is released under GPL. You can use it for all your projects for free and without any restrictions. Please link to this article if you want to spread the word. You may modify the theme as you wish.

Folio-500 in Freebie: Blog-O-Folio WordPress Theme Version 1.0

Features

Here are some of the features of the theme:

  • Simple, elegant & modern look
  • Fast loading structure
  • Supports comments threading and paging
  • Fixed width
  • 2 Columns
  • Many tunable options
  • Portfolio Integration
  • Custom write panels
  • 125 x 125 Sidebar Ads section
  • Social icons integrated
  • Email subscription form
  • Qtips for subscribe icons
  • Twitter integrated
  • Theme Requirements: WordPress 2.9.1+

Folio-1 in Freebie: Blog-O-Folio WordPress Theme Version 1.0

Installation:

In order to make Portfolio work like it should you need to rename two files in your Blog-O-Folio theme directory. Don’t worry its dead simple!

  • First find your portfolio category ID. (Visit this link if you don’t know: Link.)
  • After finding out your Portfolio category ID replace 00 in category-00.php & single-00.php files with your category ID.

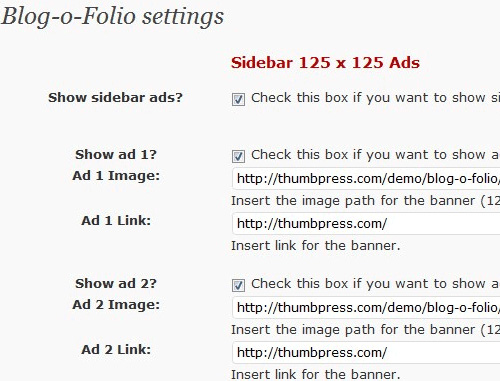
What Can You Adjust From Admin Theme Options?

  • Sidebar 125 x 125 ads: You can tune sidebar ads from inside your theme options just enter banner URLs and enter link for them.
  • Sidebar buttons settings : Adjust RSS feed link, Twitter name and your Facebook profile/fan page/group link.
  • Header logo settings: Tune your header image, enter image link and select either show image only, text only or both.
  • Welcome Message Setting: Adjust welcome box from this menu, you can edit text to show in welcome box enter image link to show in welcome box.
  • Google Analytics setting: Enter your Google Analytics code to track visitors.
  • Misc Settings: From this menu you can tune variety of options such as Favicon, Portfolio category, Amount of portfolio entries to show, Exclude pages from navigation, Show or hide social media icons on posts.

Admin-options in Freebie: Blog-O-Folio WordPress Theme Version 1.0

Where Can You Adjust E-mail Subscription Form:

Blog-O-Folio comes with a built-in jQuery-powered email subscription form that will work with your FeedBurner account. Follow these simple instructions to set it up:

  • Get your feed burner Feed Name e.g http://feeds.feedburner.com/Noupe here / Noupe is what you need.
  • In Blog-O-Folio theme directory look for subscribe.html and edit it with any text editor.
  • On line 4 & 6 put your feed name where it says FeedName.
  • You are done, make sure you enabled Email Feeds from your feedburner dashboard.

Email-form in Freebie: Blog-O-Folio WordPress Theme Version 1.0

(rb)


Get element text, including alt text for images, with JavaScript

Sometimes I find myself wanting to get the text contents of an element and its descendants. There is a DOM method called textContent that can be used for this. There is also jQuery’s text() method. Unfortunately neither method returns what I want.

In both cases, elements that can have alt attributes are omitted from the returned string. In my opinion, alt text is the text content of an img, input[type=image] or area element and should be returned by methods like these. I also find it a bit weird that they return the contents of script elements.

Not having any luck finding a method that includes alternative text and omits script elements when getting text content, I wrote my own.

Read full post

Posted in .

Copyright © Roger Johansson


  •   
  • Copyright © 1996-2010 BlogmyQuery - BMQ. All rights reserved.
    iDream theme by Templates Next | Powered by WordPress