Archive for July, 2011

How to Create a Circus Tent in Adobe Illustrator

Advertisement in How to Create a Circus Tent in Adobe Illustrator
 in How to Create a Circus Tent in Adobe Illustrator  in How to Create a Circus Tent in Adobe Illustrator  in How to Create a Circus Tent in Adobe Illustrator

Today we will be learning how to create a cute circus tent in Adobe Illustrator. Get ready to use some basic tools such as Pen Tool and some quite useful Pathfinder features. We will create colorful balloons and flowers as well. The illustration can be used for multiply purpose such as Birthday invitations, Circus posters, etc.

Let us move from words to deeds!

This is what we’ll be creating.

Preview-image1 in How to Create a Circus Tent in Adobe Illustrator

Creating the Lower Part of the Circus Tent

Create a new Illustrator document with 500 x 500 pixels in size.

0011 in How to Create a Circus Tent in Adobe Illustrator

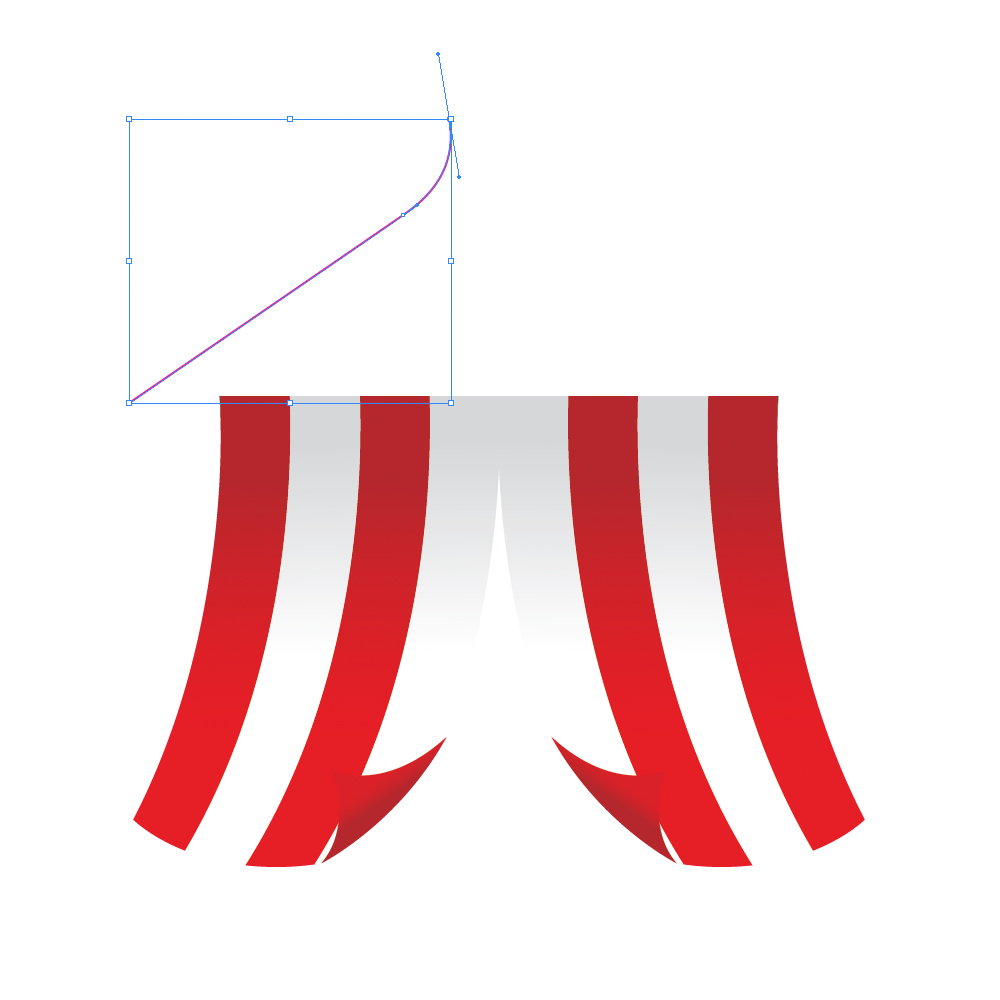
For the start, grab the Pen Tool (P) from the Tool Panel and create the path as it shown on the picture below.

0021 in How to Create a Circus Tent in Adobe Illustrator

Holding the Alt key on the keyboard select the path and move it to the right. Don’ t forget to hold the Shift key for the straight dragging. This way we will create the copy of the path. You should end up with something like this.

0031 in How to Create a Circus Tent in Adobe Illustrator

Select the Pen Tool (P) again and click on the end points of these paths in order to create a shape like this.

0041 in How to Create a Circus Tent in Adobe Illustrator

Select the Add Anchor Point Tool (+) and add the anchor point as it shown on the picture below.

0051 in How to Create a Circus Tent in Adobe Illustrator

We need to nudge this anchor point few pixels downwards. To do that select the anchor point we’ve just created with Direct Selection Tool (A) and hit the down arrow key on the keyboard.

0062 in How to Create a Circus Tent in Adobe Illustrator

Let’s create a nice arc. Grab the Convert Anchor Point Tool ( Shift + C ) from the Tool Panel, click on the new anchor and drag it to right. Don’t forget to hold the Shift key on the keyboard for straight dragging.

0071 in How to Create a Circus Tent in Adobe Illustrator

Creating the Stripes

Let’s create nice stripes for the tent.

Grab the Pen Tool (P) from the Tool Panel and create the path as it shown on the picture below.

0081 in How to Create a Circus Tent in Adobe Illustrator

We have to create the copy of this path. Hold the Alt key on the keyboard and click on the path. Holding the Shift key on the keyboard (for straight dragging) move the copy to the right.

0091 in How to Create a Circus Tent in Adobe Illustrator

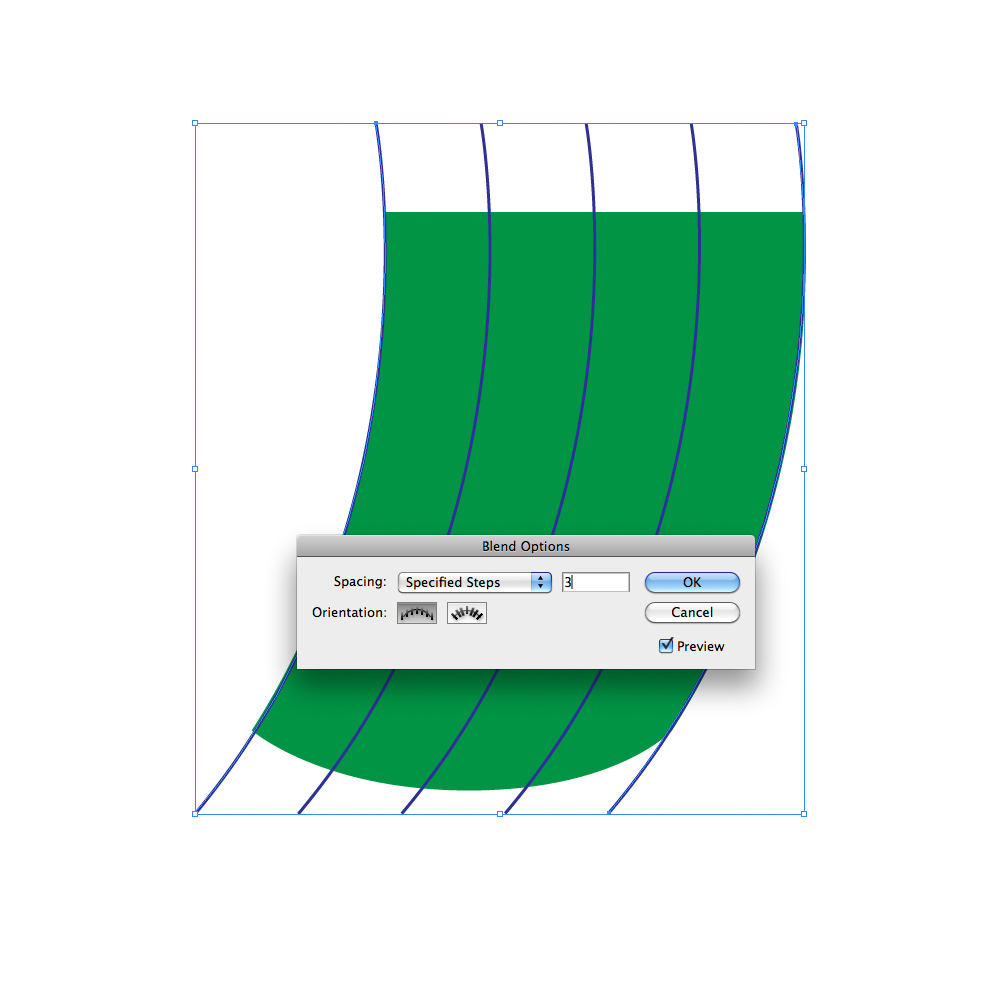
Select both paths and under the Object select Blend > Make.

0101 in How to Create a Circus Tent in Adobe Illustrator

Under the Blend Options set the Spacing to Specified Steps and the value to 3.

0112 in How to Create a Circus Tent in Adobe Illustrator

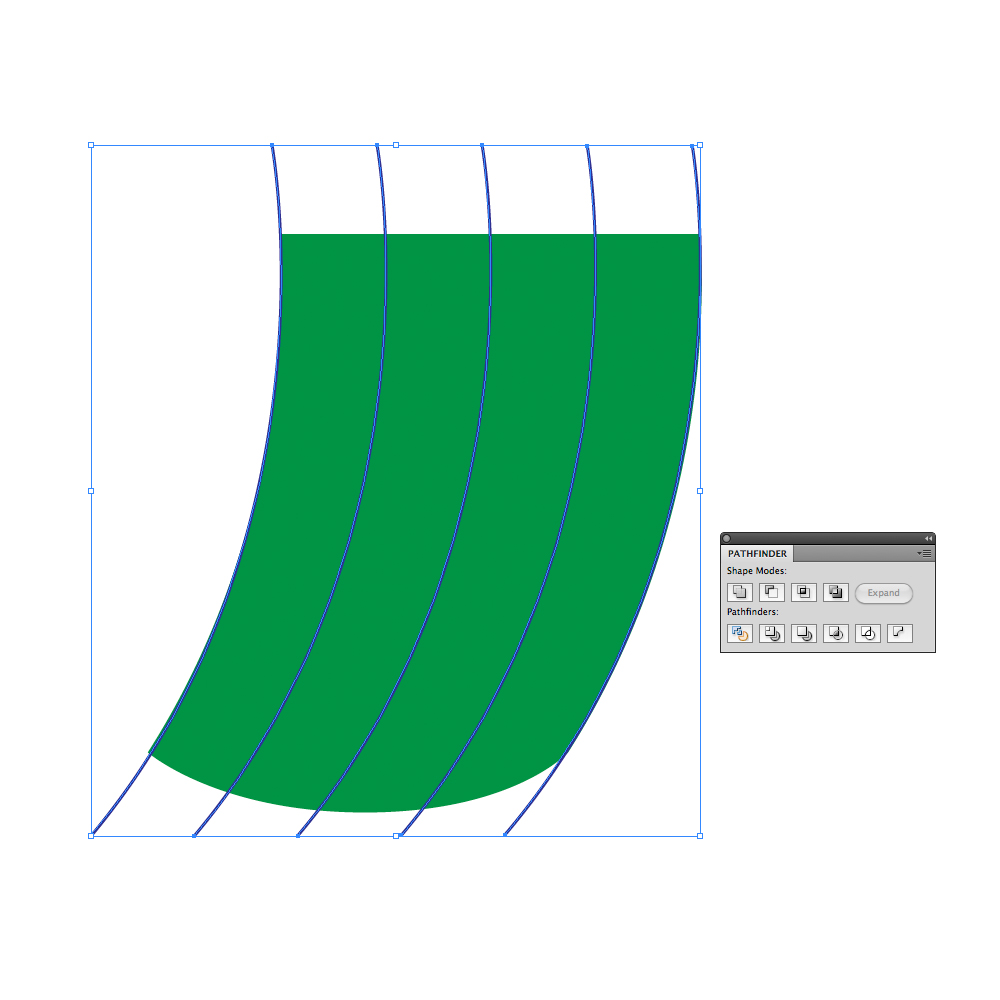
Under the Object select Expand and Ungroup ( Shift + Ctrl / Cmd + G ) the paths. Select all the elements we’ve created so far and under the Pathfinder Panel hit Divide button.

0123 in How to Create a Circus Tent in Adobe Illustrator

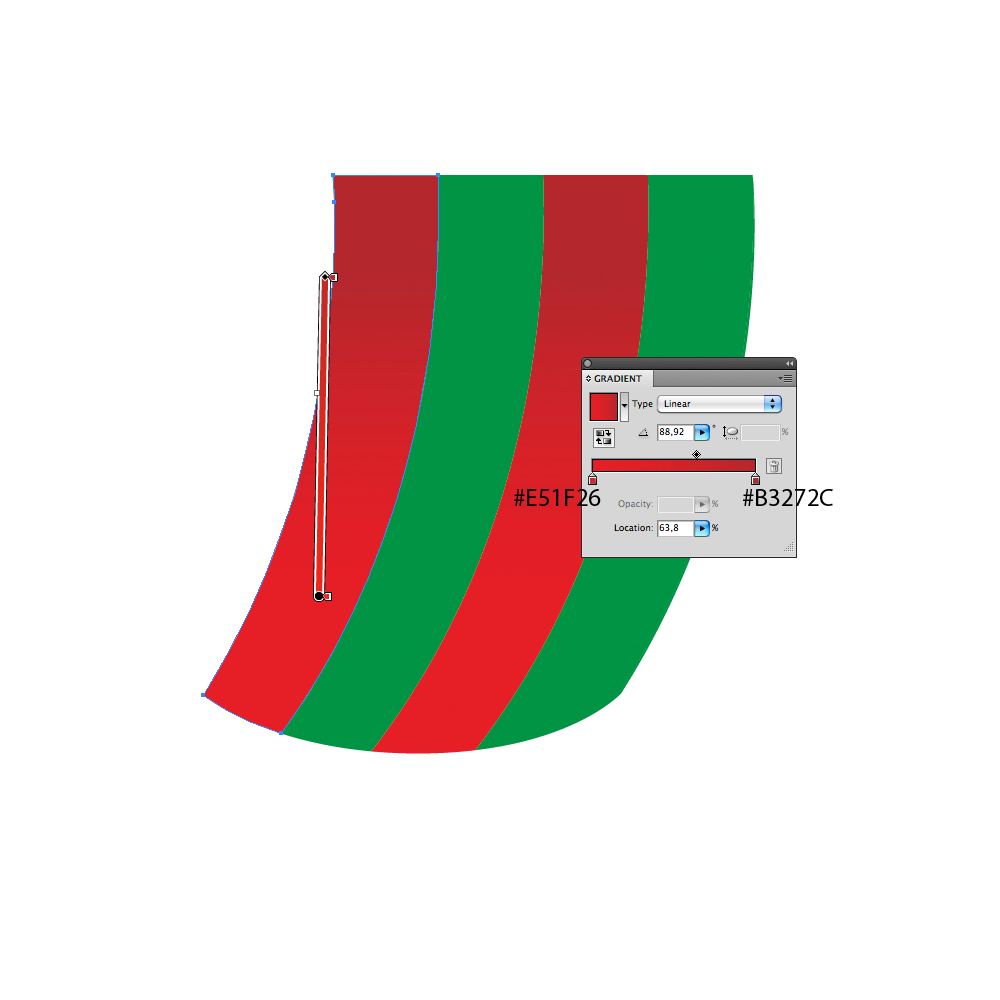
Ungroup ( Shift + Ctrl / Cmd + G ) the shape we have created. We will apply nice linear gradients to the stripes.

0132 in How to Create a Circus Tent in Adobe Illustrator

We will do the same for white stripes.

0141 in How to Create a Circus Tent in Adobe Illustrator

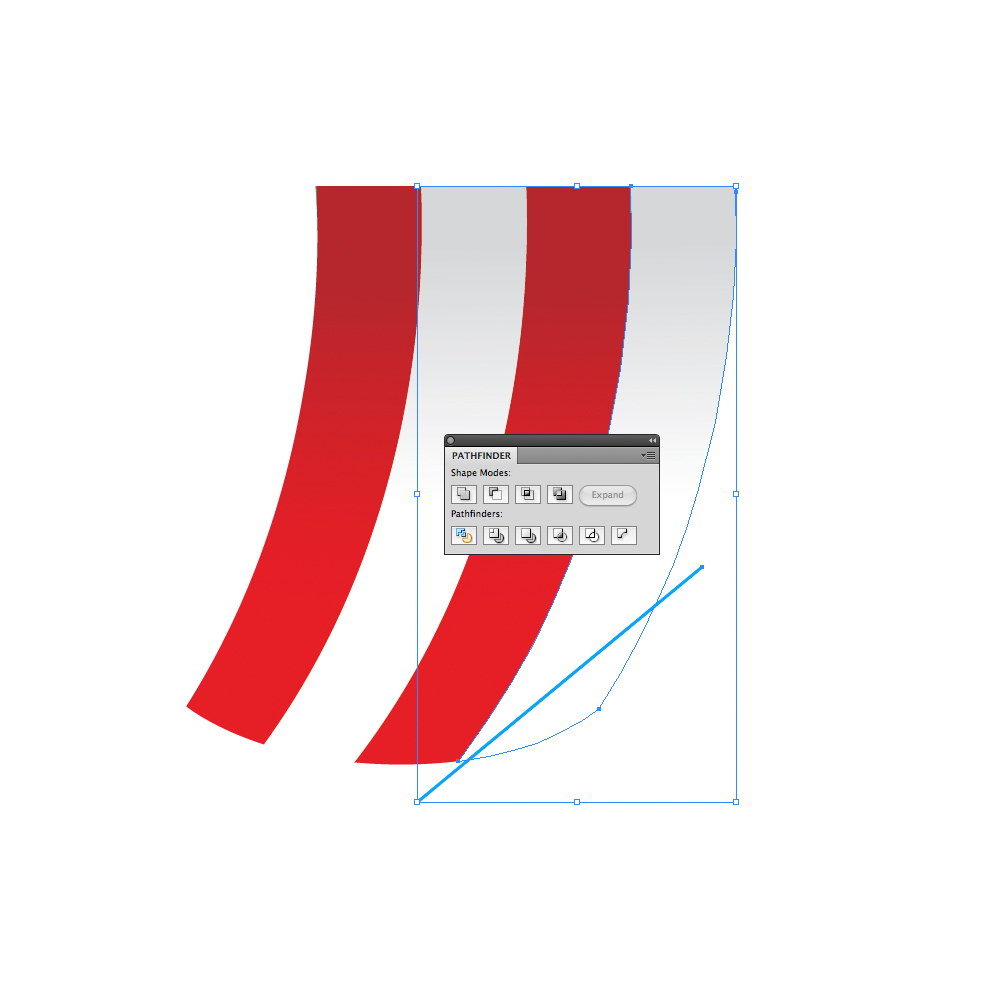
Now we will create a folded part of the tents side. Grab the Line Tool (/) from the Tool Panel and create the line as it shown on the picture below.

0152 in How to Create a Circus Tent in Adobe Illustrator

Select the white strip and the line and under the Pathfinder Panel hit Divide button.

0162 in How to Create a Circus Tent in Adobe Illustrator

Ungroup ( Shift + Ctrl / Cmd + G ) divided strip and rotate the small part for 135 degrees.  You should end up with something like this.

0171 in How to Create a Circus Tent in Adobe Illustrator

We have to adjust a bit the folded part. To do that grab the Direct Selection Tool (A) from the Tool Panel and adjust the position of the anchor points and angle of the handles.

0181 in How to Create a Circus Tent in Adobe Illustrator

With the linear gradient we will create an illusion of curled side of the tent.

0191 in How to Create a Circus Tent in Adobe Illustrator

Select all the elements we have created so far an Group them ( Ctrl / Cmd + G ). Under the Object select Transform > Reflect. Set Axis to Vertical and hit the Copy button. It will create an mirror image. Just move it to the right as it shown on the picture below.

0201 in How to Create a Circus Tent in Adobe Illustrator

0212 in How to Create a Circus Tent in Adobe Illustrator

Group ( Ctrl / Cmd + G ) all the elements.

Creating the Upper Part of the Tent

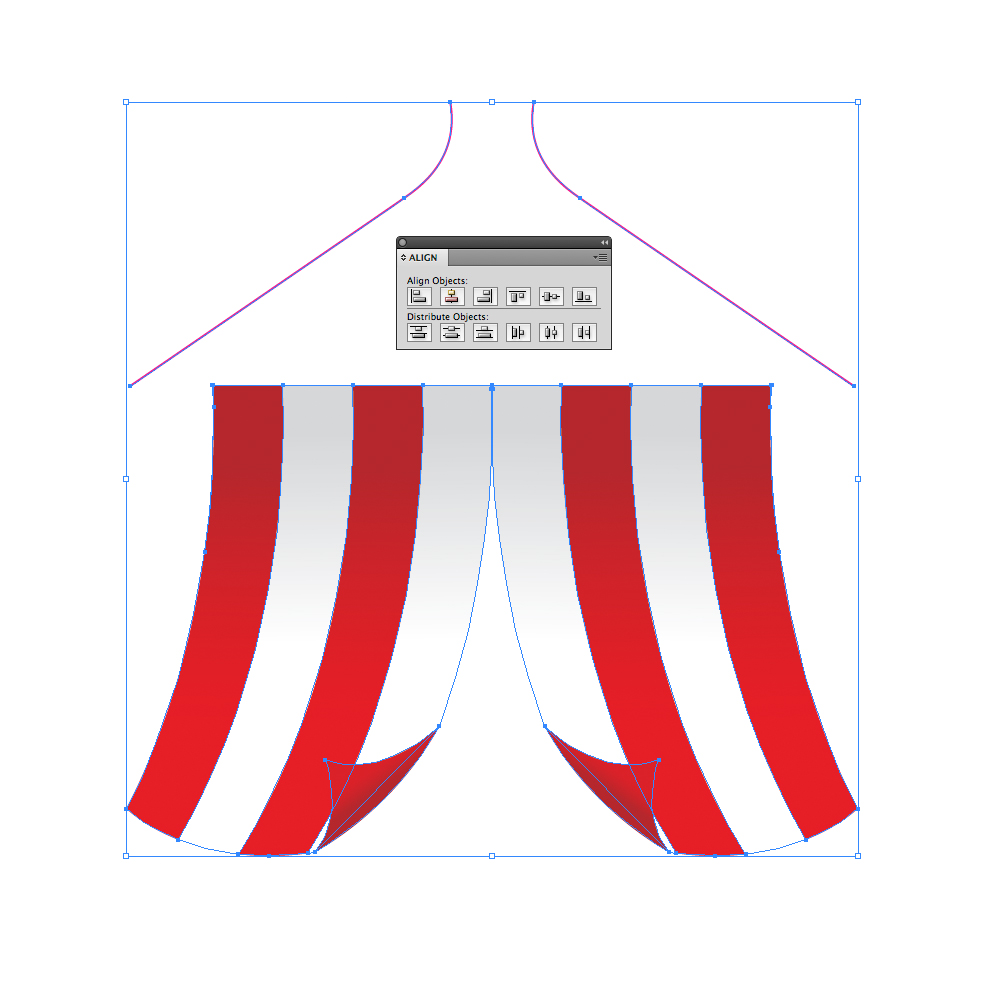
Now we have to create the upper part of the tent. Grab the Pen Tool (P) from the Tool Panel and create the path as it shown on the picture below.

0221 in How to Create a Circus Tent in Adobe Illustrator

0231 in How to Create a Circus Tent in Adobe Illustrator

Under the Object select Transfer > Reflect. For the Axis select Vertical and hit the Copy button. Place the copy on the right side. Select both paths and Group ( Ctrl / Cmd + G ) them. Select all the the objects and under the Align Panel hit the Horizontal Align Center.

0241 in How to Create a Circus Tent in Adobe Illustrator

Grab the Ellipse Tool (L) from the Tool Panel and create the ellipse.

0252 in How to Create a Circus Tent in Adobe Illustrator

Now we will have to add and to remove some anchor points. Select the Add Anchor Point Tool (+) from the Tool Panel and add two anchor points to the ellipse.

0262 in How to Create a Circus Tent in Adobe Illustrator

Grab the Direct Selection Tool (A) from the Tool Panel, select anchor points we don’t need and hit Delete key on the keyboard.

0272 in How to Create a Circus Tent in Adobe Illustrator

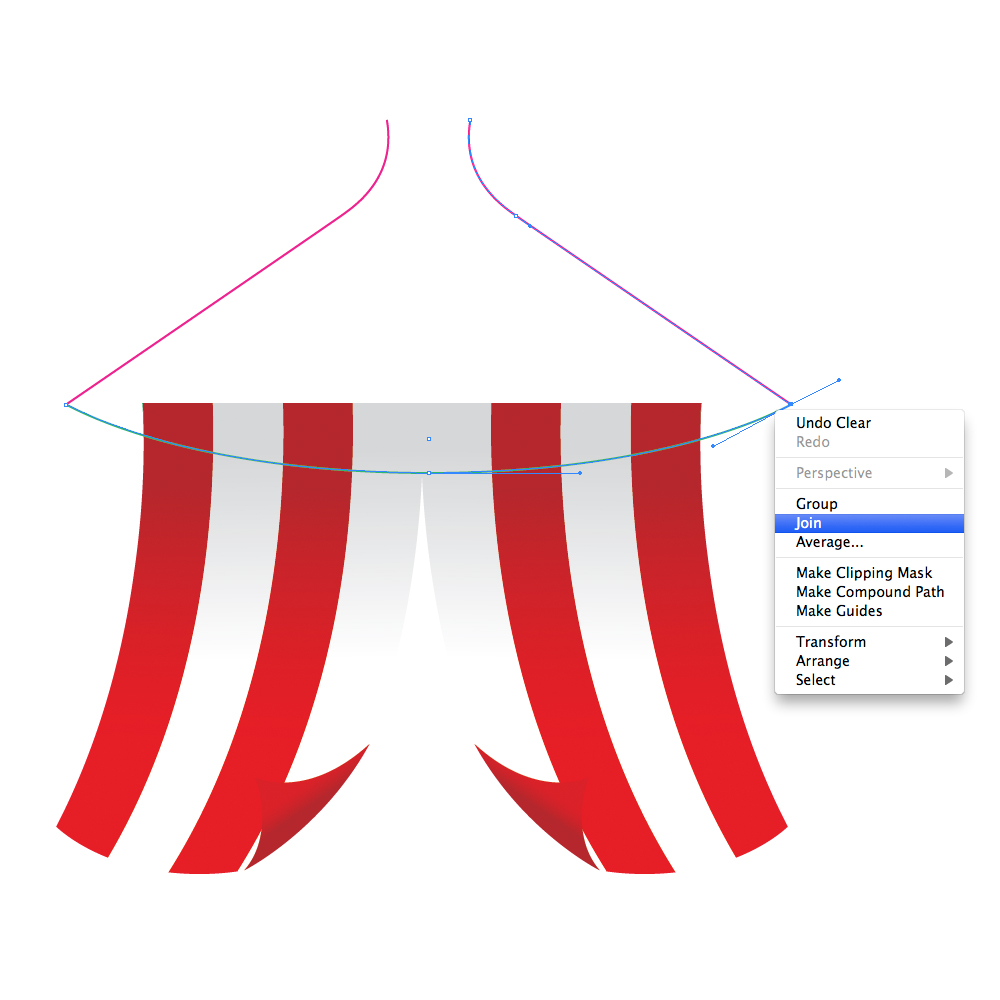
Withe Direct Selection Tool (A) select endpoints and under the right click hit the Join. Do that for the both sides of the upper part of the tent.

0283 in How to Create a Circus Tent in Adobe Illustrator

With the Pen Tool (P) close the path.

0292 in How to Create a Circus Tent in Adobe Illustrator

Let’s create red and white stripes for the upper part of the circus tent as well.

Duplicate ( Ctrl / Cmd + C, Ctrl / Cmd + F ) the green shape twice. Move one of the copy upwards.

0301 in How to Create a Circus Tent in Adobe Illustrator

Select both copies we have made and under the Pathfinder Panel hit the Intersect button.

0311 in How to Create a Circus Tent in Adobe Illustrator

Grab the Line Tool (/) from the Tool Panel and create a Vertical line. Hold the Shift key on the keyboard for the straight dragging.

0321 in How to Create a Circus Tent in Adobe Illustrator

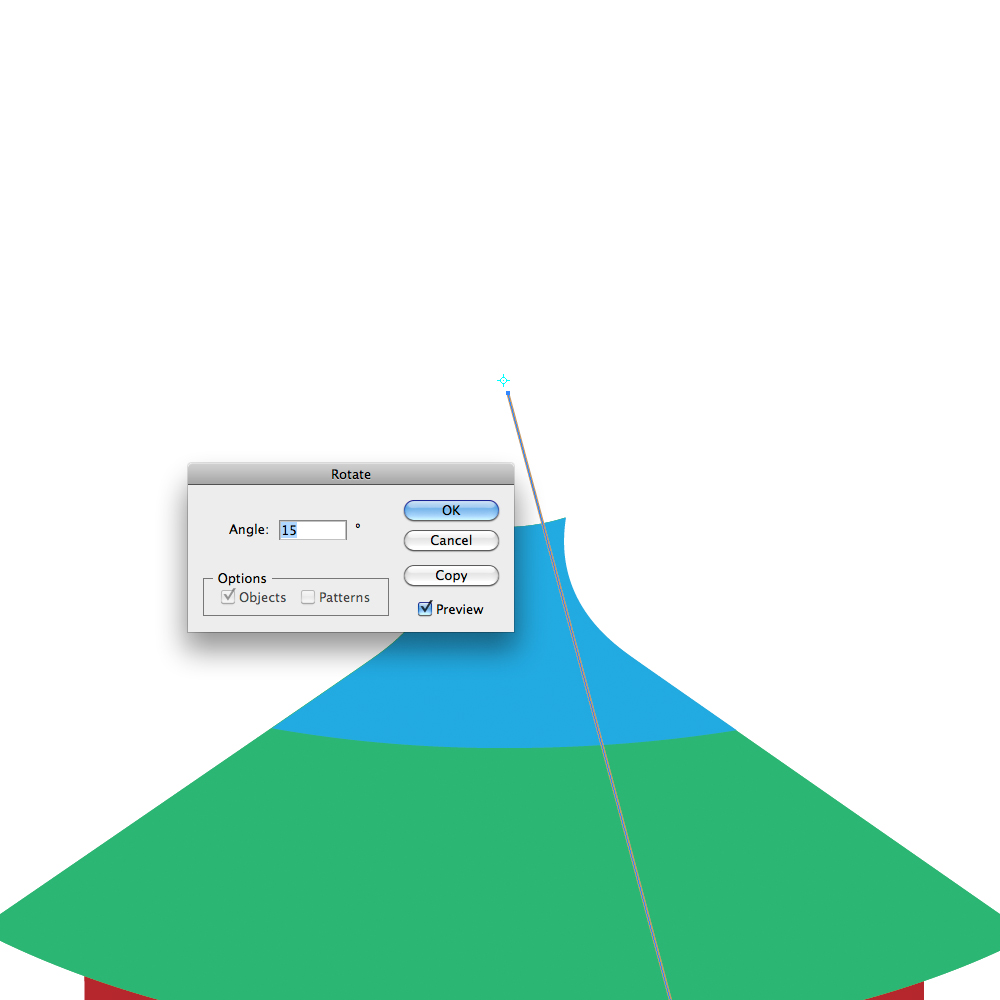
Grab the Rotate Tool ( R ) from the Tool Panel, hold the Alt key on the keyboard and click right above the vertical line.

0332 in How to Create a Circus Tent in Adobe Illustrator

The Rotation Option dialog will pop up. Set the value for the Angle to 15 degrees.

0341 in How to Create a Circus Tent in Adobe Illustrator

Hit the Copy button. It will create another line rotated for 15 degrees. To create more of those lines press the shortcut Ctrl / Cmd + D on the keyboard  22 times. It will create the whole round of lines.

0352 in How to Create a Circus Tent in Adobe Illustrator

Remove unnecessary lines. Select green shape and the rest of the lines and under the Pathfinder Panel hit Divide button.

036 in How to Create a Circus Tent in Adobe Illustrator

Ungroup the new shape and apply red and white gradients, just like we did before. Use the same gradients we’ve used for the lower part of the tent.

037 in How to Create a Circus Tent in Adobe Illustrator

038 in How to Create a Circus Tent in Adobe Illustrator

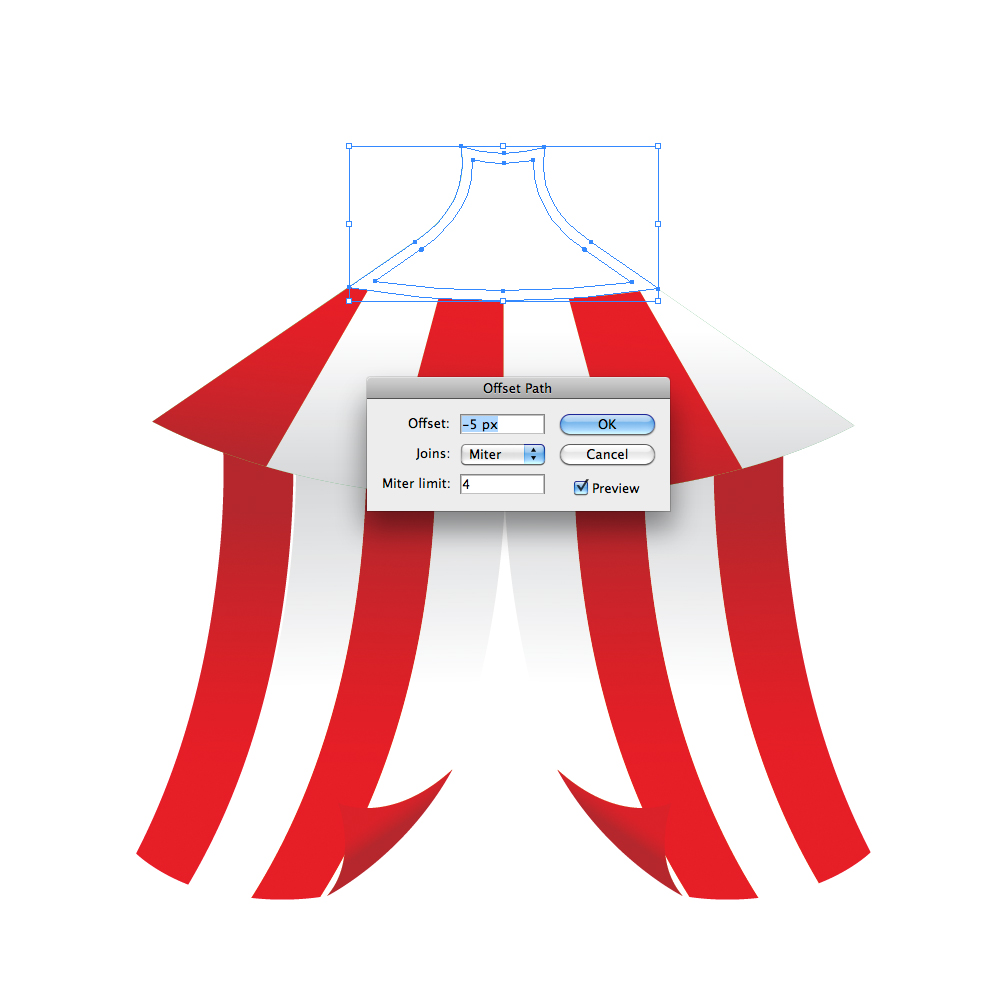
Set the Fill color of the blue shape to white (#FFFFF). Under the Object select Path > Offset Path. Set the value for Offset to -5. Set the Fill color of the smaller shape to #F1F2F2.

0391 in How to Create a Circus Tent in Adobe Illustrator

Grab the Pen Tool (P) from the Tool Panel and try to draw the shape as it shown on the pictures below.

040a in How to Create a Circus Tent in Adobe Illustrator

040b in How to Create a Circus Tent in Adobe Illustrator

040c in How to Create a Circus Tent in Adobe Illustrator

040d in How to Create a Circus Tent in Adobe Illustrator

040e in How to Create a Circus Tent in Adobe Illustrator

040f in How to Create a Circus Tent in Adobe Illustrator

040g in How to Create a Circus Tent in Adobe Illustrator

Select all the elements of the upper part of the tent (except the green shape) and send it to front ( Shift + Ctrl / Cmd +] ).

041 in How to Create a Circus Tent in Adobe Illustrator

Select only red and white stripes (as it shown on the picture below) and duplicate them ( Ctrl / Cmd + C, Ctrl / Cmd + F ). Under the Pathfinder Panel hit the Unite button.

042 in How to Create a Circus Tent in Adobe Illustrator

Select the shape we have just created and the green shape and under the Pathfinder Panel hit the Minus Front button.

043 in How to Create a Circus Tent in Adobe Illustrator

Ungroup ( Shift + Ctrl / Cmd + G ) the green shape and apply the same white and red gradients we have already used.

044 in How to Create a Circus Tent in Adobe Illustrator

045 in How to Create a Circus Tent in Adobe Illustrator

Grab the Pen Tool (P) from the Tool Panel and draw the path as it shown on the picture below.

046 in How to Create a Circus Tent in Adobe Illustrator

048 in How to Create a Circus Tent in Adobe Illustrator

Creating the Flag

Grab the Rounded Rectangle Tool from the Tool Panel and create a tiny rectangle. Apply linear gray gradient.

049 in How to Create a Circus Tent in Adobe Illustrator

We will create the shape of the flag with Pencil Tool (N), but first we have to set parameters for smooth line. With double click on the Pencil Tool icon in the Tool Panel we will bring up the Pencil Tool Options. Set the Fidelity to 2.5 and the Smoothness to 100%. Hit the OK button.

050 in How to Create a Circus Tent in Adobe Illustrator

Select the Pencil Tool (N) from the Tool Panel and create a curved line as it shown on the picture below. Don’t worry much about the shape. Just try to create a smooth waves.

051 in How to Create a Circus Tent in Adobe Illustrator

Duplicate the path ( Ctrl / Cmd + C, Ctrl / Cmd + F ), rotate it a bit and move around as it shown on the picture below. With the Direct Selection Tool (A) select endpoints on the right click hit Join.

052 in How to Create a Circus Tent in Adobe Illustrator

With the Pen Tool (P) close the path. Set Fill color to red.

053 in How to Create a Circus Tent in Adobe Illustrator

Duplicate the flag twice ( Ctrl / Cmd + C, Ctrl / Cmd + F ), scale up one of the copies and rotate it. Select both copies and under the Pathfinder Panel hit the Intersect button.

054 in How to Create a Circus Tent in Adobe Illustrator

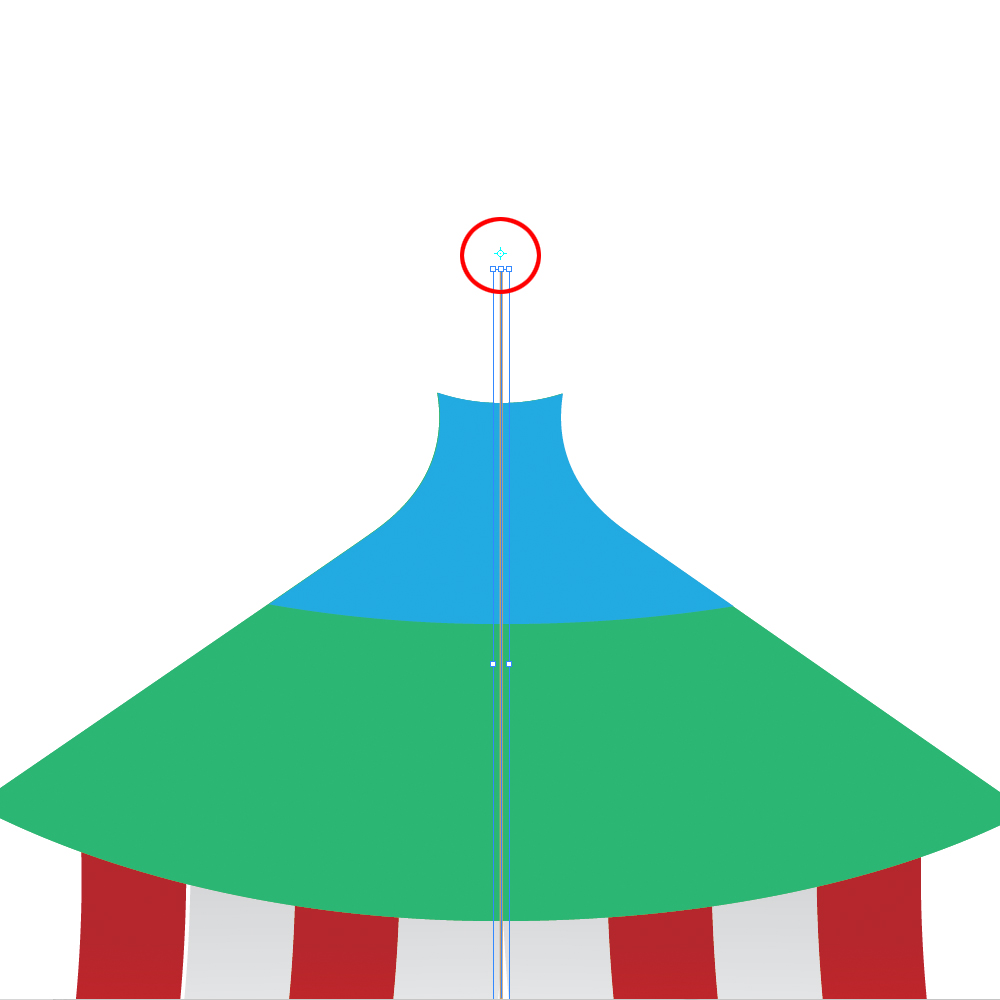
Set the Fill color to white (#FFFFF), Group it ( Ctrl / Cmd + G ) and place it on the handle on the top of the circus tent.

055 in How to Create a Circus Tent in Adobe Illustrator

Grab the Pen Tool (P) from the Tool Panel and create the back side of the circus tent. The shape doesn’t have to be perfect. Apply the same red linear gradient we are using from the start of this tutorial.

056 in How to Create a Circus Tent in Adobe Illustrator

Send the red shape to the back ( Shift + Ctrl / Cmd + [ ).

057 in How to Create a Circus Tent in Adobe Illustrator

Creating details

Select the small parts of the roof (as it shown on the picture below) and duplicate them ( Ctrl / Cmd + C, Ctrl / Cmd + F ). Scale them up and move them to the right little bit.

058 in How to Create a Circus Tent in Adobe Illustrator

Ungroup ( Shift + Ctrl / Cmd +G ) the lower part of the tent. Make sure to have all stripes ungrouped. Now we will combine some shapes inside the Pathfinder Panel.

Select the stripe and duplicate it ( Ctrl / Cmd + C, Ctrl / Cmd + F ). Holding the Shift key on the keyboard select the copy of the stripe we have just made and one of the parts we created in the previous step. Under the Pathfinder Panel hit the Intersect button.

059 in How to Create a Circus Tent in Adobe Illustrator

Set the Fill color to #720F16 and make sure to place it underneath the upper part of the circus tent. Repeat this step for each stripe. For the shadow on white stripes set the Fill color to #A7A9AC.

060 in How to Create a Circus Tent in Adobe Illustrator

061 in How to Create a Circus Tent in Adobe Illustrator

The circus tent is done. Group ( Ctrl / Cmd + G ) all the elements we have created so far.

Let’s move on to the balloons.

Balloons

We will try to create create colorful balloons in just few steps.

Grab the Ellipse Tool (L) from the Tool Panel and create the ellipse. With Direct Selection Tool (A) we will distort the ellipse little bit. Select the lower anchor point and nudge it few pixels downwards. To do that use the arrow keys on the keyboard.

062 in How to Create a Circus Tent in Adobe Illustrator

Grab the Pen Tool (P) from the Tool Panel and create simple, irregular triangle.

063 in How to Create a Circus Tent in Adobe Illustrator

With the Ellipse Tool (L) create ellipse as it shown on the picture below. Make sure to mach endpoints.

064 in How to Create a Circus Tent in Adobe Illustrator

Under the Object select Path > Offset Path. Set the value for Offset to -3.

065 in How to Create a Circus Tent in Adobe Illustrator

Let’s put all elements together and to apply some nice gradients.

066 in How to Create a Circus Tent in Adobe Illustrator

To lower part of the balloon apply linear gradient with same colors as we used for the radial gradient. With the Ellipse Tool (L) create a small ellipse and set the Fill color to white (#FFFFFF). Lower the Opacity to 25%.

067 in How to Create a Circus Tent in Adobe Illustrator

Using the same technique create balloons in oder colors. Group them ( Ctrl / Cmd + G ).

068 in How to Create a Circus Tent in Adobe Illustrator

Creating the Background

Beside circus tent and the balloons we have to create a background with cute clouds and a hill with some flowers.

Grab the Rectangle Tool (M) from the Tool Panel and click somewhere on the Artboard. A Rectangle Option box will pop up. Set the values for width and height to 500 x 600 pixels. Apply nice blue, radial gradient.

069 in How to Create a Circus Tent in Adobe Illustrator

Grab the Ellipse Tool (L) from the Tool Panel and create an ellipse. Place it as it shown on the picture below.

070 in How to Create a Circus Tent in Adobe Illustrator

Duplicate ( Ctrl / Cmd + C, Ctrl / Cmd + F ) the rectangle from the previous picture. Select both, ellipse and rectangle and under the Pathfinder Panel hit the Intersect button.

071 in How to Create a Circus Tent in Adobe Illustrator

Let’s place our circus tent and balloons on the hill. We will have to create few more details in order to improve our illustration.

072 in How to Create a Circus Tent in Adobe Illustrator

We have to create shadow that tent cast on the grass. Grab the Ellipse Tool (L) again and create two ellipses.

Set the Fill color of the larger ellipse to #004B25.

073 in How to Create a Circus Tent in Adobe Illustrator

Set the Fill color of the smaller ellipse to #0C381E.

074 in How to Create a Circus Tent in Adobe Illustrator

We will create the mirror image of the balloons. Select the group of the balloons and under the Object select Transform > Reflect. Set the Axis to Vertical and hit the Copy button. Move the reflected balloons to the left.

075 in How to Create a Circus Tent in Adobe Illustrator

076 in How to Create a Circus Tent in Adobe Illustrator

Creating Clouds

Let’s create few cute clouds.

Grab the Ellipse Tool (L) from the Tool Panel and create many overlapping circles.

0771 in How to Create a Circus Tent in Adobe Illustrator

Select them all and under the Pathfinder Panel hit the Unite button. Set the Fill color to #E6F5F9. Duplicate the cloud ( Ctrl / Cmd + C, Ctrl / Cmd +F ). Scale down the cop of the cloud and set the Fill color to white (#FFFFFF).

078 in How to Create a Circus Tent in Adobe Illustrator

Using the same techniques create few more clouds.

0791 in How to Create a Circus Tent in Adobe Illustrator

Just few more flowers and…

080 in How to Create a Circus Tent in Adobe Illustrator

…Voila! We are done.

Feel free to create the circus tent in different colors.

Preview-image-2 in How to Create a Circus Tent in Adobe Illustrator

Preview-image-3 in How to Create a Circus Tent in Adobe Illustrator

Conclusion

In this quite long tutorial we had an opportunity to use different kind of techniques. We have used Pen Tool, Pathfinder with some of it’s features and Blend Tool. Their combination has resulted in cheerful illustration that can be used in multiply purpose. Feel free to use techniques discussed in this tutorial for creating different kind of illustrations. I hope you like the tutorial. Thank you for following along.

(rb)


My Favorite Programming Mistakes

Advertisement in My Favorite Programming Mistakes
 in My Favorite Programming Mistakes  in My Favorite Programming Mistakes  in My Favorite Programming Mistakes

Over my programming career, I have made a lot of mistakes in several different languages. In fact, if I write 10 or more lines of code and it works the first time, I’ll get a bit suspicious and test it more rigorously than usual. I would expect to find a syntax error or a bad array reference or a misspelled variable or something.

Mwnt-beach in My Favorite Programming Mistakes

Coastline near Mwnt on the west coast of Wales. Read on to find out why this is halfway to being a very special place.

I like to classify these mistakes into three broad groups: cock-ups (or screw-ups in American English), errors and oversights.

A cock-up is when you stare blankly at the screen and whisper “Oops�: things like deleting a database or website, or overwriting three-days worth of work, or accidentally emailing 20,000 people.

Errors cover everything, from simple syntax errors like forgetting a } to fatal errors and computational errors.

When an error is so subtle and hard to find that it is almost beautiful, I would call it an oversight. This happens when a block of code is forced to handle a completely unforeseen and very unlikely set of circumstances. It makes you sit back and think “Wowâ€�: like seeing a bright rainbow or shooting star, except a bit less romantic and not quite as impressive when described to one’s partner over a candlelit dinner.

This article discusses some of the spectacular and beautiful mistakes I have made, and the lessons learned from them. The last three are my favorites.

Leaving Debug Mode On

The first two mistakes in this article were full-fledged cock-ups.

When I first started freelancing, I wrote a set of PHP libraries for handling database queries, forms and page templating. I built a debugging mode into the libraries at a fairly deep level, which depended on a global variable called $DEBUG.

I also kept a local copy of every major website I worked on, for developing, debugging and testing. So, whenever a problem occurred, I could set $DEBUG=1; at the top of the page, and it would tell me various things, such as all the database statements it was running. I rarely used this debug method on live websites; it was for local usage only.

Except for one day when I was working late at night, debugging a minor problem on a popular e-commerce website. I put $DEBUG=1; at the top of several pages and was switching between them. It was all a tired midnight blur, but in the end I somehow added the debugging variable to the most important page on the website, the one after the user clicks “Pay now,� and I uploaded it to the live website.

The next morning, I went out early for the whole day. I got home at 9:00 pm to find 12 increasingly frustrated messages on my answering machine and a lot more emails. For about 20 hours, whenever a customer clicked pay, they saw something like this:

Debug-mode-db-statements in My Favorite Programming Mistakes

What customers saw when they clicked “Pay.�

It took me about 10 seconds to fix, but a lot longer to apologize to my client for a day’s worth of lost orders.

Lessons Learned

I held an internal inquiry into this issue and established the following:

  1. Avoid working late at night;
  2. Make a full test order whenever I make a change to the order processing, however minor;
  3. Make sure debug statements never see the light of day on a live website;
  4. Provide some emergency contact details for me and/or a back-up programmer.

Thoughtful Debugging

For the third requirement, I implemented a couple of functions like this, to make sure that debugging messages are outputted only when I am looking at the website:

function CanDebug() {
 global $DEBUG;
 $allowed = array ('127.0.0.1', '81.1.1.1');
 if (in_array ($_SERVER['REMOTE_ADDR'], $allowed)) return $DEBUG;
 else return 0;
}
function Debug ($message) {
  if (!CanDebug()) return;
  echo '<div style="background:yellow; color:black; border: 1px solid black;';
  echo 'padding: 5px; margin: 5px; white-space: pre;">';
  if (is_string ($message)) echo $message;
  else var_dump ($message);
  echo '</div>';
}

Then, whenever I want to output something for debugging, I call the Debug function. This calls CanDebug to check the requesting IP address and the $DEBUG variable. The $allowed array contains my IP address for local testing (127.0.0.1) and my broadband IP address, which I can get from WhatIsMyIPAddress.com.

Then I can output things like this:

$DEBUG = 1;
Debug ("The total is now $total"); //about a debugging message
Debug ($somevariable); //output a variable
Debug ("About to run: $query"); //before running any database query
mysql_query ($query);

And I can be confident that no one but me (or anyone sharing my IP address, such as my boss) will ever see any debugging messages. Assuming that the variables above were set, the above code would look like this:

Debug-yellow in My Favorite Programming Mistakes

Outputting debugging statements.

For extra safety, I could have also put the error messages inside HTML comments, but then I would have had to sift through the HTML source to find the bit I was looking for.

I have another related useful bit of code that I can put at the top of a page or configuration file to ensure that all PHP notices, warnings and errors will be shown to me and only me. If the person is not me, then errors and warnings will be outputted to the error log but not shown on screen:

if (CanDebug()) {ini_set ('display_errors', 1); error_reporting (E_ALL);}
else {ini_set ('display_errors', 0); error_reporting (E_ALL & ~E_NOTICE);}

Debuggers

The method above is useful for quickly finding errors in very specific bits of code. There are also various debugging tools, such as FirePHP and Xdebug, that can provide a huge amount of information about a PHP script. They can also run invisibly, outputting a list of every function call to a log file with no output to the user.

Xdebug can be used like this:

ini_set ('xdebug.collect_params', 1);
xdebug_start_trace ('/tmp/mytrace');
echo substr ("This will be traced", 0, 10);
xdebug_stop_trace();

This bit of code logs all function calls and arguments to the file /tmp/mytrace.xt, which will look like this:

Xdebug-example in My Favorite Programming Mistakes

Contents of an Xdebug stack trace showing every function call.

Xdebug also displays much more information whenever there is a PHP notice, warning or error. However, it needs to be installed on the server, so it is probably not possible in most live hosting environments.

FirePHP, on the other hand, works as a PHP library that interacts with an add-on to Firebug, a plug-in for Firefox. You can output stack traces and debugging information directly from PHP to the Firebug console — again, invisible to the user.

For both of these methods, a function like CanDebug above is still useful for making sure that not everyone with Firebug can view the stack traces or generate big log files on the server.

Turning Debug Mode Off

Debugging emailing scripts is more involved. Definitively testing whether a script is sending an email properly is hard without actually sending the email. Which I once did by mistake.

A few years ago, I was asked to create a bulk emailing script to send daily emails to over 20,000 subscribed users. During development, I used something similar to the CanDebug function above, so that I could test the emailing script without actually sending an email. The function to send emails looked something like this:

function SendEmail ($to, $from, $subject, $message) {
  if (CanDebug() >= 10) Debug ("Would have emailed $to:\n$message");
  else {
    if (CanDebug()) {$subject = "Test to $to: $subject"; $to = "test@test.com";}
    mail ($to, $subject, $message, "From: $from");
  }
}

If I set $DEBUG=1, it would send the emails (all 20,000 of them) to a test address that I could check. If I set $DEBUG=10, it would tell me that it was trying to send an email but not actually send anything.

Soon after launch, a problem arose with the script. I think it ran out of memory from doing some inefficient processing 20,000 times. At some point, I went into fix something, forgot to set my $DEBUG variable (or else my broadband IP address had inconveniently changed) and mistakenly emailed 20,000 people.

I apologized to the agency I was working for, but thankfully nothing much came of it. I guess that spam filters blocked many of the messages. Or perhaps the recipients were merely pleased that the email did not contain anything for them to do or read.

Lessons Learned

I was very glad that I just put “test� in the subject and message of the test email, and not some statement reflecting how frustrated I was getting at that particular bug. I learned a few lessons:

  1. Be extra careful when testing bulk emailing scripts — check that the debug mode is working.
  2. Send test emails to as few people as possible.
  3. Always send polite test messages, like “Please ignore, just testing.â€� Don’t say something like “My client is a ninny,â€� in case it gets sent to 20,000 unsuspecting investors.

PHP Blank Page

Now we’re in the realm of hard-to-spot errors, rather than cock-ups. If you’d like to see a hard-to-debug error in PHP, bury the following somewhere deep in your code:

function TestMe() {TestMe();}
TestMe();

Depending on the browser and the server’s Apache and PHP versions, you might get a blank page, a “This Web page is not available,â€� a fatal error due to running out of memory, or the option to “Saveâ€� or “Openâ€� the page, like this:

Test-save-as in My Favorite Programming Mistakes

Infinite recursion, as dealt with by Firefox 3.6.

It basically causes infinite recursion, which can cause a Web server thread to run out of memory and/or crash. If it crashes, a small trace may or may not be left in the error log:

[Mon Jun 06 18:24:10 2011] [notice] child pid 7192
  exit signal Segmentation fault (11)

But this gives little indication of where or why the error occurred. And all of the quick debugging techniques of adding lines of output here or there may not help much, because as long as the offending code gets executed, the page will seem to fail in its entirety. This is mainly because PHP only periodically sends the HTML it generates to the browser. So, adding a lot of flush(); statements will at least show you what your script was doing immediately before the recursive error.

Of course, the code that leads to this error might be much more convoluted than the above. It could involve classes calling methods in other classes that refer back to the original classes. And it might only happen in certain hard-to-duplicate circumstances and only because you’ve changed something else somewhere else.

Lessons Learned

  1. Know the locations of error log files, in case something gets recorded there.
  2. This is where stack-tracing debuggers such as Xdebug can be really handy.
  3. Otherwise, set aside plenty of time to go through the code line by line, commenting out bits until it works.

Wrong Variable Type

This error often happens with databases. Given the following SQL statements…

CREATE TABLE products (
  id INT PRIMARY KEY AUTO_INCREMENT,
  name VARCHAR(60),
  category VARCHAR(10),
  price DECIMAL(6,2)
);
INSERT INTO products VALUES (1, 'Great Expectations', 'book', 12.99);
INSERT INTO products VALUES (2, 'Meagre Expectations', 'cd', 2.50);
INSERT INTO products VALUES (3, 'Flared corduroys', 'retro clothing', 25);

… can you guess what is returned when you run the following?

SELECT * FROM products WHERE category='retro clothing';

The answer is nothing, because the category column is only 10 characters long, and so the category of the last product is cut off at retro clot. Recently edited products or new menu items suddenly disappearing can create a lot of confusion. But fixing this is generally very easy:

ALTER TABLE products MODIFY category VARCHAR(30);
UPDATE products SET category='retro clothing' WHERE category='retro clot';

Database-col-error in My Favorite Programming Mistakes

The category has been cut off after 10 characters, as shown in phpMyAdmin.

I made a more serious error with the first major e-commerce website that I worked on. At the end of the ordering process, the website would ask the customer for their credit card details and then call a Java program, which would send a request to Barclays ePDQ system to take the payment. The amount was sent as the number of pence. Not being very familiar with Java, I based the code on an example I found, which represented the total as a short integer:

short total;

The Java program was called on the command line. If it returned nothing, then the transaction was considered successful, emails were sent, and the order was fulfilled. If there was an error in processing the card, the program returned something like “Card not authorized� or “Card failed fraud checks.�

Short integers can store a value between -32768 and +32767. This seemed plenty to me. But I neglected that this was in pence, not pounds, so the highest possible total was actually £327.67. And the really bad news was that if the amount was higher than that, then the Java program simply crashed and returned nothing, which looked exactly like a successful order and was processed as normal.

It took a few months and several large unpaid transactions before the error was spotted, either by the accounting department or a vigilant and honest customer. I believe they recovered all of the payments in the end.

Lessons Learned

  1. When assigning a type to a database column or variable, be generous and flexible, and try to plan ahead.
  2. Make sure that a program succeeding responds differently to a program crashing.

1p Errors

Among my favorite mistakes are those that cause a discrepancy of just 1 pence (or cent, öre or other denomination). I like them because they are usually very subtle and hard to trace and often boil down to a rounding error. I have to become a mathematical detective, a job that I would readily do if enough work was available.

For a website a few years ago, I needed to create a quick JavaScript function to output a monetary amount. I used this:

<script type="text/javascript">
function GetMoney (amount) {return Math.round (amount * 100) / 100;}
</script>

However, it was quickly discovered that amounts like 1.20 were displayed as 1.2, which looks unprofessional. So, I changed it to this:

<script type="text/javascript">
function GetMoney (amount) {
  var pounds = Math.floor (amount);
  var pence = Math.round (amount * 100) % 100;
  return pounds + '.' + (pence < 10 ? '0' : '') + pence;
}
</script>

The main difference is the extra 0 in the last line. But now that the pence is computed separately, the modulus % operator is needed to get the remainder when the amount is divided by 100. Try to spot the unlikely circumstances under which this code would cause an error.

It happened on a website that sold beads. I have since learned that beads can be sold in a huge range of amounts and configurations, including customized mixes containing fractional quantities. Once, a customer bought 1.01 of an item costing £4.95, and ended up paying just £4.00. This is because the amount was passed as 4.9995. The rounded pence was 100, and % 100 left 0 pence, and so the pounds were floored to 4.

Beads-getmoney in My Favorite Programming Mistakes

A subtle rounding error on Beads Unlimited‘s website, where 101 beads sold at £4.95 per 100 were billed as £4 instead of £5.

This is still just a rounding error, a superset of 1p errors. I made a quick change to fix it:

<script type="text/javascript">
function GetMoney (amount) {
  var pounds = Math.floor (amount);
  var pence = Math.floor (amount * 100) % 100;
  return pounds + '.' + (pence < 10 ? '0' : '') + pence;
}
</script>

This wasn’t a great fix, though, because it rounded £4.9995 down to £4.99, which put it out of sync with any corresponding server-side calculations. But even more dramatically, when someone ordered 0.7 of something costing £1.00, it ended up displaying 69p instead of 70p! This is because floating-point numbers like 0.7 are represented in binary as a number more like 0.6999999999999999 (as described in a recent Smashing Magazine article), which would then be floored to 69 instead of rounded up to 70.

This is a true 1p error. To fix this, I added another rounding at the beginning:

<script type="text/javascript">
function GetMoney (amount) {
  var pence = Math.round (100 * amount);
  var pounds = Math.floor (pence / 100);
  pence %= 100;
  return pound + '.' + (pence < 10 ? '0' : '') + pence;
}
</script>

Now, I had four fairly complicated lines of code to do one very simple thing. Today, while writing this article, I discovered a built-in Javascript function to handle all of this for me:

<script type="text/javascript">
function GetMoney (amount) {return amount.toFixed (2);}
alert (GetMoney (4.9995) + ' ' + GetMoney (0.1 * 0.7));
</script>

Discounting With PayPal

PayPal is a 1p error waiting to happen. Many websites offer voucher codes that give a percentage off each order, computed at the end of the order. If you ordered two items costing 95p, the subtotal would be £1.90, and you would receive a 19p discount, for a total of £1.71.

However, PayPal does not support this type of discounting. If you want PayPal to display the items in your shopping basket, you have to pass each one separately with a price and quantity:

<input name="item_name_1" type="hidden" value="My Difficult Product" />
<input name="amount_1" type="hidden" value="0.99" />
<input name="quantity_1" type="hidden" value="1" />

Thus, you have to discount each item separately. 10% off of 95p leaves 85.5p. PayPal doesn’t accept fractional amounts, so you have to round up to 86p, for a grand total of £1.72 in PayPal, or round down to 85p, for a total of £1.70.

To solve this, I had to also make the website discount each item individually. Instead of just doing 10% × £1.90, it accumulates the discount item by item, using a whole amount of pence each time. Assuming $items is a PHP array of order item objects:

$discount = 0; $discountpercent = 10;
foreach ($items as $item) {
 $mydiscount = floor ($item->price * $discountpercent) / 100;
 $item->priceforpaypal = $item->price - $mydiscount;
 $discount += $mydiscount * $item->quantity;
}

Lessons Learned

  1. Don’t reinvent the wheel, even very small wheels that look easy from the outside.
  2. If you get a 1p discrepancy, check where and how numbers are rounded.
  3. Avoid representing prices using floats when possible. Instead, store the pence or cents as integers; and in databases, use a fixed-point type like DECIMAL.

Daylights Savings

I would not call the last two mistakes in this list “errors.â€� They require a very specific set of fairly rare circumstances, so they are more “oversightsâ€� on the programmer’s part. Oversights are like the acts of terrorism that are excluded by home insurance policies. They go beyond what a programmer could reasonably be expected to think of in advance.

Can you guess what is wrong with the following seemingly innocuous line of code, which selects orders that were completed more than one week ago?

mysql_query ("SELECT * FROM orders WHERE completeddate < '" .
  date ('Y-m-d H:i:s', (time() - 7 * 86400 + 600)) . "'")

I used a similar line in a system for a weekly repeating order. It looked up orders that were completed last week, duplicated them, and processed them for the current week. 86,400 is the number of seconds in a day, so time() - 7 * 86400 was exactly one week ago, and +600 gives it a leeway of 10 minutes.

This was a low-budget method of implementing repeating orders. Given more time, I would have created a separate table and/or shopping basket to differentiate between repeating and non-repeating items. As it happened, this code worked well for several months and then mysteriously failed in late March.

It took ages to recover from the oversight and to process those orders manually. And even longer to find the reason, especially because I had to fool the whole website into thinking that it was a different date.

I’ve pretty much given the trick away in the title of the section: I forgot to account for daylight savings, when one week is less than 7*86400 seconds.

Compare the following three ways of getting the date exactly one week ago. The last is the most elegant. I only recently discovered it:

$time = strtotime ('28 March 2011 00:01');
echo date ('Y-m-d H:i:s', ($time - 7 * 86400)) . '<br/>';
echo date ('Y-m-d H:i:s', mktime (date ('H', $time), date ('i', $time), 0,
  date ('n', $time), date ('j', $time) - 7, date ('Y', $time)));
echo date ('Y-m-d H:i:s', (strtotime ('-1 week', $time))) . '<br/>';

Lessons Learned

Drawing general lessons from a mistake like this is difficult, but there is a specific lesson here:

  1. On websites that repeat things, remember to consider time zones and daylight savings.
  2. Consider storing all times and dates in UTC (Coordinated Universal Time).
  3. Don’t reinvent the time wheel either: strtotime is a powerful function.

The next time I do a website for repeating orders, I won’t make that mistake.

Spam Error

My favorite mistake of all time is an even subtler oversight. Can you spot what is unusual about these made-up email addresses:

  • beckyrsmythe@somewhere.com
  • glynnfrenk@someplace.co.uk

A few years ago, spammers began targeting contact forms on websites, injecting headers and forcing the forms to send millions of messages to harvested addresses and later just to the form’s usual recipient.

This necessitated anti-spam filtering directly on the Web page that processed the form. When I was first asked to do this, I combined a few anti-spam scripts that I found on the Internet. Spammers now often put blocks of random letters in their messages to try to fool spam filters. So, one anti-spam technique is to check for these random letters by looking for certain consonants in a row.

I read somewhere that words with more than six consonants in a row are extremely rare in Latin-alphabet languages. The most consonants in a row in English is six: in “latchstring.� Other languages like Polish have many more diphthongs than English (dz, sz, cz), so I used seven to be on the safe side. The PHP code uses a regular expression and looks something like this:

foreach ($_POST as $key=>$val) {
        if (preg_match ('/[bcdfghjklmnpqrstvwxyz]{7,}/i', $val))
                die ("<h1>Spam Detected</h1><p>Too many consonants in $val</p>");
}

I had to revisit the script when it blocked someone with an email address like the ones above:

Spam-error in My Favorite Programming Mistakes

A customer whose email address had seven or more consonants in a row would have received this upon submitting a form.

Based on a small sample of 10,000, I found that approximately 0.2% of all email addresses would be filtered as spam, according to the rule above. One valid email address had nine consonants in a row. Increasing the number of allowed consonants from seven to ten decreases the script’s usefulness significantly, so instead I considered the letter “yâ€� a vowel.

This worked well, until a customer from Cwmtwrch near Swansea attempted to place an order. According to my sample, only 1 in 5000 customers have a name, email or address like this. Small but important, especially if you are one of them. So, I allowed “w� as a vowel, too. You can check for this in your own customer database with a MySQL query like the following:

SELECT CONCAT_WS(' ',firstname,lastname,email,city,address1,address2) AS thefields
FROM visitors HAVING LENGTH(thefields)>20 AND thefields RLIKE '[bcdfghjklmnpqrstvwxz]{7,}'

Lessons Learned

I learned that my anti-spam script was blocking potential customers only once my client forwarded me their complaints. When I received the first one (an email address containing a couple of “yâ€�s for vowels), I was amazed. It seemed so unlikely. A couple of weeks later, when shoppers in a small Welsh village were still mysteriously unable to place an order, I almost didn’t believe it. It seems that if a piece of code has a hole, someone somewhere will fall into it. So, I’ve learned to do the following:

  1. Take all error reports and complaints seriously. They may uncover something amazing like this.
  2. Jot down the really unlikely mistakes. You will impress other programmers… or me, at least

More specifically, logging everything that is processed by a spam filter is useful, because you can then try to spot any false positives or false negatives and use them to improve the filter.

Conclusion

Programming mistakes come in many shapes and sizes. This article has ranged from the very obvious cock-ups to the extremely subtle oversights. And it looks like they all support Murphy’s Law: if something can go wrong, it will.

However, for every mistake found, reported and fixed, probably a few more aren’t. Either they aren’t found (because they are so incredibly subtle that the set of circumstances that would cause them has never happened) or they aren’t reported (because most users don’t bother reporting errors — which is why any error reports that do come in should be taken seriously) or they aren’t fixed (because doing so would be too time-consuming or expensive).

Mistakes are also more likely to be found on popular websites, mainly because so many more people are putting those websites to work, but partly because fixing one mistake could cause another somewhere else.

The best lessons, therefore, are to plan ahead and to debug thoughtfully.

(kw)


© Paul Tero for Smashing Magazine, 2011.


Sunrise Color Palettes

Advertisement in Sunrise Color Palettes
 in Sunrise Color Palettes  in Sunrise Color Palettes  in Sunrise Color Palettes

Once the sun had set on our Sunsets and Color Palettes post the search was underway for the yin to its yang. Knowing how photographers like to turn to the skies to capture the natural colors that each new day paints upon the waiting canvas, we have turned our attentions there as well. Once more showcasing some inspiring photos, this time of sunrises, and offering the accompanying color palettes derived from them.

The first time around was such a hit, and even as one reader commented asking to see a version of the posts from this side of the coin, we were planning this one. The differences in the colors between the skies at sunrise versus sunset seems somewhat more subdued, and less fiery. The softer colors that tend to show up in skies come morning ease us into our days, and in this case, provide oodles of inspiration for designers and more.

The Goods

Sunrise in Kanyakumari, Tamil Nadu, India by Mehul Antani
Kanyakumari in Sunrise Color PalettesCp-kanyakumari in Sunrise Color Palettes

Sunrise in South Korea by Puck Goodfellow
Southkorea in Sunrise Color PalettesCp-south-korea in Sunrise Color Palettes

Sunrise by David Ashford
By-david-ashford in Sunrise Color PalettesCp-david-ashford in Sunrise Color Palettes

Sunrise through the clouds by Chris Betcher
Through-the-clouds in Sunrise Color PalettesCp-through-the-clouds in Sunrise Color Palettes

Sunrise by Stephen Bowler
By-stephen-bowler in Sunrise Color PalettesCp-by-stephen-bowler in Sunrise Color Palettes

The First Sunrise of 2010 by ptrktn
First-of-2010 in Sunrise Color PalettesCp-first-of-2010 in Sunrise Color Palettes

sunrise by teknorat
By-teknorat in Sunrise Color PalettesCp-by-teknorat in Sunrise Color Palettes

sunrise by Shirl
By-shirl in Sunrise Color PalettesCp-by-shirl in Sunrise Color Palettes

Sunrise 5 by Matthew Juzenas
Sunrise-5 in Sunrise Color PalettesCp-sunrise-5 in Sunrise Color Palettes

Sunrise May 15 2007 by Paul Aloe
May-15 in Sunrise Color PalettesCp-may-15 in Sunrise Color Palettes

Sunrise in Odaiba by Kiên Nguyen Phan
In-odaiba in Sunrise Color PalettesCp-in-odaiba in Sunrise Color Palettes

Sunrise – Cascade Mountains Backdrop by brewbooks
Cascade-mountains-backdrop in Sunrise Color PalettesCp-cascade-mountains in Sunrise Color Palettes

Sunrise over Flynn Reef 2 by Alpha
Flynn-reef-2 in Sunrise Color PalettesCp-flynn-reef-2 in Sunrise Color Palettes

Sunrise by Andy Wright
By-andy-wright in Sunrise Color PalettesCp-andy-wright in Sunrise Color Palettes

Sunrise by Ken Dyck
By-ken-dyck in Sunrise Color PalettesCp-by-ken-dyck in Sunrise Color Palettes

Sunrise by Richard Smith
By-richard-smith in Sunrise Color PalettesCp-by-richard-smith in Sunrise Color Palettes

Sunrise Kawana Island 15th April 2010 by thinboyfatter
Kawana-island in Sunrise Color PalettesCp-kawana-island in Sunrise Color Palettes

Sunrise by John Vetterli
By-john-vetterli in Sunrise Color PalettesCp-by-john-vetterli in Sunrise Color Palettes

Sunrise by John Vetterli 2
By-john-vetterli-2 in Sunrise Color PalettesCp-by-john-vetterli-2 in Sunrise Color Palettes

Sunrise by Peter Pearson
By-peter-pearson in Sunrise Color PalettesCp-by-peter-pearson in Sunrise Color Palettes

Sunrise near Uluru by David Ashford
Near-uluru in Sunrise Color PalettesCp-near-urulu in Sunrise Color Palettes

Sunrise by Jody McNary
By-jody-mcnary in Sunrise Color PalettesCp-by-jody-mcnary in Sunrise Color Palettes

Sunrise at Perth International Airport by planegeezer
Perth-international-airport in Sunrise Color PalettesCp-perth-international in Sunrise Color Palettes

Sunrise over St Helier Jersey by David James Ovens
St-helier in Sunrise Color PalettesCp-st-helier in Sunrise Color Palettes

Sunrise by David Ashford 2
By-david-ashford-2 in Sunrise Color PalettesCp-david-ashford-2 in Sunrise Color Palettes

Sunrise In Kaashi Dhoo Kandu by Mohammed Malick
Kaashi-dhoo in Sunrise Color PalettesCp-kaashi-dhoo in Sunrise Color Palettes

Sunrise by Jenny Huang
By-jenny-huang in Sunrise Color PalettesCp-by-jenny-huang in Sunrise Color Palettes

sunrise by dcJohn
By-dcjohn in Sunrise Color PalettesCp-by-dcjohn in Sunrise Color Palettes

Sunrise over the high desert of south Idaho by Charles Knowles
South-idaho in Sunrise Color PalettesCp-south-idaho in Sunrise Color Palettes

sunrise by Ben Britten
By-ben-britten in Sunrise Color PalettesCp-ben-britten in Sunrise Color Palettes

Sunrise in the Black Forest by Schwarzerkater
Black-forest in Sunrise Color PalettesCp-black-forest in Sunrise Color Palettes

Sunrise by Frapestaartje
By-frapestaartje in Sunrise Color PalettesCp-by-frapestaartje in Sunrise Color Palettes

Sunrise @ Vilano Beach, FL by Don Dearing
Vilano-beach in Sunrise Color PalettesCp-vilano-beach in Sunrise Color Palettes

Sunrise by U. S. Fish and Wildlife Service – Northeast Region
By-fish-and-wildlife in Sunrise Color PalettesCp-by-fish-and-wildlife in Sunrise Color Palettes

sunrise by John Kratz
By-john-kratz in Sunrise Color PalettesCp-by-john-kratz in Sunrise Color Palettes

(rb)


Best Practices For Designing Websites For Kids

Advertisement in Best Practices For Designing Websites For Kids
 in Best Practices For Designing Websites For Kids  in Best Practices For Designing Websites For Kids  in Best Practices For Designing Websites For Kids

Designing websites and related media for kids presents plenty of opportunities for Web designers. Openings are available at many businesses and schools, as well as through parents and kids themselves, giving designers many ways to find work on electronic and print projects that appeal to kids. The types of work range from interface designs for video games to websites for birthday parties.

There was a time when kids’ websites were brash and busy, packed with colors and cartoon typography. Fortunately, the scale of the children’s market across most product ranges has resulted in rapid innovation in recent years. Most websites aimed at children (or children and adults) now follow principles that take some account of kids’ perspectives on Web design.

Dna-kids-homepage in Best Practices For Designing Websites For Kids

Both young kids and teenagers appear to like many of the same design traits that adults like, including clarity and high-quality content. At the same time, kids seem to enjoy a wider range of interactive features and greater novelty. This article explores child- and teen-friendly Web design guidelines and looks at the steps designers should consider before getting involved in work that will be marketed to kids and their parents or caregivers.

Hopefully, Web designers will be able to use these guidelines to attract more business from clients who deliver Web services to children, by demonstrating an awareness of the needs of this special age group.

Show Respect

Children become sophisticated consumers from a surprisingly early age. They are sensitive to age-targeting and bias in website design, so it’s important not to talk down to them.

A designer’s best defence against patronizing youngsters is to get some kids to comment on the design in the planning stage, because there’s a difference between remembering what it was like to be a kid and being a kid. This distinction operates on a number of levels in a design, ranging from the stylistic preferences discussed on Jacob Nielson’s usability website to the emerging behaviors brought on by widespread generational changes to Internet use.

Lego’s shopping website shows considerable respect for kids and parents alike. Products are arranged in clear categories, the overall styling is clean and consistent, and visitors can zoom in on products to see exactly what they will be buying. Kids can browse and navigate freely, while focusing on the product rather than being distracted by intrusive advertising and gimmicks. When they find the product they want, the child can easily draw their parent’s attention to the splendid item they’re about to pay for.

Lego-world in Best Practices For Designing Websites For Kids

Stick To Plain Talk

Research-based guidelines by Usability.gov state that adults like plain speaking as much as kids. Consequently, there is little to be gained from excluding kids from any website by making the language, layout, navigation or typography any more complex than is necessary. At the most basic level, over-elaborate language and dense text risk turning a website into a picture gallery, because the text, the wider message and the sale are lost when a child disengages from most of the content. The approach is simply not necessary because more able or sophisticated readers are happy to read concise language and seek further details as required.

Mr. Men is a website aimed at pre-schoolers and their parents. The straightforward design, with its white space, bright colors, concise text and blocky buttons, draws visitors in. The big buttons filter visitors to age-relevant sections of the website. The website features images of all of the characters, activities for pre-schoolers and shopping options. The shopping is outsourced to stores such as Amazon; as a result, Amazon gets most of the cash, but the owner needs to do very little to maintain the website.

Little-miss-sunshine22 in Best Practices For Designing Websites For Kids
The Mr. Men design may not be flashy or highly interactive, but it stays on task and bridges the gap between two generations very effectively.

Gain Trust

Parents and children look for safe, reputable, secure websites where content is actively moderated and support is on hand. Parents in particular will appreciate a certain amount of hand-holding in the form of accessible tutorials and walkthroughs. One of the most successful websites in recent years to build trust also happens to be one of the most controversial.

The various Sims games and websites (such as the Sims 3 website displayed below) cover a wide range of teenage and adult themes. The characters of players can get blind drunk, stay up all night, have kids way too early and do a good deal more. Electronic Arts gets around parental concerns by using its website to convince parents to trust the company. It does so with a well-rounded and integrated set of support services. The clear interface, familiar features from the games, forums, contact details, concise documentation and abundance of video tutorials all contribute to portraying the games as safe, consequence-free sandbox worlds. From there, it’s not a stretch for many parents to think that letting their kids look after a couple of virtual toddlers is not such a bad idea.

Sims3-homepage in Best Practices For Designing Websites For Kids

One critical part of the hand-holding process for any website is the sign-up process, which Debra Gelman discusses in detail over on A List Apart. The article is recommended reading, because sign-ups are critical to the success of most websites and should be trustworthy and convenient to use.

Web designers might also wish to read through the Byron Report, which investigates the concerns of UK adults regarding children’s websites. The report’s attention on the opinions of adults seems worthy, given that they are the ones completing sales and paying for purchases.

Interact

According to Jacob Nielsen’s research on teenagers, interactive website features (such as forums, mini-games, polls, ranking systems, competitions and 3-D interfaces) are valued by kids if they build a sense of community and foster participation. Bolting such features on will not likely prove effective, because kids will soon see the gaps and re-evaluate the website, despite any initial interest.

Stardoll integrates a range of interactive features and community support very well, offering a glitzy, glamorous look at fashion for tween and teenage girls. Any number of other websites allow you to dress up avatars and chat about your creations online with friends; Stardoll stands out by offering plenty of options for styling avatars and for its friendly and well-integrated community. The interactive community gives it a leg up on websites that offer only interactivity or only a static community.

Stardoll-homepage in Best Practices For Designing Websites For Kids

A recent report (PDF) from PlayScience proposes that the blend of interactive content and community features found on websites such as Stardoll is particularly effective on websites aimed at girls. The research depicts boys as being more focused on games, while girls switch between many different social and interactive activities.

Reward Loyalty

Kids consider their virtual goods and reputation as meaningful possessions, which is the reason they spend money on advancements, awards, objects and other persistent virtual items. With global sales of virtual goods already running at $7 billion annually, many online businesses would likely benefit from design features that attract and retain customers and that promote repeat purchases.

At present there tends to be a divide between website-specific award and ranking schemes on the one hand and aggregated personal content on social networks on the other. A kid’s badges, high scores, avatars and items are generally specific to a website, while their photos, chats, links and music live on a social networking platform.

Websites looking to capture that all-important loyalty that leads to subscriptions and sales of virtual goods might want to take account of how to build and sustain loyalty. If the economics of the website call for a proprietary approach, then beefing up the internal model is probably necessary. If fuller integration is commercially viable, then standalone systems like CubePoints demonstrate the type of coherent schemes that could be put in place. For example, even a standard WordPress subscription website can bring together a reward scheme and social networking functionality with the quick addition of a
CubePoints plug-in and a forum plug-in.

Cubepoints-homepage in Best Practices For Designing Websites For Kids

Offer Choice

There are many ways to present kids with choices through thoughtful design. Just a few options are consultative polls, competitions, push-button style makeovers and a lot of custom avatars. Typically, these basic elements should gel with the overall style and, particularly, with any other interactivity on the website.

In addition, Web designers might consider it a priority to offer their own in-house or site-specific choices. Opening up choice in this way involves looking at users’ workflow and the motivations underlying their use of the website. The following are a few ways to create more choice:

  • Allowing visitors to adjust the pace and frequency of interaction,
  • Offering flexible or open-ended environments,
  • Varying the range of activities offered,
  • Helping visitors construct and extend their own goals,
  • Offering multiple levels of hand-holding,
  • Enabling the construction and deconstruction of sections of the user’s experience.

Among such options, the greatest choice comes with co-design, where kids go beyond decorating avatars and completing polls and start to independently shape their own gameplay.

FreeRealms is perhaps the most effective co-design website around now. Players learn the interface, play mini-games, advance through levels and collect possessions. Then, quite suddenly, they are running wizard schools, setting up modest online ventures and investing in real estate. This happens without any instruction or guidance from the game, but rather from within the safety of a moderated and fully logged Web environment. For all intents and purposes, the website operates much like Second Life, without the live ammunition.

Freerealms-homepage in Best Practices For Designing Websites For Kids

Aim For High Impact

For some, high-impact Web design equates with 3-D graphics and both feet jammed on the accelerator. This presents a problem, because few things will make the user’s progress through a website go slower than lavish 3-D content. Certain types of gaming websites are suited to in-your-face 3-D experiences, but there are a lot of ways to achieve high impact.

Comic websites (such as those by Marvel and DC Comics) are particularly good at using existing content to bolster subscription services, mainly by recycling characters and artwork from their extensive libraries. Visitors have pretty much instant access to many high-impact static images and the means to build their own mini-comics and heroic characters in 2-D. There’s no need for much 3-D in these circumstances, because the websites are mainly about enjoying the comic book format. Video games and movies linked to recognized comic brands are already licensed to alternative distribution channels.

Marvel-homepage in Best Practices For Designing Websites For Kids

Be Child-Centered

Education Arcade’s report (PDF) discusses attempts to combine video game entertainment and education (or “edutainment�) several years ago. These efforts show the dangers of passing off learning activities as fun by sugar-coating them with mini-games. Some game websites, including Sony’s FreeRealms, have succeeded in offering independent learning within a decidedly gaming world. For now, delivering formal learning through genuinely entertaining websites remains a relatively expensive proposition.

However, Sims 3 and Free Realms are examples of highly flexible but not hugely expensive resources that support a wide range of curriculum priorities. For those who need more convincing, the relatively new start-up MangaHigh is an encouraging effort to combine purposeful number-crunching alongside genuinely entertaining design and gameplay.

The dividing line can be uncertain and contextual, but as soon as kids sense that an activity or interaction prioritizes a lesson ahead of engagement and motivation, they seem to switch off.

Mangahigh-homepage in Best Practices For Designing Websites For Kids

Conclusions

Ordinarily, now would be the time to highlight a couple of points as key considerations. But it might be more helpful to draw attention to a particular approach that hasn’t been covered yet but that stands out from the rest.

Kids enjoy novelty, and adults go to a lot of trouble to organize parties and outings that give kids new ideas and novel experiences. Ideally, a website aimed at kids does the same. Ask yourself what you could offer that would fit seamlessly in their existing Web experience and that would enable them to do something they haven’t done before.

If you want to do that, you’ll need to suppress the urge to start on screen and spend a bit more time in the planning stage. The reward is a much tighter fit between your design and the kids you’re designing for.

Case Studies And Tutorials

The websites identified above as examples of good design share a number of characteristics, including a strong visual style, plenty of color and a focus on clarity. Cartoons are perhaps the most popular style right now, but designers have a lot of options. A look at the Periodic Table of Visualization Methods would help most teams. The right side of the table is the place to pick up ideas on designing for kids.

Periodic-table in Best Practices For Designing Websites For Kids

Archives and Museum Informatics reviews the design process for the Tate Gallery’s online resources for kids aged 6 to 12. The case study, titled “Doing It for the Kids: Tate Online on Engaging, Entertaining and (Stealthily) Educating Six to 12-Year-Olds,â€� offers a step-by-step approach to meeting the design requirements of a large organization. Cartoons and comics are not the only option, but they have a visual language that many kids appreciate. Scott McCloud’s Understanding Comics has been around for a while, and it is an invaluable guide to designing comic art or in a comic style in any media.

Understanding-comics in Best Practices For Designing Websites For Kids

Participants in the 2011 SxSW Interactive festival visualized the entire conference using infographics. Their efforts led to the remarkable display of sketches, charts and diagrams on display at Ogilvy Notes. One of the visualizations is all about Web design for kids and well worth a visit. The chart provides a good starting point for thinking about what factors to take into account when mapping out a website for kids.

Oglivy-screenshot in Best Practices For Designing Websites For Kids

Web designers with strong graphic design skills have a valuable weapon in their arsenal. Those without affordable access to such skills could be at a disadvantage, but it’s surprising how much can be achieved with a digital camera and some cheap software. For example, Comic Life is inexpensive and able to apply a wide range of comic layouts and styles, yielding some fairly credible results in PDF format.

Plasq-homepage in Best Practices For Designing Websites For Kids

Further Resources


3D Modeling Tutorials to Ignite Your Creativity

Advertisement in 3D Modeling Tutorials to Ignite Your Creativity
 in 3D Modeling Tutorials to Ignite Your Creativity  in 3D Modeling Tutorials to Ignite Your Creativity  in 3D Modeling Tutorials to Ignite Your Creativity

3ds MAX, Maya, Zbrush, RealFlow & VRay are all highly regarded software solutions that not only model but also animate, render and create realistic designs. They produce mesmerizing results that can take nearly anything that you can imagine, and transform it into a breathtaking reality. These programs have become something of a magic wand for graphic designers as they are equipped to create near life-like creations. Effectively widening the field of possibilities for what designers can achieve.

This post is a compilation of some of the best 3D Modeling tutorials made using various programs like 3ds MAX, Maya, Zbrush, RealFlow & VRay, so that you can enhance your skills in the third dimension.

The Tutorials

Creating Washroom in Maya

You will learn how to create a Washroom in Maya. This tutorial will be more helpful to those who have basic knowledge of Maya.

Bathroom in 3D Modeling Tutorials to Ignite Your Creativity

Making of Ganesha – God of Wisdom

This is again exclusively a Maya tutorial in which the author has shared his take on creating his Lord’s idol. Very detailed and interesting article.

Ganesha in 3D Modeling Tutorials to Ignite Your Creativity

Making of 3D Render Hover Before The Storm

A very useful tutorial which covers the making of an architectural visualization using Maya, RealFlow, Mudbox and VRay together.

Hover1 in 3D Modeling Tutorials to Ignite Your Creativity

Project Overview: Sheikh Zayed

This tutorial focuses on creating a Portrait that was modeled in Maya, and other parts were covered using ZBrush and Mental Ray.

Sheikh in 3D Modeling Tutorials to Ignite Your Creativity

Create a Grand Piano in Maya Lessons

Learn how to do the modeling of a Grand Piano in this detailed tutorial. You will model the body(exterior) as well as the interior, strings, pins, dampers, hammers and guides.

Piano in 3D Modeling Tutorials to Ignite Your Creativity

Modeling The “Adam Syringe� From “Bioshock�

If you are a video game lover, you will enjoy this tutorial a lot. Learn how to create a high-res model of the “ADAM Syringe� from the popular video game “Bioshock�.

Bioshock in 3D Modeling Tutorials to Ignite Your Creativity

Modelling a Hand in 3D – A quick and effective guide

Enjoy this tutorial on how to make a fantastic hand model. Although this tutorial is in Maya, it can also be replicated in any other 3D program.

Hand-modeling in 3D Modeling Tutorials to Ignite Your Creativity

Video Tutorial: Head Modeling in Maya

In the previous tutorial you learned to model a hand. Now learn how to model a head with this tutorial.

Head-modeling1 in 3D Modeling Tutorials to Ignite Your Creativity

Occlusion Shading Opacity Mapped Geometry In Maya

Possess the knowledge of how to create a custom shading network inside Maya. The author has further used PaintFX and Mentalray.

Shading-maya in 3D Modeling Tutorials to Ignite Your Creativity

Facial Rigging – Maya Tutorial

This is a video tutorial that shows you an easy and understandable way of how to rig a face.

Polyface in 3D Modeling Tutorials to Ignite Your Creativity

Rigging a Cartoon Bottle using Maya

In this tut, the author shows us his methodology to rigg a cartoon bottle using Maya with joints, locators, custom attributes, set driven keys, expressions and constraints.

Rigging-bottle in 3D Modeling Tutorials to Ignite Your Creativity

Interior Design – Modeling a Room

In this tutorial the author shows us how to model a room. This is an important tutorial for the architects and interior designers.

Room-modeling in 3D Modeling Tutorials to Ignite Your Creativity

Model, Texture, and Render a Bathroom Interior Design with Maya

Once again this is another important tutorial for interior designers as they will learn how to give life to a bathroom interior using Maya.

Bathroom-modeling in 3D Modeling Tutorials to Ignite Your Creativity

Making of Dragon

Here the artist has created a lovely Dragon in Maya, sculpted and detailed in ZBrush, textured and composed in Photoshop.

Dragon in 3D Modeling Tutorials to Ignite Your Creativity

Video Tutorial: Realistic Glass of Water

In this video tutorial the artist demonstrates how to create a realistic glass of water (liquid) with Maya Mental ray materials.

Glass-of-water in 3D Modeling Tutorials to Ignite Your Creativity

Procedural Modeling with MEL Script in Maya

For those who want to learn MEL Script in Maya, this tutorial can be of great help.

Procedural-modeling2 in 3D Modeling Tutorials to Ignite Your Creativity

How to Model a Low Poly Building for Games – Maya Tutorial

This tutorial works well for both beginners as well as intermediates. Learn how to model a low poly building for game designs.

Buildings in 3D Modeling Tutorials to Ignite Your Creativity

Character Animation Fundamentals with Maya—Analyzing a walk

In this look at character animation fundamentals you can actually clear your Maya basics. This tutorial is made from scratch to animation so you can brush up your skills.

Character-animation in 3D Modeling Tutorials to Ignite Your Creativity

Super Toon Sample

Learn how to create Maya cartoon character animation through Maya 3d modeling.

Toon in 3D Modeling Tutorials to Ignite Your Creativity

Maya: Simple 2D Eyelid Rigs

Learn how to create eyelid rigs that emote as well.

Eyelid in 3D Modeling Tutorials to Ignite Your Creativity

Making of Little Bunny

Create a wierd and interesting little Bunny with the help of this tutorial.

Bunny2 in 3D Modeling Tutorials to Ignite Your Creativity

Hair Polygon Modeling Tutorial

This tutorial is more for beginners and it throws light on how to create hair polygon modeling.

Hair-polygon in 3D Modeling Tutorials to Ignite Your Creativity

Making of Don’t Beat Me

This is a vast tutorial with multiple programs used along with Maya. The author has also used Mudbox and ZBrush. So you will get opportunity to check out your skills on that software too.

Beatbhanu in 3D Modeling Tutorials to Ignite Your Creativity

Spider Texturing In Maya

This tutorial focuses on texturing a spider for an organic model.

Textured-spider in 3D Modeling Tutorials to Ignite Your Creativity

3D Rendering – Render Layers – Maya Tutorial

Learn how to render layers in Maya through this turorial.

Maya-rendering in 3D Modeling Tutorials to Ignite Your Creativity

(rb)


  •   
  • Copyright © 1996-2010 BlogmyQuery - BMQ. All rights reserved.
    iDream theme by Templates Next | Powered by WordPress