Archive for September, 2012

Batch Resizing Using Command Line and ImageMagick // Free Bash Script


If you deal with images, sooner or later you will want to automate the repeating process of saving different sizes from one source image. If you own Adobe Photoshop and do not save too many output sizes, Photoshop actions are probably quite enough for your needs. However, keeping a Photoshop action up-to-date is quite painful — change a source folder, and you’re screwed.

As you probably noticed in Smashing Magazine’s monthly desktop wallpaper series, especially if you work on wallpapers, preparing them for a plethora of desktop resolutions is quite a task. On my own wallpapers website (Vladstudio), I generate more than 300 JPEG files for each wallpaper! I want my art to reach as many devices as possible, which means I need to publish my wallpapers in as many sizes as I can support. On the other hand, I do not want to spend the rest of my life resizing my artworks — I’d rather draw new ones!

Long ago, I used Photoshop actions to save multiple sizes from a source file, but it quickly became a nightmare to maintain. Photoshop provides a more powerful tool — scripting language (it’s not the same as “actions”, though the concept is similar). When writing a script, you use a programming language to tell Photoshop what to do (compared to actions, where Photoshop records what you do with mouse and keyboard). However, it’s not easy to learn at all, and I also wanted to completely remove Photoshop from process.

The solution I found is ImageMagick — a command-line image manipulation program, available for Windows, Mac and Linux. Unless you are a server administrator, you probably never thought of resizing images using command line. However, after switching to command line, I never looked back at Photoshop for batch resizing.

Using command line is:

  • Easy to expand — adding new sizes takes only one line of code.
  • Easy to maintain — changing folders is as easy as changing one variable.
  • Portable — I can save images on my server as well as my main computer.

Terminal in Python
The bash script in use in Terminal. Large view.

If you have never worked with command line before, it all might look scary at first. However, with a bit of patience, you will find that it’s actually a very powerful tool.

Below is the bash script I wrote, simplified for more universal usage. It takes the following parameters (from either you or from default values):

  • Set of output sizes.
  • Source file.
  • Destination path (path must include the % symbol, which will be replaced by output size, i.e. “800×600”).
  • Optional signature image.

Batch Resize Script
The result after the script was applied. Large view.

Then it resizes source image into every output size, applying a signature. For a better understanding, please look through the comments in source code.

The script requires:

  • imagemagick — to install. Follow instructions for your OS.
  • python — I’m sure your PC already has it installed!

Tested in Ubuntu and Mac OS X. How to use:

  • Save resize.sh to any folder on your computer.
  • Edit the file and set default values for variables (optional).
  • Open Terminal, navigate to this folder, and execute the following command: bash resize.sh.
  • Follow instructions, sit back and enjoy!

The Bash Script

Here is the full bash script. Of course, you can also download it from GitHub.

#!/bin/bash

# Edit the settings below:

# Output sizes - 
# Please note the format: each size is wrapped with quotes, width and height are separated with space.
output=("800 600" "1024 768" "1152 864" "1280 960" "1280 1024" "1400 1050" "1440 960" "1600 1200" "1920 1440" "1024 600" "1366 768" "1440 900" "1600 900" "1680 1050" "1280 800" "1920 1080" "1920 1200" "2560 1440" "2560 1600" "2880 1800")

# If you frequently use the same source file (e.g. "~/Desktop/src.jpg"), 
# set it in "default_src"
default_src="src.jpg";

# If you frequently use the same destination
# (e.g. "~/Desktop/Some_folder/%.jpg"), set it in "default_dst"
# Destination must include "%", it will be replaced by output size, e.g. "800x600"
default_dst="%.jpg";

# Add signature? 
default_sign='y'

# If you frequently use the same signature file (e.g. "~/Desktop/sig.png"), 
# set it in "default_sig"
default_sig="sig.png";

# Gravity is for cropping left/right edges for different proportions (center, east, west)
default_gravity="center"

# Output JPG quality: maximum is 100 (recommended)
quality=100

# ======
# Do not edit below.
# ======
# Welcome to Smashing resizer!
# Written by Vlad Gerasimov from http://www.vladstudio.com
# 
# This script takes one "source" image and saves it in different sizes.
# 
# Requires:
# * imagemagick - http://www.imagemagick.org/
# * python - I'm sure your PC already has it!

# Unfortunately, bash is awful at math operations.
# We'll create a simple function that handles math for us.
# Example: $(math 2 * 2)

function math(){
  echo $(python -c "from __future__ import division; print $@")
}

# To make our script short and nice, here is the "save()" function.
# We'll use it to save each size.

function save(){

  # read target width and height from function parameters
  local dst_w=${1}
  local dst_h=${2}

  # calculate ratio 
  local ratio=$(math $dst_w/$dst_h);

  # calculate "intermediate" width and height
  local inter_w=$(math "int(round($src_h*$ratio))")
  local inter_h=${src_h}

  # calculate best sharpness
  local sharp=$(math "round((1/$ratio)/4, 2)")

  # which size we're saving now
  local size="${dst_w}x${dst_h}"
  echo "Saving ${size}..."

  #crop intermediate image (with target ratio)
  convert ${src} -gravity ${gravity} -crop ${inter_w}x${inter_h}+0+0 +repage temp.psd

  # apply signature
  if [ "${sign}" == "y" ]; then
  convert temp.psd ${sig} -gravity southeast -geometry ${sig_w}x${sig_h}+24+48 -composite temp.psd
  fi

  # final convert! resize, sharpen, save
  convert temp.psd -interpolate bicubic -filter Lagrange -resize ${dst_w}x${dst_h} -unsharp 0x${sharp} +repage -density 72x72 +repage -quality ${quality} ${dst/\%/${size}}

}

# Ask for source image, or use default value
echo "Enter path to source image, or hit Enter to keep default value (${default_src}): "
read src
src=${src:-${default_src}}

# ask for destination path, or use default value
echo "Enter destination path, or hit Enter to keep default value (${default_dst})."
echo "must include % symbol, it will be replaced by output size, e.g. '800x600'"
read dst
dst=${dst:-${default_dst}}

# Ask for signature image, or use default value
echo "Apply signature? (hit Enter for 'yes' or type 'n' for 'no') "
read sign
sign=${sign:-${default_sign}}

# Ask for signature image, or use default value
echo "Enter path to signature image, or hit Enter to keep default value (${default_sig}): "
read sig
sig=${sig:-${default_sig}}

# ask for gravity, or use default value
echo "Enter gravity for cropping left/right edges (center, east, west), or hit Enter to keep default value (${default_gravity}): "
read gravity
gravity=${gravity:-${default_gravity}}


# detect source image width and height
src_w=$(identify -format "%w" "${src}")
src_h=$(identify -format "%h" "${src}")

# detect signature width and height
sig_w=$(identify -format "%w" "${sig}")
sig_h=$(identify -format "%h" "${sig}")


# loop throught output sizes and save each size
for i in "${output[@]}"
do
	save ${i}
done

# Delete temporary file
rm temp.psd

# Done!
echo "Done!"

Please let me know if you have any suggestions for improvements. Or perhaps you use a different technique to batch resize your images? Please share your thoughts, opinions and ideas in the comments section below!

(jvb) (vf)


© Vlad Gerasimov for Smashing Magazine, 2012.


Freebie of the Day: Photoshop Action ‘The Wise Watson’


The nice folks over at Lookfilter.com want to promote their yet to be finished collection of fresh Photoshop actions. Of the announced four actions only one is already available by now. Good for all of us, they give it away for free. Who wouldn’t appreciate a professional photography effect? And that’s exactly what you get for giving away your email address.

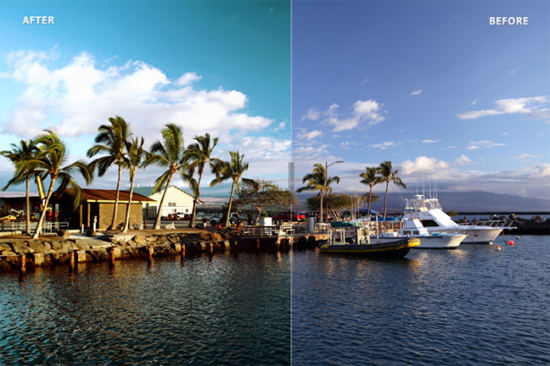
Photoshop Action: The Wise Watson adds Drama to your Photos

Lookfilter gave some interesting names to their collection of photographic effect filters. We have “The Wise Watson”, “The Loaded Leibovitz”, “The Awesome Avedon” and “The Early Eggleston”. People with a little knowledge in photography will probably notice that these all relate to the names of famous photographers. What Lookfilter tries to replicate with each action set is nothing less than the atmosphere that was typical for these photographers. Several different images shown for each action let you judge for yourself how well you think the goal has been met.

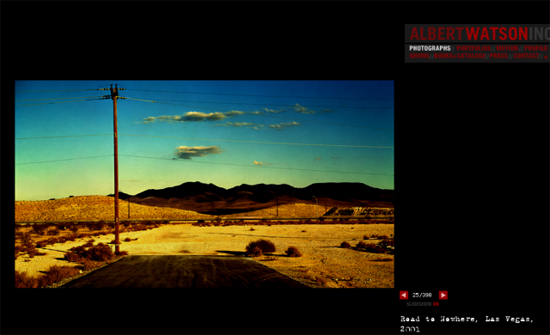
An impressive example taken off the Lookfilter website

It’s easy to show impressive imagery on a website. As it’s a wicked world out there, I was not sure whether the promised effects would really be achieved. So I went ahead and traded off my email address against a download of “The Wise Watson”. The installation ist simple. After having signed up for the newsletter, Lookfilter will send you an email in which you are asked to confirm the subscription. Clicking on that link will take you back to the website, where your download is initiated. You’ll notice the download of a zip-file. Unzip the contained Lookfilter.com.atn and drag and drop it into the actions window of your open Photoshop installation. Not open? Okay, then. Start Photoshop, from the top navigation choose Window, then click Actions. In the Actions window click on the down-arrow situated right under the x-symbol for closing the window on the top right corner. A dropdown opens, where you’ll want to choose “Load Actions”. Your file system opens and you navigate to the folder you unzipped the action to. Choose it, click load, that’s it.

An original photography by Albert Watson (Source: Official Website)

Now you’ll find The Wise Watson at the end of the actions list. All you have to do now, is open an image, open the actions window, highlight The Wise Watson with a single click and press the play button located in the status bar of the actions window. A lot of steps will now automatically be initiated and finally you’ll be presented with the new look of your original.

The Wise Watson is named after photographer Albert Watson who is best known for his dramatic use of colors and lighting. I’m not a professional know-it-all in contemporary photography, but in my humble opinion, Lookfilter’s action does indeed catch the atmosphere of a might-be Watson very well. Again, judge for yourself.

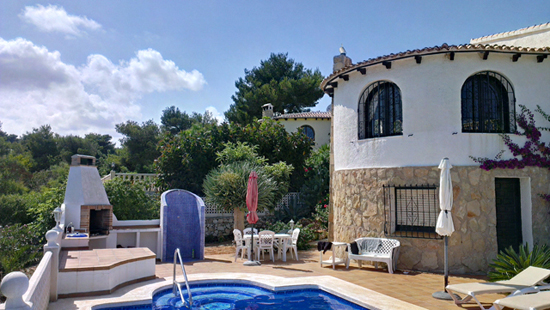
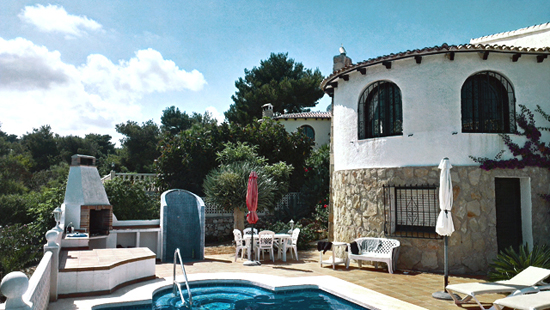
To give you an idea of how the action changes the look of an ordinary photo. I took one of the images of my sadly already passed by vacation and fired the Watson-effect at it. Here is what the picture looks like, before and after:

Before: My little pool villa as my camera really saw it

After: My little pool villa as Watson might have seen it

The Wise Watson is offered free of charge as long as the collection has not been officially launched. At the time of this writing that hasn’t been the case, obviously. So better be quick and download while you still can. As the other filters don’t exactly drive you into bankruptcy either – they accumulate to an affordable 19 USD – you might as well stay relaxed and wait for the day. I’m glad I took The Wise Watson while it was hot, though, and so should you…

Related Links:


The Creative Way To Maximize Design Ideas With Type // Drawing And Mark-Making


As with most designers, being sure that we explore and select the most successful, memorable and stimulating designs is a vital aspect that underpins every project we undertake. For us, the beginning of a new challenge has never been as simple as asking ourselves what might be the best avenue to take and then sitting down at a computer and attempting to fulfill that idea.

After researching the subject matter, we will almost always begin with a sheet of paper and pencil and draw out a variety of design options to help bring together and develop the breadth of ideas that are maturing in our minds. In this article, we will explore the use of drawing and mark-making as an integral part of the creative process.

First Example of Hand Rendered Type
An example of mark-making that helps to formulate design ideas for working with type and image. Note the changes in mark-making that indicate different levels of type.

We have found that exploring design options on paper using drawing and mark-making is a great way to ensure that we are moving in the right direction with a project; plus, we don’t think this working process can be beaten for stimulating unexpected solutions that would otherwise have been very unlikely to see the daylight. We‘ll focus on different types of drawing and mark-making as problem-solving tools and skills; they form a vital part of visualizing and exploring design alternatives that involve quantities of type, with or without images.

Why Textural And Tonal Qualities Of Type Should Be Addressed In Drawing

Letterforms, lines of type and words come together with different tonal values as well as varying characteristics of patterning; depending on the darkness of tone generated, together with the scale and nature of texture, a viewer is attracted to a greater or lesser degree. Some great examples of this can be found by looking at the newspaper and magazine designs of Jacek Utko. Looking at all of the sample pages below, we are struck by the number of dynamic levels of text created by different typefaces, point sizes, weights and measures, as well as the imagery. The changing tonal values especially tempt and guide the reader through the pages in a particular sequence.

Jacek Utko
Working with art direction from Liudas Parulskis and Vilmas Narecionis, Jacek Utko has designed some captivating pages for the weekend section of Lithuanias Verslo Zinios. The layouts make dramatic use of textural and tonal diversity and also contrast of scale.

The textural and tonal qualities in layouts are used as much to help guide the audience in a particular order as for aesthetics. These qualities should be effectively captured through drawing and mark-making if the visual of a concept is to be sufficiently realistic to enable adequate design judgments to be made. This can be fairly easily achieved by using a relatively speedy design shorthand practiced by and familiar to many designers. Larger type is lettered in, capturing the stylistic essence, weight and proportions of the desired letterforms; text can be lined, or “greeked,� in using a mix of mark-making techniques, pens, pencils and/or varied pressure to indicate textural and tonal differences.

The examples featured in this article go only some of the way to demonstrating and capturing the infinite rhythms and varieties of typographic alternatives and combinations, but they do still demonstrate that even during early-stage drawing of visuals, capturing subtleties and changes of pace is essential. Drawing and mark-making styles can be developed to indicate and capture the textural and tonal difference that are present when working, for example, with all-caps sans-serif letterforms, as opposed to the very different visual “beat� that comes from uppercase and lowercase characters.

Finding The Right Marking Tools And Paper

In highlighting the refinement of this type of design drawing, we should also briefly comment on the tools that can be used to express these subtle typographic nuances. We work with a smooth lightweight paper that in the UK is called layout paper; the semi-transparent properties of this inexpensive material are great for tracing through from one sheet to another, making for speedy refinement of drawings. Many of the designers we speak to use a mix of mark-making tools, depending on the characteristics they wish to create; some work with marker pens, others prefer fiber-tipped fine-line pens, and some draw with soft pencils. The one aspect that these choices seem to have in common is that they enable the designer to vary the quality of the mark simply by varying the pressure: press hard to create a thicker, darker mark, and press more gently to create a lighter, finer tone.

Developing Your Own Design Shorthand

Returning to the description of this style of visualizing as being “relatively speedy,� in reality, this process can be time-consuming, and while the results are not necessarily great in detail, this is thoughtful work that we certainly find to be the most time-efficient and creative way to work, particularly when confronted by completely new design challenges.

The drawing and mark-making in visuals that we are discussing here function on a number of levels. They capture alternatives of the textural and tonal details of layout; they are also a great way to explore different compositional alternatives; and they can be really helpful when used as templates or patterns to help streamline the process from marking to final design.

Typographic texture and tone will make different facets of a design more or less prominent. Choices of face, color, type size, tint, weight, inter-character spacing, line spacing and overall spatial distribution will affect the density of type and, consequently, the lightness or dark of the work. All of these aspects can be captured well with drawings and mark-making, affecting not only tonal values, but also the subtle textural qualities of type. Too often, visuals capture only the scale and position of type, without showing more detailed characteristics.

Aleksandrs Golubovs
Aleksandrs Golubovs’ layout deals with composition and does not show hierarchy or changes in typeface, point size, weight or leading. Minimal additional work with more varied mark-making would easily capture all of these missing elements.

The examples below demonstrate that we are not suggesting hugely time-consuming mark-making, but rather merely sufficient variety to convey a realistic and satisfying impression.

Mark Making 1

Mark Making 2
The visuals above are examples of different mark-making styles that demonstrate changes in weight, scale, leading and case. A mixture of marker, pen and pencil have been used here, but any tools may be used; ideally, though, tools that create marks of different quality in response to varied pressure are best.

Why Is Visualizing So Helpful To Designing With Type?

We take the view that using drawing and mark-making to produce visuals is an excellent way to develop ideas and extend design in order to explore creative possibilities. Drawing often pushes us into unexpected and exciting avenues of design that we might not have otherwise considered. An amazing link is forged between the brain and hand, effectively enabling the translation and visualization of even the most subtle design ideas, including textural and tonal variations. The act of drawing is an expression of this link. There are plenty of well-known quotes about the connections between the head, the heart and the hand. John Ruskin, the British artist and writer, said in the late-19th century, “The education of a young artist should always be a matter of the head and heart and the hand.� Art and design, Ruskin said, “must be produced by the subtlest of all machines, which is the human hand.�

In 1950, Richard Guyatt, the British designer and academic, described the three interrelated elements of design as the combined action of head, heart and hand. The head provides logic; the heart, emotional stimuli; and the skill that gives form to design concepts is executed by the hand.

As part of our work with students and in our own design practice, we often use two levels of drawing to visualize. These two forms we describe as micro and macro. Micro-visualizing within more complex design challenges explores the alternatives of detail “close in�; for example, how a heading, subheading and paragraph of text come together or how an image and caption unite.

When the most effective combination is decided upon, the relationships and combinations can then be developed and applied across other micro aspects of the design challenge. Taking a number of these effectively resolved micro-visuals, we would progress to our second level of visualization: macro-visualizing. By using the semi-transparent properties of layout paper, we would speedily trace through and bring together a group of micro-visuals to form an entire “page� grouping. It is at this stage that we would draw in the page’s parameters and try out different relationships of scale and varied compositional possibilities.

Jones and Smith

Sticky Graphics Thumbnail 1

Sticky Graphics Thumbnail 2

Sticky Graphics Thumbnail 3

Sticky Graphics Type Visuals
These images show some of the micro-thumbnails for our book design for “Sticky Graphics.� Given that the book is about memory devices, we wanted to be sure to create a lasting impression with type. In our design drawings, shown above, we indicate possible textural and tonal variations and hierarchy for the design credits and captioning; also, we have noted the compositional aspects needed for these micro-elements of the design. The final image shows some primary digital interpretations of these drawings.

Abigale Macro 1

Abigale Macro 2

Abigale Macro 3
These three images are by graphic designer Abigail Urwin, who has kindly shared some of her macro design drawing and visuals. In these examples, Abigail is developing designs with type for a news spread in a magazine. These pages will ultimately contain five separate smaller articles that come together under a common theme. In the first two images, she is exploring alternative ways to design these articles. In the third image, Abigail has started to show how she might bring these five articles together in the one spread.

Layout Making It Fit Drawn Micro Visuals

Layout Digital Visual 1

Layout Digital Visual 2
These examples show some of the initial micro-visuals for our first book, “Layout: Making It Fit.� The drawings explore textural, tonal, hierarchical and compositional options, and the two double-page spreads show some of our digital interpretations of aspects of these design drawings.

Starting a new design in this way, we would always begin by searching out the most complex aspect of the project. Figuring out a design system to tackle the most difficult scenario first makes it easier to apply the resulting design systems and relationships to simpler aspects of the project. There are no hard and fast rules to sequencing the various aspects of visualization. We have found that the order in which we draw by hand and work on the computer varies, and the two methods are sometimes merged. However done, using these two methods of development in partnership is an excellent way to maximize design ideas.

If You’re An Experienced Designer, Is Visualizing Really Necessary?

In a completely new design project, the methodology outlined above helps to ensure that our result is not in any way restricted by the starting point on the computer or by the relatively simple manipulations that are often tempting to pursue but not necessarily the most appropriate or stimulating. Drawing helps to put our most effective design concepts squarely at center stage and forces us to then find the best way to achieve the desired result. If we start with a blank sheet of layout paper and pencil and, of course, undertake research to get inspiration, then design-wise, the sky’s the limit.

Were ever inclined to simply reuse a palette of typographic styles that worked in a previous project, simply for ease and speed? We know we were, but taking the time and effort to try out alternatives and to develop completely different options would have improved the result and, for that matter, increased our satisfaction. We had our eyes on the clock and produced solutions that were satisfactory but definitely not the most effective, stimulating or satisfying.

Translating Drawing Into Design

A vital aspect of this process is being able to translate the nuances of mark-making into the final work. This requires making a detailed and precise evaluation of the drawings. The subtle contrasts of tone and texture in your visuals should help to build a valuable picture of the type and imagery and, for that matter, every other aspect of the design. Look carefully at the subtleties in the visuals, and use them as a starting point in selecting the nuances of typeface, weight, tracking, kerning and even leading.

Making the transition from smaller paper visuals to Web or print design can be difficult, and we discuss this issue often with our students. One system that seems to work well for now — albeit, one that relies totally on the visuals being proportional in size to the final design — is to scan or carefully photograph the visuals and then drop them into the background of a digital file to be used as a template for the final artwork. When the design is sufficiently rendered, the template can be deleted.

Translating Designs 1

Translating Designs 2
The three images here show the process described in the preceding paragraph. The first step shows a simple drawing of the front page of a newsletter. The next two images show stages leading to the finished version. The digital rendering, including of the type, is shown in magenta to distinguish between the layers for the purpose of this article.

Another Reason To Draw: As Inspiration For Working With Type And Image

Another reason to do mark-making is to develop ideas for type, which we have done very effectively and included as an exercise in our book Create Impact with Type Image and Color. The method involves finding samples of type and then cutting and pasting them to form new layouts. The copy does not have to make sense, but the abstract results can be a surprising and inspiring way into a design project that involves type.

Layout 1

Layout 2

Layout 3
This exercise has been very popular with our students, who have been inspired by the design options captured by their abstract layouts. In the examples shown here, students have brought together found samples of type to create textural and tonal contrast and dynamic composition, without the pressure of designing for sense.

The ease and instant gratification of rapidly generating a design right on the computer screen is very tempting. Acceptable concepts can be and are generated this way. But if a designer aspires to a wider spectrum of interesting and usable visual concepts, then achieving this by working solely on the computer is unlikely.

In no way are we belittling the computer; the asset is invaluable to the designer. But we firmly believe that it should not replace the intuitive pathways between the head, heart and hand. Drawing by hand first and then by computer is not set in stone; either may come first if we use them in tandem to explore and develop the most effective solutions for audiences and designers alike.

Paper and pencil concepts must be a part of the design process if ideas are to be maximized. There are no rules or precise styles that designers need to follow, although sufficient accuracy and detail is needed in order to be able to make informed judgments. Our cut-and-paste way of working with found samples of type and putting together unusual combinations can also be an inspiring starting point. While there are no set do’s and don’ts in the design process, an appropriate amount of drawing, mark-making and experimentation is bound to improve the final result.

This article has been a wonderful opportunity to examine the role that drawing and mark-making can play when generating ideas with type. Previously, we had only briefly touched on this topic when writing more extensively about the textural and tonal qualities of designing with type and imagery in a number of our books, including Create Impact with Type Image and Color and The Graphic Design Exercise Book. Both of these practical guides are useful reminders of the fundamentals of graphics and of designing with type.

Useful Ressources

(al)


© C. Knight, J. Glaser for Smashing Magazine, 2012.


Anniversary Special: Printed Books 30% Off! // Reminder


You’ve probably already heard: we’ve turned six years old! One thing is for sure: the past six years have been special – we’ve learned a lot! Much of this would not have been possible without your help. We are very grateful for your support and your feedback that keeps us going, and constantly inspires us to come up with new ideas and ways to improve Smashing Magazine.

Looking back at our work over the years, we feel grateful and proud of what we have achieved, and this celebration calls for an exceptional surprise. We’d like to share a special offer with you today: 30% discount on all printed Smashing books! For you, your friends, colleagues, or perhaps even your clients! Please note that this discount is only valid until Saturday midnight CET.

Overall, we have released four printed books in the past. Each book has a story of its own, but in all cases, we made sure to pack the books full with useful and valuable content. Along with each printed book, you get an eBook version for free (in PDF, ePUB and Kindle formats). This is the chance to add the books to your office reference library, or surprise a fellow colleague with a great set of Smashing books!

The Full Smashing Books Anthology
(4 printed books + 4 eBooks)
$69.30 $99.00
Smashing Book 3 + 3â…“ Bundle
(2 printed books + 2 eBooks)
$34.85 $49.80
Smashing Books 1 + 2 Bundle
(2 printed books + 2 eBooks)
$34.85 $49.80
Smashing Book 3
(Printed + eBook)
$27.90 $39.90
Smashing Book 3â…“
(Printed + eBook)
$10.40 $14.90
The Smashing Book 2
(Printed + eBook)
$27.90 $39.90
The Smashing Book 1
(Printed + eBook)
$16.00 $22.90

Acknowledgements

We thank each and every one of you for reading, listening, leaving a comment, and for even mentioning us during your coffee breaks. We take it to heart, respect your time and sincerely appreciate your love and support. We promise to keeping doing our best and keep on smashing!

Have fun exploring, reading and designing!

Yours sincerely,
The Smashing Team


© Smashing Editorial for Smashing Magazine, 2012.


tiltShift.js: Tiltshift-Effects with CSS3 and jQuery


tiltShift.js is nothing short of a little sensation. Using the new CSS3 Image Filters, developer Noel Tock realized a tiltshift-effect for any image you’d want to apply one to. It has of course to be said, that at the time of this writing only Chrome and Safari 6 are able to visualize the effect. Furthermore the pictures have to be generally qualified for the use of tiltshift. But this proves true for all possible fake tiltshifts, as can be achieved by Photoshop and others.

tiltShift.js: Very Clever Use of CSS3 Image Filters

To be absolutely honest, Noel Tock’s jQuery-plugin is more or less a wireframe. The effects applied only work in Chrome and Safari 6 and are generally dependent on being invoked on suitable photos. These should be taken from quite a distance and a higher angle of a subject that is best to be found in the middle of the photo. Of course you could apply tiltshift.js to any other photo, but wouldn’t achieve a visible tiltshift-effect in these cases.

That said in advance, Tock’s little javascript can be steered rather finely by using several parameters. Parameters are passed through the use of the new HTML5 data-attributes. Using data-position you define the position of the image section that should stay in focus. Valid values range from 0 to 100. A value of 50 would center the focus in the middle of the image. Combine that with data-focus, also ranging from 0 to 100, to set the size of the focus. Setting a value of 10 would mean, that 10 percent of the image would stay focussed, while the rest would appear blurred.

Having set that, data-blur is there to define the radius, while data-falloff will control the size of the area between full focus and full blur. You see, there’s nothing left to chance. For invoking the effect you fire it on a div-wrapper, that should be styled via CSS to avoid unwanted behaviour designwise.

tiltShift.js is made available under the GNU GPL license. Thus it is freely usable for any legal purpose. The project has just been setup on Github and shows a glimpse of the bright future, we as web developers are moving to with accelerating velocity.

Related Links:


  •   
  • Copyright © 1996-2010 BlogmyQuery - BMQ. All rights reserved.
    iDream theme by Templates Next | Powered by WordPress