Author Archive

Should you care about digital waste?

Watch my video and see why it’s so important to minimize digital waste.

Are you aware of how much digital waste your WordPress website is producing?

Did you know this waste carries an actual cost for both you and your website’s visitors?

Digital waste is an especially poignant topic in open source software (like the WordPress ecosystem), where the barrier to contribution is extremely low.

Wherever you have a lower barrier to entry, you also have lower quality output on average.

Consider, for example, the WordPress Plugin market, which is brimming with “solutions” to every problem (and non-problem) on the internet.

The general perception about Plugins is that you can find one to solve any problem you might have.

But this is precisely the wrong outlook.

The question you should be asking yourself is not, “Can I find a Plugin to do what I need?”

But rather, “Can I find an efficient, organized, and well-maintained Plugin to do [x] that I can rely on both now and in the future?”

Obviously, the average WordPress user is not equipped to ask or answer this question.

Which leads us to a pretty huge implication…

Developers—not end users, who bear the actual cost—are responsible for digital waste

When it comes to websites and digital waste, end users are just pawns in the game. After all, they’ll simply use whatever solutions are both popular and accessible.

This basic fact puts the responsibility for managing digital waste squarely on developers.

Unfortunately, developers have very little incentive to minimize digital waste because this process:

  • Is difficult
  • Takes a lot of time
  • Requires care

For software businesses, these all add up to costs, and in the absence of external pressure, costs are antithetical to a typical profit motive.

As a result, most software companies essentially cannot afford to care about digital waste unless it impacts performance in a significant way.

At first glance, this seems like a dark and gloomy indictment of the web software industry, but the news isn’t all bad because…

The need for efficiency increases every day

The external pressures to reduce digital waste are mounting with each passing second.

People with poor connections on mobile devices still want—and sometimes need—immediate access to information.

Of course, the presence of digital waste slows this access time considerably while also increasing the bandwidth costs associated with access.

And the pressures don’t stop there.

We know from both Amazon and Google, for example, that customers spend more money more often as site speed improves.

This means there is indeed a profit motive attached to the reduction of digital waste.

But that’s not all.

When we explored the idea of centralized vs. decentralized platforms, we noted that the technical debt of these platforms—which is a first cousin of digital waste—is heaped on you, the user!

In other words, even though WordPress users aren’t necessarily responsible for the creation of digital waste, they will indeed be responsible for dealing with it whenever a critical juncture arises in the future.

(“Critical junctures” are simply points in the future where things break or where it becomes obvious that something must be done to rein in the waste and debt saddling a particular website.)

If I’ve learned anything from a decade in the software industry, it’s that people hate dealing with messes they didn’t consciously create.

And when this costs them money, it makes them feel cheated.

So there’s a basic human incentive in play here, too. Sooner or later, people will “wake up” and see the writing on the wall:

Reducing digital waste is a way of ensuring a more manageable and less complicated future.


What does a decentralized WordPress environment look like?

Watch my video and see what a decentralized WordPress environment might look like.

Almost everything we rely on to operate online is a centralized platform. WordPress, Twitter, Facebook, YouTube, you name it—they’re all gigantic, centralized platforms.

Ok, sure, but why does that matter?

It matters because the bigger centralized platforms get, the less freedom users have.

We see this lack of freedom in obvious ways—bans, suspensions, and outright censorship—and in more insidious ways like being forced to accept and adapt to functionality people may not want or need.

If freedom and control over your own stuff are important to you, then this idea of centralization vs. decentralization is critical to your future.

The big lie of centralization

Centralized digital platforms are appealing for a few key reasons:

  • Popularity — Everybody uses them (oftentimes without even questioning this decision)
  • Access — They’re the gatekeepers to a global audience
  • Easy Onboarding — They make it quick, easy, and often free to get started

With social media giants, the promise is that you can “join in on the fun” and access the worldwide audience with purpose-built publishing tools.

With WordPress, the promise is that you can build a modern website and extend it in infinite ways to do whatever you need.

These promises are true…until they aren’t.

Time always reveals the truth

Relying on a centralized platform is a Faustian bargain:

Initially, you offload some effort and responsibility in exchange for immediate access and gratification.

But over time—and because you have absolutely zero say in how the centralized platform operates—you are forced to deal with whatever the platform throws your way:

  • Accepting new features
  • Changing the way you operate based on new guidelines (codes of conduct, etc)
  • Possible censorship and/or restricted access to the global audience

Bottom line: As centralized platforms grow and gain power, you become smaller and lose power relative to them.

And given enough time, centralized platforms will reach a point where they only serve themselves at the expense of their users.

So the question you need to ask yourself is this:

Is it a good idea to give up all your power and control to centralized platforms, or should you be looking for a de-centralized solution that preserves your freedom?


How to Tune Typography Based on Characters Per Line

In my research into Golden Ratio Typography, I focused primarily on the core geometric properties of text—font size, line height, and line width.

But there’s another facet of text that nearly all of the existing research on typography deals with: It’s called characters per line (CPL).

If you’ve ever read a study on typography, you’ve no doubt encountered CPL. Many of these studies recommend “optimal” CPL ranges that include anything from 55 to 100 CPL.

With an “optimal” range that large, the CPL you use on your site ultimately comes down to personal preference. This raises one huge question:

How can you tune your typography to an exact (or, at least approximate) CPL?

Tuning Text for Characters Per Line

Before you can tune your text, you have to understand how CPL works and what the consequences of different CPLs are. Here’s the deal:

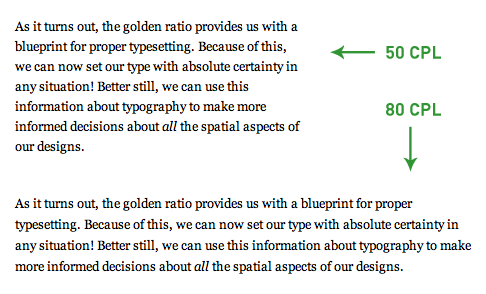
For any font size, as the CPL increases, the line width also increases.

Characters per line vs. line width

Figure 1. For a given font size, line width increases as CPL increases. Designers must consider this behavior when determining how wide a column of text should be.

This has some significant design implications, and worse, most designers don’t even consider CPL when choosing a column width for their text. They simply pick a column width, and however many CPL that results in…well, that’s what you get.

Frankly, I can’t stand this imprecise approach. Every decision—especially those involving your design and typography—should have a meaningful rationale behind it.

The bottom line here is that your typography should dictate how wide your columns of text are, not vice-versa.

So, how can you tune your typography to a specific CPL and, therefore, a specific width?

There are two potential approaches you can take here. You can:

  1. Use the good ol’ trial and error method, whereby you select different widths, count the characters per line, and settle on the width that you prefer.
  2. Figure out a programmatic way to predict CPL, and then choose a width based on this prediction.

Choice number one is a laborious pain in the rear, and it gets old really quickly. On top of that, it’s simply an imprecise approach, and we all know how I feel about that…

Contrary to number one, choice number two sounds great and makes a ton of sense. Problem is, you don’t have a programmatic way to predict CPL…yet.

Using Math to Predict CPL

Recently, I became obsessed with the idea of predicting CPL at any font size, so I set out to uncover a mathematical relationship between font size and CPL.

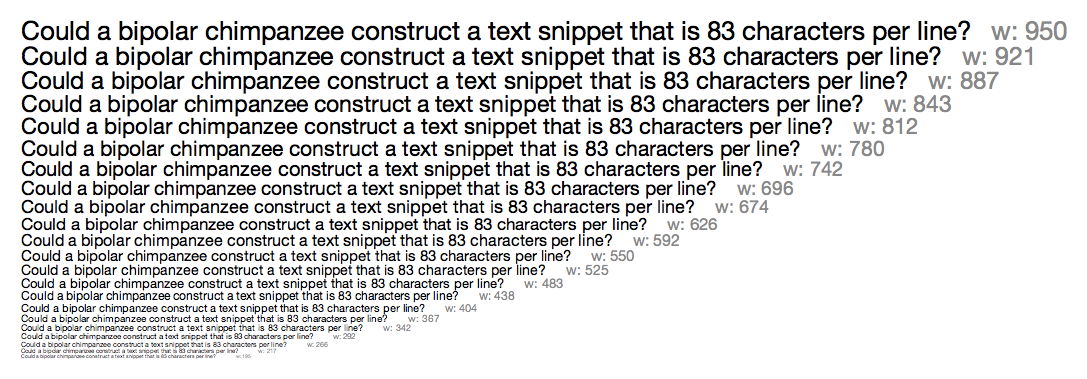
To do this, I examined text samples in the range of 40–100 CPL at font sizes between 5 and 26px for various fonts. You can see one of my samples in Figure 2 below.

Characters per line research sample

Figure 2. Research sample with Helvetica Neue set to 83 CPL. To determine the average character width at a particular font size, you can divide the resulting width (shown in gray next to each line of text) by the CPL. Click to enlarge.

As I stated above, my goal was to determine the mathematical relationship between font size and CPL for particular fonts (obviously, this relationship will differ slightly from font to font). Here’s how I did it:

Using text samples like the one in Figure 2, I first calculated the average character width (cw) at each font size by dividing the resulting line width by the CPL value.

Average character width equation

Not surprisingly, as the font size increased, the average character width also increased. The next step, however, is where things started to get interesting.

To relate font size and character width, I simply divided the font size (f) by the newly-calculated average character width:

Character constant equation

And this is where I noticed something extraordinary—for any font, the value (μ) from the above equation remains constant, even at different font sizes. In other words…

Each font has a character constant, μ, associated with it that relates the font size to the width of each character.

It may not be obvious at first, but this character constant is awesome because it establishes a mathematical relationship between the vertical (font size) and horizontal (character width) dimensions of text.

For instance, if you have a font size of 12px, and the font you’re using has a character constant of 2.3, then 2.3 characters will fit in every 12px increment of width (on average).

Thanks to this relationship, it’s possible to predict CPL mathematically. Here’s how it’s done:

Start with a desired CPL value, and then divide it by the character constant for the font you’re using. This results in a width factor, xw, which is specific to the desired CPL and font:

Width factor equation for CPL

The width factor from the equation above tells you how many increments of width are needed to reach the desired CPL. Once you have the width factor, all you need to do is multiply it by the font size to get the predicted line width, w, that will result in the desired CPL.

Predicted width for CPL

The aforementioned equations can be simplified and combined into one master equation that relates CPL, font size, and line width for any font:

Master equation for width, font size, and CPL

Alright—now that you’ve seen the basic math behind CPL, let’s bring this together by looking at an example.

Sample Predicted Width Calculation Based on CPL

In this example, the goal is to achieve 75 CPL at a font size of 16px for a font that has a character constant of 2.28. You can use the master equation from above to solve this problem:

Sample predicted width calculation based on CPL

So, for a font with a character constant of 2.28 at a size of 16px, a width of 526px will yield approximately 75 CPL.

But what if you wanted to know how wide your text would have to be for this same font at 18px? This is easy because you can simply substitute a new font size into the master equation, like so:

Sample predicted width calculation based on CPL and a different font size

So while you’d need 526px to achieve 75 CPL at a font size of 16px for this particular font, you’d need 592px to achieve the same CPL at a font size of 18px. Pretty sweet!

A Closer Look at Character Constants

The most important concept in CPL tuning is undoubtedly the character constant, μ.

As I stated earlier, the character constant is different for every font. In order to build a CPL prediction algorithm, it’s necessary to examine each font individually to determine its μ value.

This process is more complicated than it first seems, simply because different text samples have different average character widths (depending on the characters that appear in that particular sample).

Text samples set to 68 CPL

Figure 3. Both text samples are set to 68 CPL, but the line widths (and thus, the average character widths) are different because the samples contain different characters.

When researching character constants, it’s possible to account for these differences by taking a large enough data sample. If you were to test enough different text samples with each font, you’d eventually nail down a statistically significant value for μ.

Ultimately, though, the character constant is only useful for predicting an approximate CPL value—actual CPL values will differ from line to line depending on the characters involved.

Here’s a quick rundown of the character constants I’ve compiled through my research thus far (note: none of these are statistically significant):

Serif Fonts

  • American Typewriter — 2.12
  • Baskerville — 2.51
  • Georgia — 2.27
  • Hoefler Text — 2.44
  • Palatino — 2.30
  • Times New Roman — 2.60

Sans-serif Fonts

  • Arial — 2.31
  • Gill Sans — 2.51
  • Gill Sans 300 — 2.58
  • Helvetica Neue — 2.26
  • Lucida Grande — 2.07
  • Tahoma — 2.30
  • Trebuchet MS — 2.22
  • Verdana — 1.98

Monospace Fonts

  • Courier New — 1.60

The character constant provides a new, algorithmic way to understand how fat or skinny a font is. Lower character constants are “fatter,” and higher constants are “skinnier.”

Simply put, the character constant is an interesting new way to consider different typefaces.

It will prove handy for designers who are looking for a quick and precise way to select fonts that will exhibit particular aesthetics and spatial properties.

Also—and I really like this—smart programs can use the character constant to work with fonts in a more precise, more predictable way.

Update: A commenter pointed out a perfect potential application—building smarter CSS font stacks based on similar character constant values!

Math, Schmath. Software to the Rescue!

When I unveiled the Golden Ratio Typography Calculator, the point was to make it easy to explore finely-tuned typography without having to do heavy mathematical lifting.

Now, I’m pleased to announce that I’ve incorporated this new CPL research into the calculator, too. All that math you saw above? Yeah, you won’t have to do any of it :D

The upgrades to the typography calculator are powerful. Not only can you optimize your typography based on characters per line, but you can also explore the impact of different fonts on CPL in any setting!

Change fonts by using the font selector that appears on any typographical recommendation, and you can observe how the approximate CPL changes based on the typeface.

Golden Ratio Typography font selector

Figure 4. Use the font selector on any typographical recommendation to see how CPL changes relative to the typeface. Fascinating, I tells ya!

The Bottom Line

Typography is the most important component in all of design. There’s no doubt about it—design is a language of communication, and words are the most powerful communication tool we have.

It makes sense, then, that we should strive to understand as much as possible about typefaces, their metrics, and how they work.

Using the Golden Ratio Typography Calculator, you can explore the finer points of typography like never before.

You’ll gain insight into line heights, line widths, CPL, and how different fonts behave (grr, baby!). Best of all, you’ll be able to create beautiful typography on your site thanks to the precise recommendations from the calculator.


Secret Symphony: The Ultimate Guide to Readable Web Typography

Right now, there’s a mathematical symphony happening on your website.

Every single one of your readers is subconsciously aware of this symphony, and more important, they are all pre-programmed to respond to it in a particular way.

The question is this:

Is your site’s symphony pleasing and inviting to your readers, or does it turn them off and make it harder to communicate with them?

The Mathematical Symphony of Typography

As it turns out, this symphony is not unique to websites. You “hear” it every time you read a book, newspaper, magazine, or web site—every place where typography exists.

At first glance, you might think that typography and math have nothing to do with one another. After all, typography consists of letters and words, and math is…well…numbers.

But the truth is, typography is a combination of artistic letterforms and mathematical proportions, an exquisite marriage of form and function.

When the mathematical proportions of your typography are harmonious, your site—and your content, specifically—look appealing to readers.

Conversely, when the proportions of your typography are imbalanced, your content isn’t as attractive to readers, and your site seems cluttered and disorganized.

The bottom line is this:

The mathematical proportions of your typography are vitally important to how readers perceive both your site and your content.

So how can you tweak the proportions of your typography to create a beautiful mathematical symphony?

Let’s take a trip down the typographical rabbit hole and find out!

The 3 Fundamental Dimensions of Typography

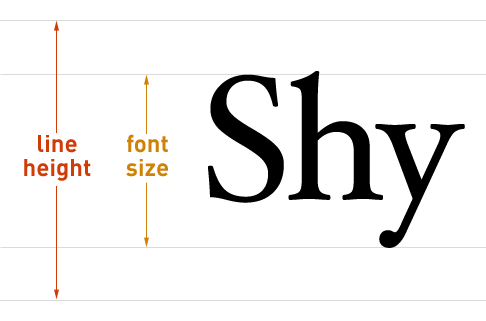
Every paragraph you’ve ever seen has 3 primary dimensions. The first two, font size and line height, are vertical in nature.

Font size and line height

Figure 1. How font size and line height work in web browsers. Font size is measured from the top of a capital letter (S) to the bottom of descending characters (y). Half the line height extends both up and down from the centerline of the text.

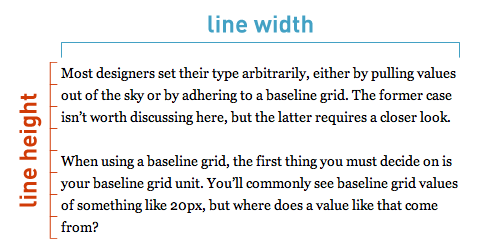
The third dimension, line width, is horizontal.

Line height and line width

Figure 2. Line height and line width form the vertical and horizontal dimensions of typography.

Taken together, these 3 dimensions are responsible for how you perceive typography.

To get a feel for how these dimensions work together, it’s helpful to look at a few text samples where one dimension is varied and the others are held constant. This way, you’ll be able to see the effect that each dimension has on the other two.

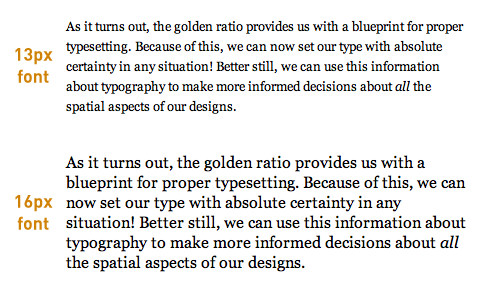
In Figure 3 below, the line height and line width are fixed, and the font size is varied from 13 to 16px.

Variable font size with constant line height and line width

Figure 3. With the line height and line width held constant, it’s clear that larger font sizes require larger line heights to maintain both proportion and readability.

In the first paragraph of Figure 3, the line height is large enough relative to the font size to produce generous whitespace between the lines of text. However, in the second paragraph, the line height is not large enough relative to the font size to yield sufficient whitespace, and it looks cramped as a result.

This leads to an important conclusion: As font sizes increase, line heights must also increase in order to maintain the geometric proportions of a paragraph. In other words:

Font size and line height are proportionally related.

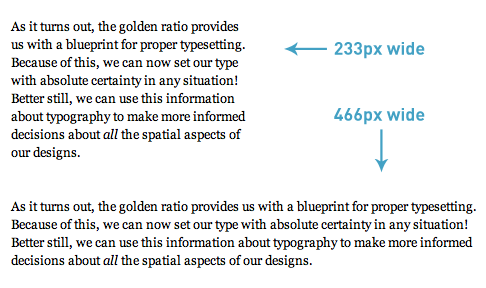
In the next example, the font size and line height are fixed, and the line width is varied from 233 to 466px.

Variable line width with constant font size and line height

Figure 4. As the line width is increased, the text becomes harder to read because the line height has not been increased to offset the effect of the width.

Despite the fact that the line heights are the same in the two paragraphs of Figure 4, their readability is quite different because of the differing line widths.

As the line width gets longer, it becomes more difficult to perform a return sweep (the movement of the eyes from the end of one line to the beginning of the next) unless the line height is also increased to account for this effect.

Research confirms this conclusion, too. In a 2004 study from the University of Reading (how ironic), Mary C. Dyson states:

Long line lengths are said to need more interlinear spacing to ensure that the eyes locate the next line down accurately when executing a return sweep…

Bottom line? It’s clear that line heights and line widths are mathematically related in some way. More specifically:

For any font size, the line height must increase as the line width increases.

But what is the exact mathematical nature of this relationship?

Harmonious Proportions and the Golden Ratio

Answering this question might be easier than it first seems because nature has given us a remarkable blueprint for beautiful and effective proportionality.

Evident in plants, animals, the shape of galaxies, and even your DNA, this proportionality blueprint is so pervasive that humans have noticed it for thousands of years. We’ve used it, too—it can be seen in art and architecture throughout history.

So what is this incredible proportion that “really ties the room together?”

I’m talking, of course, about the golden ratio.

When nature needs a proportion to relate things and to provide order on any scale, it tends to use the golden ratio.

With typography, the goal is to relate font size, line height, and line width in an aesthetically pleasing and orderly way.

Could it be, then, that the golden ratio is applicable to typography as well?

The Mathematics of Golden Ratio Typography

As you probably guessed, the answer is an emphatic yes! Here’s how it works:

First, the font size (f) and line height (l) are proportionally related through a ratio (h). Mathematically, this is about as simple as it gets, and the basic equation looks like this:

Line height equation

In the equation above, the optimal line height is produced when h equals the golden ratio (φ). This insight gives us the following equation:

Optimal line height equation

Unfortunately, just knowing the optimal line height for a given font size is not enough.

Earlier, you saw that all 3 typographical dimensions—font size, line height, and line width—affect one another. Therefore, you cannot talk about line height or font size without also considering the line width.

Based on this reasoning, there must also be an optimal line width that corresponds to the optimal line height from the equation above.

Problem is, you don’t know the exact relationship between line width and line height. All you know for sure is that the line width is significantly greater than the line height.

With the help of basic mathematical modeling, you can make an educated guess that the relationship between the optimal line height and line width is exponential. Here’s the simplest equation to express that:

Optimal line width equation

This is remarkable because now, for the first time, you have a solid mathematical basis for the relationship between font size, line height, and line width.

Note to designers: Golden Ratio Typography is intended to serve as a basis for proper typesetting. Factors such as x-height and other typeface metrics also influence typography and should be considered in finalized designs. Golden Ratio Typography provides the most rational starting point for adjustments of this nature.

There’s one little problem here, though: The web isn’t nearly as precise as these equations.

You see, web designers are constrained to using integer values for things like font size, line height, and line width (this will be the case until sub-pixel rendering becomes a reality).

The above equations all yield highly precise decimal values, and simply rounding the answers to the nearest integer produces significant errors that will cause your resulting typographical proportions to be imprecise.

The bottom line is that the web is not optimal, and therefore, the optimal equations presented above are insufficient for fine-tuning your typography in the real world.

Ultimately, if you want precise Golden Ratio Typography on your website, then you’re going to need some tuning equations.

Fine-tuning Golden Ratio Typography for the Web

To understand how typographical tuning works, let’s look at an example.

For a font size of 16px, the perfect line height is achieved when h equals the golden ratio. This yields a value of 25.88854px for the optimal line height. Using this value, you can then determine that the associated optimal line width is 670.21670px.

Optimal line height calculation for size 16 font

Optimal line width calculation for size 16 font

If you tried to use these values in your site’s CSS, you’d encounter problems.

Because it only resolves integer values, the web cannot display a line height of 25.88854px. Instead, the best you could do for the line height is 26px.

But 26px is greater than the optimal line height given by the equations, and as you’ve seen, you cannot change the line height—not even a little bit!—without also changing the associated line width (otherwise, the resulting proportions would not be precisely “golden”).

Therefore, the process of rounding the line height from 25.88854px to 26px requires that the resulting line width be greater than 670.21670px.

This is the essence of typographical tuning:

If your line width is shorter than the optimal width, then your corresponding line height must be less than the golden ratio. Conversely, if your line width is longer than the optimal width, your corresponding line height must be greater than the golden ratio.

Here’s a graph to help illustrate this concept for the most commonly-used font sizes:

Line height vs. line width for common font sizes

Figure 5. As line widths increase, line heights must also increase to preserve geometric proportions and readability. The horizontal gray line in this graph represents the golden ratio (φ), and you can see how line heights behave relative to this value for the most commonly-used font sizes. Click to enlarge.

Mathematically speaking, the typographical tuning equations are more complicated than the equations you’ve already seen. Fortunately, I’ve done the heavy lifting here, so you can focus on the concept and the results.

Ultimately, you need two tuning equations for the different scenarios you will encounter while setting typography. Depending on the situation, you’ll need to determine:

  1. The adjusted line height, given a font size and line width
  2. The adjusted line width, given a font size and line height

Here are the equations to do just that:

Line height ratio tuning equation
Line width tuning equation

Using the second equation above, you can determine the adjusted line width for the aforementioned example situation of a 16px font size with an integer line height of 26px.

Adjusted line width for 16px font with a line height of 26px

The adjusted width, which will maintain golden typographical proportions for this scenario, is 685.32505px. For use on the web, this must be rounded to 685px.

Let’s look at another example that will hit closer to home (and this is how you can tune the typography on your own website right now):

What if you wanted to use a 16px font size in a content width of 550px? What should your adjusted line height be in this case?

Here’s how you’d solve that problem:

Sample line height ratio calculation

Sample line height calculation

The answer here is 25.00169px. Once again, this value must rounded to the nearest integer for use on the web, and this results in an adjusted line height of 25px.

Golden Ratio Typography Calculator

Obviously, doing a bunch of math every time you deal with typography will get tiresome very quickly.

To remedy this, I’ve created the Golden Ratio Typography Calculator, which makes it incredibly easy to determine the perfect typography for any situation!

Smart and versatile, the calculator will give you golden typographical recommendations based on the input you provide.

If you enter only a font size, the calculator will show you the optimal line height and line width for that font size.

If you enter only a width, the calculator will show you the best and second-best font size/line height combinations for that width.

If you enter both a font size and a width, you get the whole shebang:

  • Optimized typography for your font size and width
  • The best typography for the width you’ve provided
  • The second-best typography for the width you’ve provided
  • The optimal typography for the font size you’ve provided

Go play around with the Golden Ratio Typography Calculator and explore finely-tuned typography like never before!

The Incredible Impact of Golden Ratio Typography

I hinted at this earlier, but I want to make it clear: The stuff I’ve shared with you today doesn’t just apply to the web. In fact…

Golden Ratio Typography can be used to fine-tune the typography of any medium!

Books, newspapers, magazines, websites, e-readers, you name it—they can all benefit from the improved proportions that Golden Ratio Typography provides.

And now, as you begin to view the world through the lens of Golden Ratio Typography, you’ll notice countless opportunities for typographical optimization.

The Bottom Line

Golden proportions are evident throughout the universe, and they occur in places where form and function combine to produce a beautiful, effective, and useful result.

Remember the mathematical symphony of typography?

By employing Golden Ratio Typography, you’ll ensure that your site has a golden symphony that will appeal to everyone.

Supercharge Your WordPress Category Page SEO with This Simple Tip

If you’ve followed my advice over the last few years, then you already know how to use WordPress categories effectively.

But now that you’re using categories in a meaningful way, do you know how to get your category pages to rank well and dominate in the search engines?

Using this tip that I’m going to share with you today, you’ll be able to do just that.

However, before we begin, I need to let you in on a little secret—by default, WordPress does not provide you with the controls necessary to create category pages that have maximum SEO juice.

Fortunately, this is where I come in :D

Add a Unique Headline and Content to Your WordPress Category Pages

Here’s the trick: All you need to do to get your category pages to slay in the search engines is to add a unique headline and some unique content.

Jaw-droppingly simple? Yep.

Possible with a default installation of WordPress? Nope.

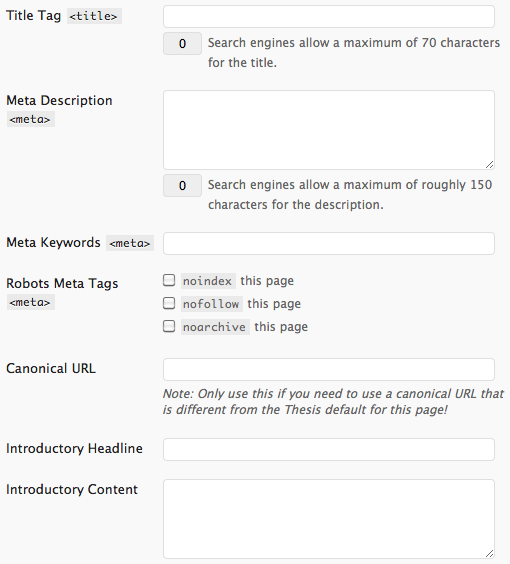
But it is possible with the Thesis Website Framework, which adds these essential SEO controls to “edit category” pages in the WordPress interface:

Thesis category SEO controls for WordPress

See the Introductory Headline and Introductory Content fields in the image above?

By adding unique content to those fields on each of your category pages, you will make your WordPress category pages rank better in search engines.

How Sugarrae Uses Thesis to Build Category Pages that Rank

Without a doubt, my favorite example of someone who uses Thesis category controls to rank like crazy is Sugarrae.

Check out her affiliate marketing category page, which consistently ranks in the top 10 for the hyper-competitive term “affiliate marketing.”

See the introductory content before the list of posts? It ain’t just sexy, folks—it is essential for getting the maximum SEO benefit from your category pages, and Thesis makes it all possible.

With Thesis, you can take your site to new heights by employing the same strategies as professionals like Sugarrae.

If you’ve never checked it out before, then now is the perfect time to see how Thesis will improve your site.


  •   
  • Copyright © 1996-2010 BlogmyQuery - BMQ. All rights reserved.
    iDream theme by Templates Next | Powered by WordPress