Author Archive

Xcode window management sucks

Hi, did you come here to tell me that Xcode offers "all-in-one" editing? Please, don't send me an email. This is addressed in this article if you take time to read it.

I posted some thoughts to twitter last night about how much the Xcode window management drives me insane. What I got back was a huge reaction of “it’s perfect” and “this is how OSX works” Suddenly I was wondering, am I just insane for thinking the window management is absolutely horrible?

No, no. I’m not. It’s horrible. Just because Apple built it, does not make it perfect.

Tabs are the future (actually it’s been the standard for years)

Tabs have clearly proven themselves to be a superior method for editing multiple code files. Why? Because the most recognizable thing about code file is it’s filename. Not the look of the text. Let’s look at this through some examples.

Case #1: Window-based management FTW, Photoshop

Example of window management in Photoshop

Window management in OSX defaults to a new window for each document. This works wonderfully for most applications when you can see the differences visually. Photoshop is a great example. Using Exposé, I can see which document I mean to be working on at a glance The visual representation of the document is the unique identifier.

Some more points on why this works so well:

  • Image documents are the only windows you will ever see in Photoshop. Everything else is a panel. This functionality is the same for all five-star document-based apps. iWork, iLife, etc. There is a really good reason Apple chose to hide panels when activating Exposé.
  • Photoshop is a document immersive program. It’s unlikely you’ll be working on more than one PSD at a time. The document is all that matters. Conversely with code, the project is all that matters (not one code file).

Case #2: Tab-based management FTW, Texmtate

Example of window management in Texmate

Window management for Textmate is handled via tabs and a persistent sidebar. At a glance, you can see all files you’re currently working on. In the case of Cocoa, you are often switching between interface & implementation files, but this is easily handled via cmd-opt-up, so long as you have the name of the class right, you’ve got the right file.

Some points on why this works so well:

  • Windows provide a way to group files in a meaningful manner. Each window is a unique project. Remember, the project is the important thing — when coding in Cocoa, you’ll need to edit multiple files at once to make them work with one another.
  • I can quickly move between individual files via the keyboard. Considering coding is almost purely typing, keeping my hands on the keyboard is killer.

Case #3: WTF-based management FTL, Xcode

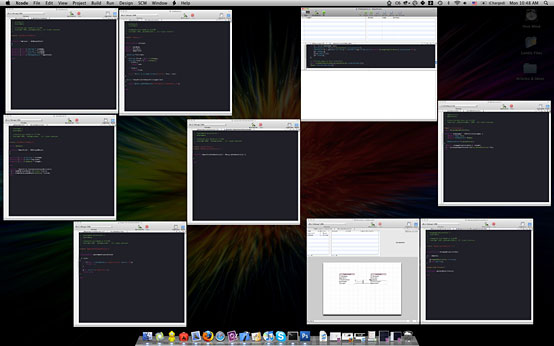
Example of window management in Xcode

Window management for Xcode is handled via a combination of this thing called a Project window, which morphs depending on it’s toolbar state, windows for each document, and windows for ancillary programs (like the model editor). Please note I have the same number of windows open in this screenshot as I did in Textmate (7). It’s actually a pretty small program, but completely overwhelming.

Some points on why this doesn’t work so well:

  • Windows mean different things. Some mean code documents, some mean visual aid, some mean a kind of “project” that groups all things.
  • The project window continually morphs it’s state as you enter and exit debugging. It’s appearance is different, not upon your application’s state, but rather the toolbar button in the upper left, that automatically changes (one-way).
  • All the code looks the same. There is no unique identifier in Exposé mode. I must selectively hover over each file and read it’s filename. Or, I can exposé to try and find the project window (which can look much like a code window too), and then open a new document.
  • If I accidentally Cmd-W the Project window, I have to start from scratch, opening the whole project and each document again. This often happens as you accidentally open windows and want to immediately close them.

Some may counter, telling me that Xcode offers editing inside the project window. Sure, this works, but offers just as many frustrations.

  • You must single click on files to open them. Double-clicking them still opens them in a new document.
  • Because of the above, and the last bullet on the previous list, I constantly find myself accidentally closing the project because I was trying to close an accidentally opened window.
  • Unless I choose not to run my program, I constantly have to switch out of debug mode and back into editing mode via the toolbar.
  • Every single time I open Xcode I have to force it into editor mode.
  • There is a delay in single clicking a document. You click the file on the sidebar, the sidebar highlights, but the new document doesn’t open in the editing window for a second or two. When trying to scan documents for some code, this results in endless confusion.
  • There’s no idea of “open files” in this mode. No context for which I’m working. I can’t say, work on the View Controllers by opening each of them. Each time I must select the unique view controller in the sidebar, ordered alphabetically.

It’s a shame

It’s a shame, because other than the window management, Xcode is really an awesome IDE. The actual text editing is great as is debugging, scriptability, and file management. It really helps solve all the problems that Cocoa apps force upon mere text editors (long method names, class names, files being in one directory, different types of files in the same directory, etc).

It’s the program’s fatal flaw in my mind. It isn’t that it’s sub-par, or not good enough — it’s downright infuriating to use. I want to do mean things to cute kittens whenever I use it. So I don’t. I use TextMate. Which actually is very good at Cocoa & Objective-C. But it means much more typing (especially with the shift key) since TextMate favors tab-triggers rather than tab-completion.

At the end of the day, this is the kind of stuff I hope Mac developers care about. It’s about making the user experience the #1 priority in software development. And it’s something that I’m confident Apple knows about and intends to fix in future versions of Xcode. Because they care about the user experience.


Top reasons your CSS columns are messed up

I believe the recent surge in popularity of CSS frameworks comes from a lack of basic understanding of the CSS box model and how it’s implemented across browsers. I wanted to share with you some quick tips on how to avoid easy pitfalls so you can create your own CSS framework in no time flat, without all the cruft of having ten thousand column combinations available. Keeping these quick tips in mind at all times will allow you to do something I like to call defensive coding — and really that’s all CSS frameworks are: defensively coded snippets of CSS.

Your margins are doubled in IE6

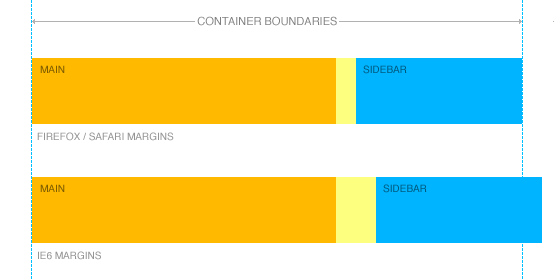
Here’s a super common pitfall: IE6 will double margins facing the direction of the float. Example problematic code:

.sidebar{
  float:left;
  margin-left:20px;
}

This sidebar will have a 40px left margin in IE6 — almost certainly throwing the sidebar down below the content, and not next to the content as it should be. Easy fix: add display:inline; No side effects in any browser, and IE6 obeys margins perfectly.

.sidebar{
  float:left;
  margin-left:20px;
  display:inline
}

Why it works: By declaring float on an element, you implicitly demand that it must be rendered as a block element — thus rendering the display:inline inert. However, due to IE6’s awesome CSS engine, it fixes a bizarre bug that is the #2 reason I see CSS columns fail in IE6.

Your content is wider than your column

Let’s pretend you’ve got this simplistic setup of code:

.columns{
  width:500px;
}
.columns .main{
  float:left;
  width:400px;
}
.columns .sidebar{
  float:right;
  width:100px;
}

HTML:

<html>
...
<div class="columns">
  <div class="main">
    <img src="/images/awesome.gif" />
  </div><!-- /.main -->
  <div class="sidebar">
    <p>Sidebar rules!</p>
  </div><!-- /.sidbear -->
</div><!-- /.columns -->
...
</html>

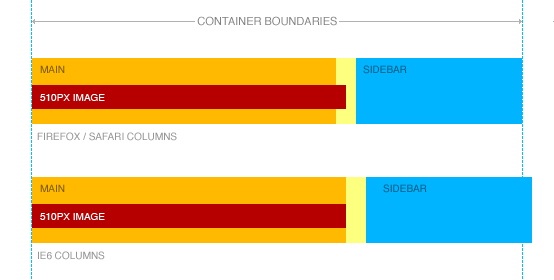
Harmless right? You might view this in Firefox and everything will be fine. But then you look at it in IE6 and your sidebar has mysteriously dissapeared below .main. WTF? You look at the HTML, the CSS, and everything’s fine. What could possibly be wrong? A common problem here is if awesome.gif is 510px wide. What this does is push out .main to 510px, and suddenly there’s not enough room for .sidebar inside .columns any longer. Ack!

Easy fix: add overflow:hidden to your columns. This forces the width restriction to crop any extruding content. New magical CSS:

.columns{
  width:500px;
}
.columns .main{
  float:left;
  width:400px;
  overflow:hidden;
}
.columns .sidebar{
  float:right
  width:100px;
  overflow:hidden;
}

Your margins extend past your container

So you’re building out a simple product listing template out, and you throw it in an unordered list:

ul.listing{
  margin:0;
  width:400px;
}
ul.listing li{
  list-style-type:none;
  float:left;
  margin:0 20px 0 0;
  width:85px;
}

HTML:

<html>
...
<ul class="listing">
  <li>Product #1</li>
  <li>Product #2</li>
  <li>Product #3</li>
  <li>Product #4</li>
</ul>
...
</html>

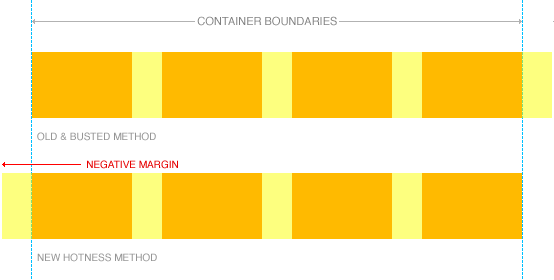
This CSS will work just fine in something like Firefox, but for mysterious reasons you’ll see that Product #4 appears on it’s own line in IE6. What’s happening here? I mean 4 columns x 85px + 3 gaps x 20px = 400px, right? Except that your 4th gap is hanging over the right edge — pushing the true width of the blocks to 420px. Firefox is smart and lets that margin just hang out there — but IE6 will apply that margin within the parent wrapper — throwing the 4th item down since it takes up 20px more than it should have.

The fix? Apply a left margin to each item, with a negative margin to the wrapper. This means that every item has a visible margin, but the whole block of elements are yanked back by the negative margin:

ul.listing{
  margin:0 0 0 -20px;
  width:420px;
}
ul.listing li{
  list-style-type:none;
  float:left;
  margin:0 0 0 20px;
  width:85px;
}

This gets around the nasty solution of adding a class to the first or last item in every row — something I’ve seen with abundance around the web.

Building a CSS framework in no time

Wev'e got to start out with some basic HTML. Here’s what I’ve been using lately:

<html>
...
<div class="columns col2">
  <div class="column first">
    ...
  </div><!-- /.first -->
  <div class="column last">
    ...
  </div><!-- /.last -->
</div><!-- /.columns -->
...
</html>

For different column widths, I’ve been changing out the col2 declaration to things like col2A, col2B, col2C and so on. You could easily give them more semantic names like products-columns too.

Self clearing is the future

The first step for any column framework is self-clearing. It’s easy, practical, and reduces all those damn clearing divs.

.columns:after {
    content: ".";
    display: block;
    height: 0;
    clear: both;
    visibility: hidden;
}
* html .columns {height: 1%;}
.columns{ display:inline-block; }
.columns{ display:block; }

Float those columns

Next step is to actually float those columns. So let’s add a couple more declarations:

.columns .column{
  float:left;
  overflow:hidden;
  display:inline;
}
.columns .last{ float:right; }

.col2 .first{ width:500px; }
.col2 .last{ width:100px; }

.col2A .first{ width:400px; }
.col2B .last{ width:200px; }

.col3 .first{ width:100px; }
.col3 .second{ width:280px; margin-left:20px; }
.col3 .last{ width:200px; }

Done… uh, what?

Oh, yeah. That’s it. That’s all it takes to create reliable columns in CSS. Really.

Here’s an example page to prove it!


Why I don’t use CSS Frameworks

CSS Frameworks seem like an awesome advancement at first glance: speed up your development, normalize your code base, and eliminate those nasty browser bugs! Hot damn, where do I sign up? Unfortunately there’s some pretty strong caveats that go with those statements.

The frameworks themselves are very good

I’d like to start this off by saying there’s nothing inheritly wrong with any of the CSS, HTML, or ideas put into these frameworks. I also think it’s an absolutely fabulous idea that people are writing them — it gives newcomers an easy way out to create professional looking designs using semantic XHTML and CSS.

Advantages of Frameworks

Most CSS frameworks offer three primary selling points:

  • Speed up your develoment (don’t have to write all that HTML/CSS)
  • Don’t worry about those nasty IE bugs!
  • Normalize your code/class base

Speeding up your development

For those who have intimate knowledge of the framework, I do believe the frameworks will speed up development. But for the average user, I think that the time required to understand the architecture of the framework far outweighs the menial task of coding it from scratch.

Over the past three years, I’ve built unknown dozens of layouts, with most of them being extremely visually complex. On average, it takes me about 8 hours to build out a Master design into a functioning bug-free template. Of that time, I would have to say that doing the basic layout & typography (framework material) takes less than 20 minutes. That’s less than 5% of development time.

You may save time, but the question quickly becomes how much time, and at what cost? We’ll cover that later. My point being that frameworks do not solve the hard problems in CSS — the ones that pop up when you’re knee-deep in HTML and suddenly the goddamn box doesn’t show up in IE6. These are the problems that take the majority of time when developing a website.

Don’t worry about IE bugs

Well, gee that sure would be a wonderful thing if that were the case, wouldn’t it? The truth is the frameworks do eliminate some bugs — but they’re the easy ones to pick off. The ones solved by a quick display:inline or height:1%.

The frameworks don’t solve bugs where none of the public hacks work. Or where IE inexplicably adds a 30px top margin to your element, but then dissolves in when you hover over your main navigation. It doesn’t solve the problems when IE displays the same HTML and CSS differently on two different computers.

It doesn’t solve the hard problems.

Normalize your code base

This is one area I think frameworks are great at: getting a large team of people all using the same code structure. But then again, I think this can be solved by an internal styleguide just the same.

Disadvantages of frameworks

There are a few pretty severe disadvantages of frameworks in my eyes:

  • Familiarity with your code’s architecture
  • Inheriting someone else’s bugs
  • Not learning

Familiarity with your code’s architecture

This is the largest reason I’ve never built or used a CSS framework. By building a site from the ground up, you gain a knowledge of your site’s architecture that can’t be learned through any study or documentation. When a programmer asks you a question about restructuring the HTML, you can answer right away. You know where the CSS styles are (hopefully) and you know how the layout works.

This is increasingly relevant in today’s Javascript-out-the-ass world. Once you start manipulating the XHTML/CSS of your site through dynamic scripting: you better know how it’s laid out. Javascript-based effects are tied very closely to the CSS structure of the site. You’ll have to know when you can use float and when you can use position to lay out elements. Should you use line-height, margin, padding, or height to get that container to extend? It’s a very important decision: and laying out the architecture helps you achieve this.

Inheriting someone else’s bugs

At the end of the day, no framework is perfect. No design is perfect. But instead of fixing your bugs, you’re fixing someone else’s bugs. Do you know how much it sucks fixing your own bugs? It sucks 10,000x worse fixing someone else’s bugs.

Not learning

Again, on my mantra of why I wouldn’t recommend frameworks comes the lack of knowledge gained by fixing those problems frameworks solve. I’ve advocated before how important it is to build websites. I can guarantee you that if you keep building sites from the ground-up, you’ll learn new things each time. You’ll learn not only how to fix and avoid browser bugs, but how to make your markup more elegant. You’ll transform the act of building websites from a job into an art.

Conclusion

Hopefully this clears up a bit of why I don’t like CSS frameworks. It’s not that they’re bad — it’s just that I don’t think they offer enough value for the drawbacks. It all comes down to intelligently analyzing your situation before you jump head-first into someone else’s code.

The one “framework” I do use

On that note, there is one framework I do use. It’s the CSS reset — not that I’d even call it a framework. Here it is in all its glory:

/*------------------------------------------------------------------------------------
  Global Styles
------------------------------------------------------------------------------------*/
* {
    padding:0;
    margin:0;
}
h1, h2, h3, h4, h5, h6, p, pre, blockquote, label, ul, ol, dl, fieldset, address { margin:1em 0; }
li, dd { margin-left:5%; }
fieldset { padding: .5em; }
select option{ padding:0 5px; }

.hide, .print-logo, .close-button{ display:none; }
.left{ float:left; }
.right{ float:right; }
.clear{ clear:both; height:1px; font-size:1px; line-height:1px; }
a img{ border:none; }

What’s your take on frameworks? Do you use them? If so, what other benefits have you gained from using them?


MooTools Javascript Classes

One of Javascript’s major blunders when it comes to Object-Oriented design is the lack of true classes. Lucky for us, we’ve had every library author out there have their whack at creating a class structure.

What is a class?

A class is kind of a template. One of the big concepts of OO is treating your code as real world objects. Let’s say you want to have three variables for different dogs: ollie, rowdy, and killer. Each of these variables should be an instance of a class. That class’s name would be Dog. Each particular dog is an instance of the generic Dog class. I won’t go into much more detail here: there’s plenty of reading to do on what classes really are, and how to use them best.

MooTools = <3

Out of all the class systems I’ve used, I’d have to say MooTool’s class system (spanwed from Dean Edward’s Base) is the cleanest, most extensible system yet. Creating and extending classes is ridiculously easy.

Create a class

var Animal = new Class({
    initialize: function(){
        this.text = "Animal Runs!";
    },
    run: function(){
        alert(this.text);
    }
});

var pet = new Animal();
pet.run();
// ==> "Animal Runs!"

(It’s also fair to note that MooTools supports Prototype’s Class.create method as well)

Extend a class

var Dog = Animal.extend({
    initialize: function(){
        this.parent();
    },
    bark: function(){
        this.run();
        alert("Woof! Woof!")
    }
});

var pet = new Dog();
pet.bark();
// ==> "Animal Runs!"
// ==> "Woof! Woof!"

You’ll notice you still get access to parent methods (through this.parent()), as you can see where this.text gets initialized when a new instance of Dog is created.

The syntax is short, sweet, and to the point. Furthermore it allows me all the flexibility I need… well, almost. MooTools team gets bonus points for the next section.

Javascript mixins… kinda

There are two common actions that many Javascript actions have: options, and callbacks. MooTools have created a sort of ruby-style mixin for classes to handle these functions. MooTools calls these mixins Utility Classes. To enable these, add this line to the code above:

Dog.implement(new Options, new Events);

Options

What does this do? First off, it allows for quick, easy, extendible options. All you do is set your default options in an options property, and then call the setOptions method inside your class. Here’s an example:

var Dog = new Class({
    options: {
        age: 5,
        type: "Jack Russel Terrier"
    },
    initialize: function(name, options){
        // Here's the magic!
        this.setOptions(options)

        this.name = name;
    },

    bark: function(){
        alert("My name is " + this.name + " and I am " + this.options.age + " years old");
        this.fireEvent('afterBark', this);
    }
});
Dog.implement(new Options, new Events);

var ollie = new Dog('Ollie');
ollie.bark();
// ==> "My name is Ollie and I am 5 years old"

var rowdy = new Dog('Rowdy', {age:15});
rowdy.bark();
// ==> "My name is Rowdy and I am 15 years old"

By mixing in the Options methods, you now have access to setOptions, which either uses user-defined options or class-based defaults (with one line of code).

Events

You can also define custom events (usually called callbacks). Notice the this.fireEvent('afterBark') bit in the Dog class above? Check it out:

var killer = new Dog('Killer');
killer.addEvent('afterBark', function(dog){
    alert(dog.name + ' just barked!');
});
killer.bark();
// ==> "My name is Killer and I am 5 years old"
// ==> "Killer just barked!"

It allows you to tie into the same event functionality used for the DOM, but with your own methods you create in your classes. I’m in love with this easy functionality — sure there’s been other ways to do this, but none so elegant as what the Moo team has come up with.

Chain

The last utility class is the Chain class. This allows for some nice chaining of classes: I’ll leave it up to you to explore this one since I haven’t used it in great detail yet. In a nutshell: it allows for time-dependent chains (so that events fire after another one is complete).

Conclusion

Every good Javascript developer knows that there’s 50 ways to skin a cat when it comes to classes and Javascript. But for me, one of the largest reasons MooTools is my framework of choice is the underlying class system. No extending Object, and no overriding of parent methods. The syntax is clean and easy to remember, giving it huge bonus points in my book.

Personally, I would like to thank the smarter developers who have taken the hard hits with Javascript to implement these nice OO techniques. Without them, my Javascript would still be procedural-based with tons of global variables thrown about. Yay for frameworks!

1 Comment more...

Using TextMate’s TODO bundle

If you use TextMate, you should really think about using the TODO bundle more often. It’s a simple, low-maintenance bundle that adds tremendous value to your code.

Setting TODO, FIXME, and CHANGELOG

Using the bundle is pretty easy. In any language, just type in a quick comment with the prefix TODO, FIXME or CHANGED like so:

def view
  # TODO: different display for different types of clips: active, processing, etc
  @clip = Clip.find(params[:id])
  # TODO: Make a real related clips dealieo
  @related_clips = Clip.find(:all, :limit => 6, :conditions => ["clips.status = 'processed'"])
end

Using this syntax lets you keep pushing ahead at full steam and leave the hard stuff for later. For example, in the above example I wanted to get a quick functional prototype out the door. It wasn’t mandatory that the Related Clips actually be related: it was only mandatory that there was content present.

You can also use the keywords FIXME or CHANGED throughout your code, like so:

def view
  # FIXME: This totally breaks if an invalid ID is given
  @clip = Clip.find(params[:id])
  # CHANGED: @related_clips now uses a model method related_clips
  @related_clips = Clip.related_clips(params[:id])
end

This lets others working on the code let you know that you know something is broken and/or changed, but you just don’t have time to get to it.

Getting the information back

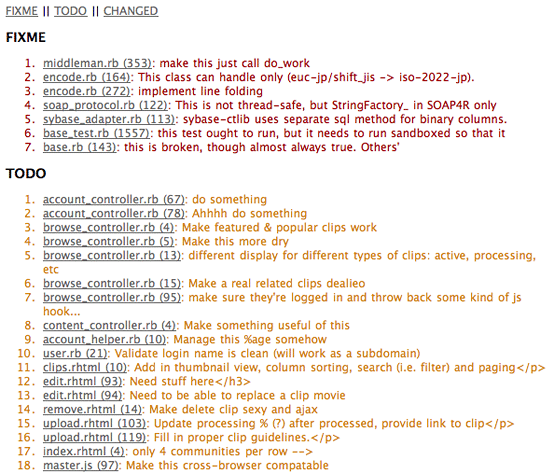
Well, that’s all fine and well.. but how do you know what needs to be fixed/changed/done ? Just hit Ctr+Shift+T and TextMate will pop up with a pretty little list, hyperlinked and all

Screenshot of the TODO list Ctrl + Shift + T brings up a list of all your todo's

I use this bundle practically every time I open up Textmate. It allows me to keep on a focused track of development, while still keeping a lot of “ooh, I need to do that sometime” kind of tasks on the radar.


  •   
  • Copyright © 1996-2010 BlogmyQuery - BMQ. All rights reserved.
    iDream theme by Templates Next | Powered by WordPress