Archive for January, 2012

Piet Zwart: The Rebellious Type


“Among the few I have indicated, is there no dynamic man of action, the rebel who will help determine the aspect of the collective expression of tomorrow? Ponder this question and know that to make beautiful creations for the sake of their aesthetic value will have no social significance tomorrow, will be non-sensical self-gratification. Every era contains the conditions for providing a rebel.�

- Piet Zwart

Portrait of a Rebel

Personally, I admire the rebels, the forward thinkers, the people despised by society for being “different.� Zwart was, according to several sources, “not an easy man.� He was known for his “indiscretion� and many considered him “self-centered.� When have people like him ever been understood by the mediocre?

Others recall that he was driven to excel. He worked late into the night, usually until three in the morning, set high standards for himself that others thought were unattainable by any person. He was concerned about promoting himself and paranoid about others having the wrong impression of him. As he was named The Most Influential Designer of the Twentieth Century by the Association of Dutch Designers (although some articles on Zwart list it as the Professional Organization of Dutch Designers) in 2000, he obviously succeeded in making his mark, despite the rumors and innuendos from those around him.

Many, it seems in my research probably felt more out of jealousy from Zwart’s ideals of perfection and his insistence on being involved in articles and books about him. The Oxford Journal writes, ‘Yvonne Brentjens’s new monograph… charts his struggle to arrive at an objective, scientific and technically perfect design, hence the word Vormingenieur (engineer of form).’

Piet Zwart was born on May 28th, 1885 in Zaandijk, North Holland (died in September 27th, 1977 at the age of 92). From 1902 until 1907 he attended the School of Applied Arts in Amsterdam where it is said there was little division between several disciplines as drawing, painting, architecture and applied arts. Zwart and fellow students developed by themselves with little interference from above, as teachers weren’t always present. “A smashing school with no idea of a program,” as Zwart recalls.

It was this lack of formal classroom training that led him to approach his design, especially typography in a fresh and untraditional way. While the purely horizontal grid design of straightforward type and images was the norm, leading to the Swiss School of Design in the 1940s and 1950s (also read the Noupe article on Swiss School designer, Josef Müller-Brockmann), Zwart felt his designing from his gut.

As with most geniuses, there was a self-initiated method that broke the very same rules he had never learned, or, as I suspect, he cared nothing for and wanted to break. He also experimented in the use of photography incorporated into his designs, leading to photomontages. Still, with all the rule breaking and experimentation, Zwart was concerned with readability, feeling that typography should be clear and functional. If any influence must be assigned, he used the basic principles of constructivism and “De Stijl” in his commercial work.

One must put Zwart’s work into context of the time and design influences. His use of type and montage was incredibly ahead of his time. Even today, such work is inspiring, fresh and unique. His lack of training shows a gift and inner creativity that is individual and comes from deep within. One has to wonder if Zwart’s “difficultâ€� personality, as nay-sayers put it, is a reaction to the misplaced and vociferous opinions of other contemporaries who couldn’t fathom Zwart’s designs.

While time has proved him to be a truly great creative, it must have been hard for him to put up with life as the target of harsh critiques from charlatans and mediocre talents. It’s a great lesson for designers to understand that one’s own creative vision is not fodder for other creatives to comment upon. In the long run, history will be the judge of great creativity and not the opinions of others in the field.

Zwart’s designs for a book for children on the Dutch Postal Telegraph and Telephone system. Sophisticated, fun and informative. It is an incredible visual, using his favorite bright palette and would be enjoyed by kids even today!

He started his career as an architect and he worked for Jan Wils and Berlage. As a designer, Zwart was well known because of his work for both the Nederlandse Kabelfabriek Delft (the Dutch Cable Factory in Delft) and the Dutch Postal Telegraph and Telephone. Today, a designer might look at these as boring jobs but he had great leeway over his creative output and that is yet another lesson he has for modern designers – you can take the most mundane item and make a beautiful design. Can you imagine a cable and wire company today allowing such design for their catalog of products? Perhaps Zwart’s work can be used as an example of the excitement that can be mixed with any product?

He ended up resigning from NKD in 1933 to become an interior, industrial and furniture designer. Perhaps it was his restless nature or perhaps just his desire to self-improve and his yearning to find something just out of his reach. Another lesson to us as we should always try to reach new heights with our design and never settle for the easy path but to keep searching our creative nature to improve ourselves and our design.

Zwart had been fired from the Rotterdam Academy of Fine Arts in 1933, after he had been quite explicit about the redevelopment of art education. Some say he was teaching communist ideals to his students and some say his progressive ideas had been closely linked to the innovative methods and objectives of the Bauhaus School in Dessau where he was asked to host a number of lessons in 1929.

Oddly enough, the very school that fired him was renamed after Zwart — The Piet Zwart Institute of the Willem de Kooning Academy Rotterdam. Times often change after it’s too late for the individual. It may have been these personal battles, his inner id being challenged by the industry as well as himself that led to a brilliant madness that drove incredible, ground breaking creativity.

The kitchen he designed for Bruynzeel in 1938 is a good example. It was highly progressive for its time. This was the first time that domestic appliances like a refrigerator and stove could be integrated in the design in a practical way. All the elements were designed with logical proportions, and customers could combine them as they wished. Handy details like glass containers, a pull out breadboard and storage racks made the kitchen a textbook example of comfort and efficiency.

His apple-green pressed glassware compact as tubular tea cups that sit in interlocking hexagonal saucers. ‘The emphasis on form rather than decoration,’ according to an article in New City Art, says, ‘ not only severs ties with the clutter of the Victorian past but identifies everyday items with the values—efficiency, durability, mass distribution—of emerging industrial and communications technologies.’

Early Ikea? Again, think about the time when this was designed. It was incredibly futuristic and set a standard that is still used today.

As with many who lived in the dark days of the Second World War, Zwart, along with 800 other prominent citizens were arrested and held by German soldiers. After the war, when he was released from captivity, he mainly focused on industrial design. One can only imagine what years of captivity did to him. He never spoke of those years. It is amazing he went back to creative work, albeit in another field.

One cannot have much introspection into a person’s private pain. The old saying is that an artist must suffer for their art. Zwart certainly suffered although it’s hard to tell how much of it was self-imposed. It is, however, his legacy of creativity that lives on and has lessons for the creatives of today. His drive and dedication to his vision is a great lesson. His work, if one thinks of the time and culture of his heyday, was such a departure – almost futuristic but he still managed to convince people that his vision was the best way to communicate the message.

As mentioned in this article, he was dedicated to creating a clear and vivid message for the end user. He succeeded on his own terms, despite a stumble in his career, here and there but that only propelled him farther into fame. Our lesson is that little stumbles or failures, if they can be called that and not life lessons, should always push us further into creativity while understanding the work is the most important factor. It is, after all, the legacy of our names that we will eventually leave behind.

(rb)


How to Tune Typography Based on Characters Per Line

In my research into Golden Ratio Typography, I focused primarily on the core geometric properties of text—font size, line height, and line width.

But there’s another facet of text that nearly all of the existing research on typography deals with: It’s called characters per line (CPL).

If you’ve ever read a study on typography, you’ve no doubt encountered CPL. Many of these studies recommend “optimal” CPL ranges that include anything from 55 to 100 CPL.

With an “optimal” range that large, the CPL you use on your site ultimately comes down to personal preference. This raises one huge question:

How can you tune your typography to an exact (or, at least approximate) CPL?

Tuning Text for Characters Per Line

Before you can tune your text, you have to understand how CPL works and what the consequences of different CPLs are. Here’s the deal:

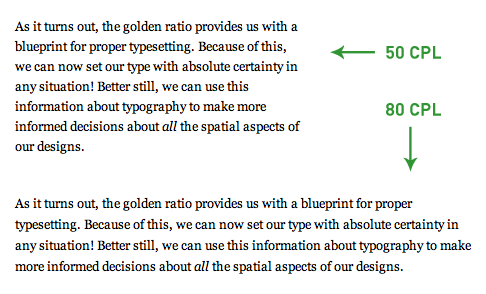
For any font size, as the CPL increases, the line width also increases.

Characters per line vs. line width

Figure 1. For a given font size, line width increases as CPL increases. Designers must consider this behavior when determining how wide a column of text should be.

This has some significant design implications, and worse, most designers don’t even consider CPL when choosing a column width for their text. They simply pick a column width, and however many CPL that results in…well, that’s what you get.

Frankly, I can’t stand this imprecise approach. Every decision—especially those involving your design and typography—should have a meaningful rationale behind it.

The bottom line here is that your typography should dictate how wide your columns of text are, not vice-versa.

So, how can you tune your typography to a specific CPL and, therefore, a specific width?

There are two potential approaches you can take here. You can:

  1. Use the good ol’ trial and error method, whereby you select different widths, count the characters per line, and settle on the width that you prefer.
  2. Figure out a programmatic way to predict CPL, and then choose a width based on this prediction.

Choice number one is a laborious pain in the rear, and it gets old really quickly. On top of that, it’s simply an imprecise approach, and we all know how I feel about that…

Contrary to number one, choice number two sounds great and makes a ton of sense. Problem is, you don’t have a programmatic way to predict CPL…yet.

Using Math to Predict CPL

Recently, I became obsessed with the idea of predicting CPL at any font size, so I set out to uncover a mathematical relationship between font size and CPL.

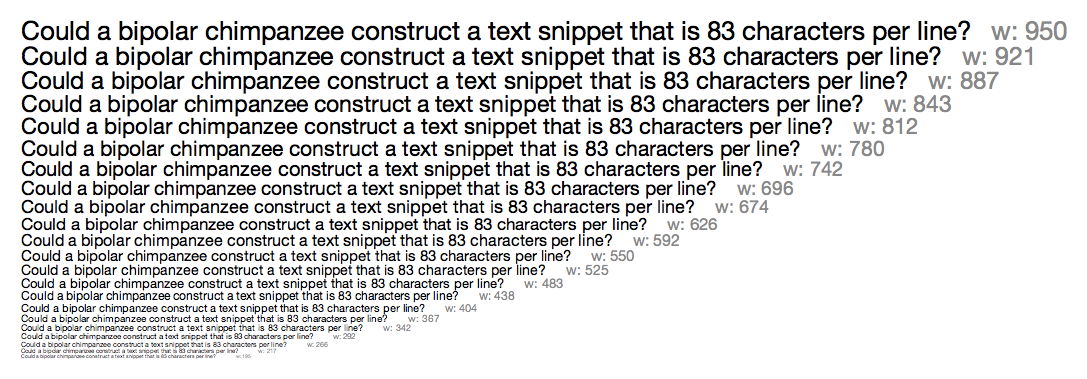
To do this, I examined text samples in the range of 40–100 CPL at font sizes between 5 and 26px for various fonts. You can see one of my samples in Figure 2 below.

Characters per line research sample

Figure 2. Research sample with Helvetica Neue set to 83 CPL. To determine the average character width at a particular font size, you can divide the resulting width (shown in gray next to each line of text) by the CPL. Click to enlarge.

As I stated above, my goal was to determine the mathematical relationship between font size and CPL for particular fonts (obviously, this relationship will differ slightly from font to font). Here’s how I did it:

Using text samples like the one in Figure 2, I first calculated the average character width (cw) at each font size by dividing the resulting line width by the CPL value.

Average character width equation

Not surprisingly, as the font size increased, the average character width also increased. The next step, however, is where things started to get interesting.

To relate font size and character width, I simply divided the font size (f) by the newly-calculated average character width:

Character constant equation

And this is where I noticed something extraordinary—for any font, the value (μ) from the above equation remains constant, even at different font sizes. In other words…

Each font has a character constant, μ, associated with it that relates the font size to the width of each character.

It may not be obvious at first, but this character constant is awesome because it establishes a mathematical relationship between the vertical (font size) and horizontal (character width) dimensions of text.

For instance, if you have a font size of 12px, and the font you’re using has a character constant of 2.3, then 2.3 characters will fit in every 12px increment of width (on average).

Thanks to this relationship, it’s possible to predict CPL mathematically. Here’s how it’s done:

Start with a desired CPL value, and then divide it by the character constant for the font you’re using. This results in a width factor, xw, which is specific to the desired CPL and font:

Width factor equation for CPL

The width factor from the equation above tells you how many increments of width are needed to reach the desired CPL. Once you have the width factor, all you need to do is multiply it by the font size to get the predicted line width, w, that will result in the desired CPL.

Predicted width for CPL

The aforementioned equations can be simplified and combined into one master equation that relates CPL, font size, and line width for any font:

Master equation for width, font size, and CPL

Alright—now that you’ve seen the basic math behind CPL, let’s bring this together by looking at an example.

Sample Predicted Width Calculation Based on CPL

In this example, the goal is to achieve 75 CPL at a font size of 16px for a font that has a character constant of 2.28. You can use the master equation from above to solve this problem:

Sample predicted width calculation based on CPL

So, for a font with a character constant of 2.28 at a size of 16px, a width of 526px will yield approximately 75 CPL.

But what if you wanted to know how wide your text would have to be for this same font at 18px? This is easy because you can simply substitute a new font size into the master equation, like so:

Sample predicted width calculation based on CPL and a different font size

So while you’d need 526px to achieve 75 CPL at a font size of 16px for this particular font, you’d need 592px to achieve the same CPL at a font size of 18px. Pretty sweet!

A Closer Look at Character Constants

The most important concept in CPL tuning is undoubtedly the character constant, μ.

As I stated earlier, the character constant is different for every font. In order to build a CPL prediction algorithm, it’s necessary to examine each font individually to determine its μ value.

This process is more complicated than it first seems, simply because different text samples have different average character widths (depending on the characters that appear in that particular sample).

Text samples set to 68 CPL

Figure 3. Both text samples are set to 68 CPL, but the line widths (and thus, the average character widths) are different because the samples contain different characters.

When researching character constants, it’s possible to account for these differences by taking a large enough data sample. If you were to test enough different text samples with each font, you’d eventually nail down a statistically significant value for μ.

Ultimately, though, the character constant is only useful for predicting an approximate CPL value—actual CPL values will differ from line to line depending on the characters involved.

Here’s a quick rundown of the character constants I’ve compiled through my research thus far (note: none of these are statistically significant):

Serif Fonts

  • American Typewriter — 2.12
  • Baskerville — 2.51
  • Georgia — 2.27
  • Hoefler Text — 2.44
  • Palatino — 2.30
  • Times New Roman — 2.60

Sans-serif Fonts

  • Arial — 2.31
  • Gill Sans — 2.51
  • Gill Sans 300 — 2.58
  • Helvetica Neue — 2.26
  • Lucida Grande — 2.07
  • Tahoma — 2.30
  • Trebuchet MS — 2.22
  • Verdana — 1.98

Monospace Fonts

  • Courier New — 1.60

The character constant provides a new, algorithmic way to understand how fat or skinny a font is. Lower character constants are “fatter,” and higher constants are “skinnier.”

Simply put, the character constant is an interesting new way to consider different typefaces.

It will prove handy for designers who are looking for a quick and precise way to select fonts that will exhibit particular aesthetics and spatial properties.

Also—and I really like this—smart programs can use the character constant to work with fonts in a more precise, more predictable way.

Update: A commenter pointed out a perfect potential application—building smarter CSS font stacks based on similar character constant values!

Math, Schmath. Software to the Rescue!

When I unveiled the Golden Ratio Typography Calculator, the point was to make it easy to explore finely-tuned typography without having to do heavy mathematical lifting.

Now, I’m pleased to announce that I’ve incorporated this new CPL research into the calculator, too. All that math you saw above? Yeah, you won’t have to do any of it :D

The upgrades to the typography calculator are powerful. Not only can you optimize your typography based on characters per line, but you can also explore the impact of different fonts on CPL in any setting!

Change fonts by using the font selector that appears on any typographical recommendation, and you can observe how the approximate CPL changes based on the typeface.

Golden Ratio Typography font selector

Figure 4. Use the font selector on any typographical recommendation to see how CPL changes relative to the typeface. Fascinating, I tells ya!

The Bottom Line

Typography is the most important component in all of design. There’s no doubt about it—design is a language of communication, and words are the most powerful communication tool we have.

It makes sense, then, that we should strive to understand as much as possible about typefaces, their metrics, and how they work.

Using the Golden Ratio Typography Calculator, you can explore the finer points of typography like never before.

You’ll gain insight into line heights, line widths, CPL, and how different fonts behave (grr, baby!). Best of all, you’ll be able to create beautiful typography on your site thanks to the precise recommendations from the calculator.


GuideGuide: Free Plugin For Dealing With Grids In Photoshop


This article is the fourth in our new series that introduces the latest, useful and freely available tools and techniques, developed and released by active members of the Web design community. The first article covered PrefixFree; the second introduced Foundation, a responsive framework; the third presented Sisyphus.js, a library for Gmail-like client-side drafts. Today we are happy to present Cameron McEfee’s Photoshop extension GuideGuide which provides a tool to create pixel accurate columns, rows, midpoints and baselines.

Take a moment and think about creating a multi-column grid in a Photoshop comp. Have your palms started to sweat? Yes, creating grids in Photoshop is a pain indeed. Some designers just estimate and drag guides arbitrarily onto the stage. Others draw vector shapes, duplicate them to represent columns, then stretch them to fit their design. The hardy few who don’t say things like, “I’m a designer, not a mathematician,� generally use a little math and logic to calculate their grid. If you were to boil that math down, it probably ends up looking something like this:

(siteWidth - (gutterWidth × (numberOfColumns - 1) ) ÷ numberOfColumns = columnWidth

I was sitting at my desk one day doing this exact equation when I thought, “Man, this looks just like code. I wish someone would make a plugin that would do this for me.” Several months and many grids later, it occurred to me that I could probably build the plugin myself.

Enter: GuideGuide

I created GuideGuide for the sole purpose of making one of the most time consuming parts of Photoshop based design as easy as possible. Enter in a few numbers and GuideGuide will draw a grid on your document using Photoshop’s guides. You’ll become drunk with power the first time you watch it happen, I promise. Even better, GuideGuide’s real power is Photoshop’s marquee. If you have an active selection in your Photoshop document, GuideGuide creates the grid you specify within the selection’s boundaries. Anything GuideGuide can do, can be done using either the document or a selection.

Columns and Rows

Designing a site that needs multiple columns and gutters? GuideGuide has your back.

Columns and Rows

Midpoints

GuideGuide makes finding the midpoint of items within your design a breeze. Simply draw a selection or ⌘ + click (ctrl + click on Windows) to create a selection around the item you want to find the midpoint of. To find its midpoint, click one of the midpoint buttons.

Midpoints

GuideGuide places a guide at the midpoint of the selection. Now you can easily center align elements under the original item.

Save It For Later

If you find yourself frequently using the same grid over and over, you can save it as a set for later use.

The Fun Part

Sure, GuideGuide has its basic rows, columns and midpoints, but with a little creativity it can do a whole lot more.

Measure Navigation

I hate figuring out how wide a navigation element needs to be to evenly fit across the width of a site. Instead, I let GuideGuide do the work for me.

  1. Make a selection the width of your site
  2. Enter your info, thinking of the columns field as the number of navigation items and the gutter field as the space you want between each item (if you want it).

Measure Navigation

Element Padding

Want to draw a box around an item but don’t feel like measuring it out exactly?

  1. ⌘ + click (ctrl + click on Windows) the item to make a selection around it.
  2. Enter a negative margin in one of GuideGuide’s margin fields, and click the icon next to it. GuideGuide will fill that value into all the margin fields.
  3. Use the newly placed guides to draw your box.

Element Padding

Baseline Grid

Using GuideGuide’s explicit row height, you can easily create a baseline grid for your design.

  1. Enter your desired line height in the row height field.
  2. Align your type and other elements to your new baseline grid.

Baseline Grid

Thoughts?

Do you have an unconventional use for GuideGuide? Post it in the comments of this post. I love hearing the clever and unusual ways people use GuideGuide. Found a bug or have a feature request? If you’d like to request a feature or have found something that is broken, please create an issue on GuideGuide’s support repo over on GitHub.

To download GuideGuide and learn more about some of its hidden features, head on over to guideguide.me. OS X Lion users with CS5 will need to download a patch for Adobe Extension Manager before they will be able to install GuideGuide.

(il)


© Cameron McEfee for Smashing Magazine, 2012.


Stunning Digital Art Inspired by Video Games


Since their inception, video games have provided great inspiration for offline artists and digital artists alike. Video games generally adhere to a fantasy theme, which is perhaps what makes them so intriguing visually. Often characters are exaggerated human forms, with bulging bodies, enormous power, or great speed and agility. Many games include characters of another species, possessing magical powers and skills.

Undoubtedly video games offer some of the richest character designs. Of course video games don’t stop at character design. Entire worlds are invented for these characters to inhabit, and whilst they range from the minimal, to the vast and sprawling, these worlds are often visually intriguing.

Today we’ve compiled over 50 examples of wonderful digital art inspired by the video game format. These illustrations range from depictions of famous characters, to epic battles, landscapes and even text effects.

Digital Art Inspired by Video Games

Ry Spirit’s Video Game Art

Ry Spirit is a hugely talented digital artist who has built up a Facebook following in the thousands. His work has very unique style, being both bold/colorful and cartoony. Whilst some of his work does include sharp outlines, generally his compositions have quite soft edges, with a certain handdrawn feel to them.

We get a real sense that these pieces have been ‘painted’ rather than simply filled in with color in Photoshop. The rich shadowing and textures really make this work stand out.

Ry’s work generally put characters at the forefront. Interestingly he captures each character doing something indicative of their existence. Rather than simply placing a character on a plain background, he’ll have child-Link waking up in his bed, or pokemon mid-battle.

video game art

video game art

video game art

video game art

video game art

video game art

video game art

video game art

video game art

video game art

video game art

video game art

Sandara Video Game Art

Sandara is widely known for her detailed, realistic fantasy artworks. She truly manages to capture the essence of each character she observes. Generally her work will utilize lighting very well, engulfing dark characters in deep shadows, whilst using glows/rays of light to bring life to the piece.

There is definitely a sense of fantasy in her work, as her compositions tend to focus on magical creatures (dragons, elves, wolfmen etc…). She also tends to base each piece around a certain color palette, which evokes the mood in each composition. Below you can observe a magical couple amidst a purple, romantic landscape, or a fierce warrior, fighting through a fiery, amber scene.

video game art

video game art

video game art

video game art

video game art

video game art

video game art

video game art

video game art

video game art

video game art

Nezma Video Game Art

Nezma (otherwise known as Nat from Canada) is a talented digital artist with a penchant for capturing the magical world of video games. Her work shows tremendous diversity, as you can see from the examples below. She ranges from soft, cartoony drawings, to sharp vector designs, and realistic digital paintings.

What is admirable is that whatever medium she chooses, Nezma manages to capture the true essence of her character. The pieces below show great attention to colors and lighting and range from cute to ominous.

video game art

video game art

video game art

video game art

video game art

DXSinfinite Video Game Art

DXSinfinite has some truly inspiring digital art, much of it based on video game characters. Again, this artist shows tremendous diversity in his work, and can capture an anime scene, or a highly realistic depiction of his favorite character.

His work shows great attention to form, with the vastly bugling muscles of many video game characters providing a wonderful study of the human body. We get a sense of power and energy from many of his works, and he truly captures the might behind some of these popular video game creations.

video game art

video game art

video game art

video game art

video game art

video game art

video game art

video game art

video game art

video game art

video game art

GENZOMAN Video Game Art

Last, but certainly not least, GENZOMAN whose works are some the of most favored fantasy digital art in the collection. His work is rich in texture, lighting and details, resulting in a realistic, yet still very much fantasy outcome. He often combines his expert shading and digital painting skills with intense light effects in Photoshop, generally used to demonstrate the explosive powers of the characters he is capturing.

The backdrops for these characters are equally rich, and really place each creation in their natural setting. Each composition typically uses very bold colors and rich shadows to capture the ‘larger than life’ visuals inherent in the video game format.

Definitely an artist to keep your eye on!

video game art

video game art

video game art

video game art

video game art

video game art

video game art

video game art

video game art

video game art

video game art

video game art

video game art

video game art

video game art

video game art

(rb)


Dynamic Look at Life: Collection of HDR Photography


As we have talked about in the past, photographers capture moments of life and present them to us in much more visually enhanced ways. Allowing a new tint to be laid atop the world as we traditionally know and experience it. Especially when those photographers turn to HDR. By increasing the range between the lights and darks of a set of images these artists create some truly breathtaking effects when those images are combined or enhanced.

So below we have a collection of HDR photography that is packed full with some truly inspiring imagery. From the more subtle examples of this technique, to the more dramatic the showcase features quite a dynamic range of its own. We hope that there is a little inspiration waiting for each of our readers in the mix of works below.

The Collection

Northern Venice by Azagh

HDR by marian9502

Tread Carefully by ShadowDragon22

HDR Sunset by Grislogia

Bridge 206… by TheBaldingOne

Tallest Buildings in Miami Beach by Johnny23xx

The Gotic Church by PhotoSir

Moderno by alexContreras

Atomium by liverpool67

Red Walls and Tissues by Azagh

Edinburgh II by Metallimark

Glogow 01 by Shavitrah

Norway – The Geiranger fjord HDR by jonny-island

The Mouth of O’Connell St. by KeithHogan

The Last Match I by Dakann

The Night of Light by Pipera

Street by hotfiresantu

Oxford by BinarySystem

State Library – Melbourne by dzign-art

Out of Thoughts… by Kazzaz

Juggernaut by SB420

..sedation.. by strobefx

Inside the Sphere III HDR+ by Metallimark

Window of reflections by Letoffee

…St. Vitus Cathedral 2…Prague by erhansasmaz

Longcity Hdr by snowblader

Storm by LDRPhotography

Sundown by Draken413o

The Dark Knight by SB420

Edinburgh by Metallimark

Getting Gloomy by DistortedVizion

Where There Once Was by TheSpenner

Waterwheel Ruins V.2 by dana223

Small Boat Marina, Scalloway, Shetland. HDR by azoomwithaview

b e k l e r s e by MistyTableau

(rb)


  •   
  • Copyright © 1996-2010 BlogmyQuery - BMQ. All rights reserved.
    iDream theme by Templates Next | Powered by WordPress