Anime is a particular type of cartoon created or influenced by Japanese animation. The best-known qualifications of this special type of art are large eyes, tiny noses, wild hairs, and long limbs.
With these features, one can easily recognize anime style. For many, it is fun, but not that easy to draw anime. Here you can find the best tips to create an anime drawing step by step.
STEP 1: Drawing an Anime Head and Face
Before diving into details, first, you should create a structure. The basic principle for this is drawing a circle and extending the chin below the circle. Then you need to draw two lines, one horizontal and one vertical, passing through the circle’s center. Now, you can add ears and eyes symmetrically right under the horizontal line and eyebrows above the eyes. You can use simple curves for eyebrows, a little thicker in the middle. The mouth can be placed at the bottom, and the nose -a tiny vertical dash- between the eyes and mouth.


After finishing the facial details, you can start drawing the hair. Anime hair consists of different small parts instead of one direct line. Therefore it is better to divide it into pieces. Splitting into three parts may be the easiest way—basically, the front, the back, and the sides.
Adding several tufts from the front is a good starting point. Then you can draw sides, again separating the hair into clumps. Instead of drawing a straight line, you should add a slight curve to make it more real. Lastly, add relatively straight lines for the back. You can extend it under the shoulders for long hair. If you want to add a bun, you can do it right after this step. You can add one to the middle or two to each side. For the best bun, the starting point is a circle. After, it can be turned into natural hair by adding curved lines in it.

STEP 2: Sketching an Anime Body
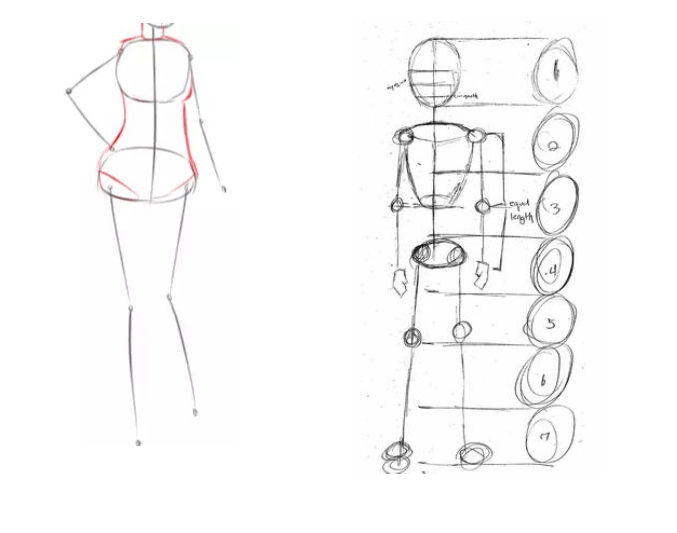
Again, you should start with a structure to create a perfect body. Generally, there is a rectangle for the chest, small circles for showing shoulders, leg, and arm joints, and finally, an oval for the hips. After completing that step, you are ready to connect these shapes. Draw curved lines from chest to hips and from neck to shoulders. In the end, the body should look like an hourglass. Then you can add legs narrowing from top to bottom and arms in any position. Here you can use small circles to help you when you are separating the upper part of the limb and the lower part of the limb.

After completing the big parts, you can start adding details like hands and shoes. For the hands, the first step is drawing two widening lines and adding a rectangle starting from the left side. The next step is drawing another line to show the knuckles. After that, divide the shape slightly symmetrical for the fingers and curve the straight lines. Now, it is time to connect all the lines you put before and create fingers. You can use different hand positions, but the fundamental principle is always the same: creating an outline and connecting the points.

Drawing shoes are easier than drawing hands. After drawing the feet in the desired position, create an outline for the shoes relatively wider than the feet. Erase the feet line. Then, add some details, such as shoelaces and designs on the shoes.

STEP 3: Adding Clothes
For an anime character, there are lots of options when it comes to clothes. However, for a beginner, the simplest option is a combination of a shirt and jeans or a shirt and skirt, depending on gender.
To draw a shirt/t-shirt, firstly, create a sketch as in the other parts. Draw loose lines around the arms and body. If you are having trouble doing it directly, you can use basic geometric shapes like a rectangle for a shirt. If you do so, you can curl the lines afterwards according to body shapes. Then add the collar if it is a shirt. Make sure to draw the collar’s outline far enough from the neck and body so that it appears to have some volume. After drawing the outside, keep going with the details. Add creases around the breast, armpit, waist, and elbow. Do not forget to add buttons to the shirt.

Drawing a jean might be seen as the simplest part. Since you already have the lines for the legs, all you need to do is to draw loose curved lines along the body lines. After finishing outlines, erase the leg lines and add creases, especially to the ankles. Finally, add the button and a small shape for the zip.
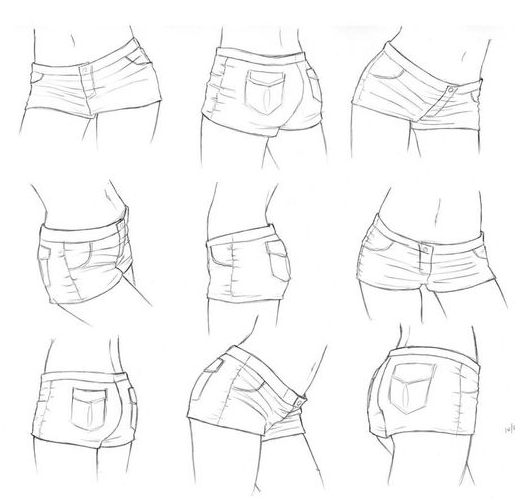
If you want to draw shorts, follow the same steps but instead of covering the whole part of the legs, make it shorter around the knees.


To draw a skirt, begin with the outline again. To show the folds’ dimensions, draw several vertical lines. It’s essential to remember that the folds in this specific pattern point in one way before gently curving in the opposite direction.

Last but not least, add some colors to your character to make it more real and attractive.
Here are some easy drawing examples:


Some master arts


Knowing the body shapes of anime characters is an essential point in creating perfect drawings. When drawing a figure, always start with a scratch. In other words, do not forget to use a sketch as a starting point. Afterwards, you can add all of the details as you want. Also, remember that you will find your own technique over time; you just need to practice before becoming a master.
The post How to Draw an Anime: Best Anime Drawing Tips appeared first on noupe.